
Follow Me On Social Media!
Search Results for Bread in 10 Minutes

Introduction
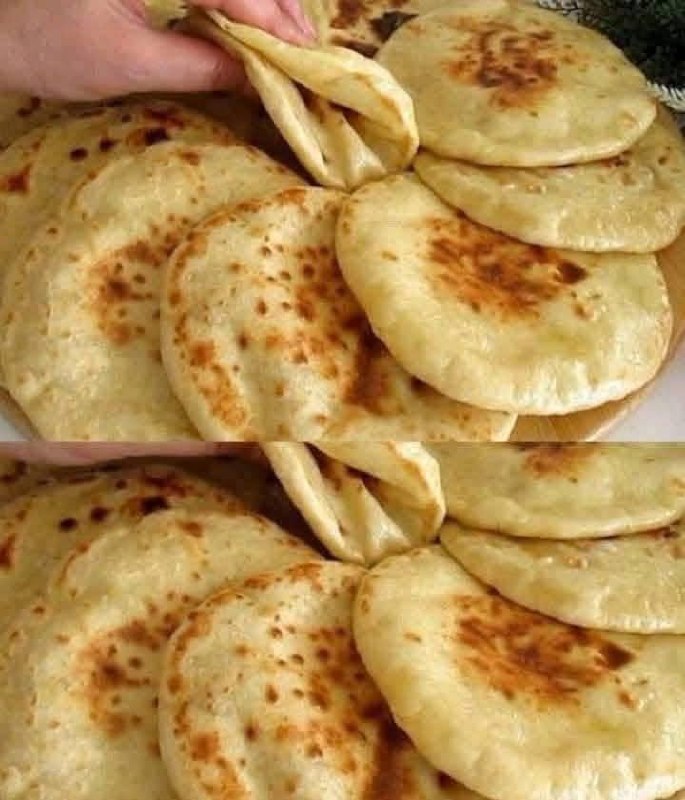
Imagine this: you’re craving something warm, comforting, and freshly baked, but the clock is ticking, and the thought of waiting for yeast to rise feels like an eternity. What if we told you that delicious, pliable bread could be yours in just 10 minutes? Yes, you read that right – 10 minutes! Our Speedy Skillet Flatbreads are here to revolutionize your kitchen, offering the ultimate solution for those moments when only fresh bread will do, but time is of the essence. This isn’t just a recipe; it’s a culinary magic trick, transforming simple pantry staples into golden, chewy perfection right before your eyes.
These flatbreads are incredibly popular for good reason. They bypass the lengthy proofing times of traditional yeast breads, making them an ideal companion for busy weeknights, last-minute gatherings, or whenever a sudden bread craving strikes. What makes them so special? It’s their incredible speed and versatility. Crafted without yeast, these flatbreads rely on a quick-acting leavening agent (or sometimes none at all, for an even flatter, chewier result) and the direct heat of a hot skillet to cook up in mere minutes. The result is a soft, slightly chewy bread with delightful golden-brown spots, perfect for scooping up dips, wrapping around fillings, or simply enjoying on its own.
Beyond their impressive speed, these skillet flatbreads are a testament to the beauty of simplicity. They use ingredients you likely already have on hand, making them an accessible and budget-friendly option for any home cook. Their neutral yet satisfying flavor profile makes them an incredibly versatile canvas, ready to be paired with everything from savory curries and stews to sweet spreads and fresh fruit. Get ready to discover your new go-to quick bread recipe that promises maximum flavor with minimal effort.
Nutritional Information
Per serving (approximate values):
- Calories: 150
- Protein: 4g
- Carbohydrates: 25g
- Fat: 3g
- Fiber: 1g
- Sodium: 200mg
Ingredients
- 2 cups (240g) all-purpose flour, plus more for dusting
- 1 teaspoon baking powder
- 1/2 teaspoon salt
- 3/4 cup (180ml) warm water (or milk/yogurt for richer flavor), plus 1-2 tablespoons more if needed
- 2 tablespoons olive oil (or other neutral oil), plus more for cooking
Instructions
- In a large mixing bowl, whisk together the all-purpose flour, baking powder, and salt. Make sure these dry ingredients are well combined to ensure even leavening.
- Gradually pour in the warm water (or milk/yogurt) and 2 tablespoons of olive oil into the dry ingredients. Use a wooden spoon or your hands to mix until a shaggy dough forms.
- Turn the dough out onto a lightly floured surface. Knead the dough for about 2-3 minutes. The goal is to bring it together into a smooth, elastic ball, not to develop gluten extensively like traditional bread. If the dough is too sticky, add a tiny bit more flour; if it’s too dry, add a teaspoon of water at a time. The dough should be soft and pliable.
- Divide the dough into 8-10 equal pieces. The exact number depends on how large you want your flatbreads to be. Roll each piece into a small ball.
- Lightly flour your work surface and a rolling pin. Take one dough ball and roll it out into a thin circle, about 6-8 inches in diameter and about 1/8 inch thick. The thinner you roll them, the quicker they will cook and the crispier they can get. Repeat with the remaining dough balls.
- Heat a large cast iron skillet or non-stick pan over medium-high heat. Add about 1/2 teaspoon of olive oil to the hot pan, swirling to coat the bottom.
- Carefully place one rolled-out flatbread into the hot skillet. Cook for 1-2 minutes per side, or until golden-brown spots appear and the flatbread puffs up slightly. You might see small blisters forming on the surface, which is a good sign.
- Flip the flatbread and cook for another 1-2 minutes on the second side until it’s also golden and cooked through.
- Remove the cooked flatbread from the skillet and place it on a plate. Cover it with a clean kitchen towel to keep it warm and soft while you cook the remaining flatbreads. Add a little more oil to the pan between flatbreads if needed.
- Serve immediately and enjoy your fresh, 10-minute speedy skillet flatbreads!
Cooking Tips and Variations
Achieving perfect 10-minute flatbreads is all about technique and a little bit of intuition. First, let’s talk about dough consistency. The ideal dough should be soft, pliable, and just slightly tacky to the touch, but not sticky enough to cling to your hands. If it’s too dry, your flatbreads will be tough; too wet, and they’ll be difficult to handle and roll. Adjust with tiny amounts of flour or water until you reach that sweet spot. For rolling, aim for an even thickness of about 1/8 inch. This ensures even cooking and a tender texture. If parts are thicker than others, they might remain doughy while thinner parts burn. Don’t be afraid to use a good amount of flour on your work surface and rolling pin to prevent sticking, but brush off any excess before cooking.
The skillet heat is paramount for success. A medium-high heat is typically perfect. You want the pan hot enough to brown the flatbread quickly and cause it to puff up, but not so hot that it burns before cooking through. If your pan is smoking excessively, it’s too hot. If the flatbreads are cooking too slowly and drying out, the pan isn’t hot enough. Test with your first flatbread and adjust the heat as needed. A cast iron skillet is highly recommended for its even heat distribution and ability to create beautiful golden spots, but any heavy-bottomed non-stick pan will work well.
For delicious variations, consider incorporating flavors directly into the dough. For a savory twist, add 1-2 cloves of minced garlic, a teaspoon of dried herbs like oregano or rosemary, or a pinch of chili flakes to the dry ingredients. You can also knead in a tablespoon or two of finely grated Parmesan cheese for cheesy flatbreads. For a richer, more tender flatbread, substitute some or all of the water with milk or plain yogurt. The tang from yogurt adds a lovely depth of flavor. You can also experiment with different flours; while all-purpose is standard, a blend with a small amount of whole wheat flour can add a nutty flavor and more fiber, though it might require a touch more liquid.
Don’t overcrowd the pan; cook one or two flatbreads at a time, depending on the size of your skillet. This ensures consistent heat and allows each flatbread to cook properly without steaming. As they cook, watch for those beautiful golden-brown blisters and slight puffing – these are indicators of a well-cooked flatbread. Once cooked, immediately transfer them to a plate and cover them with a clean kitchen towel. This traps the steam, keeping them soft and pliable, which is essential for that perfect chewy texture.
Finally, consider the serving experience. While fantastic on their own, these flatbreads shine when paired with various accompaniments. They are excellent for dipping into hummus, baba ghanoush, or a simple olive oil and balsamic vinegar mixture. They make fantastic quick wraps for grilled chicken, falafel, or even just fresh veggies. For a quick mini pizza, spread with tomato sauce, sprinkle with cheese, and briefly broil or pan-fry until the cheese melts. For a breakfast treat, spread with jam, honey, or a savory egg and cheese scramble. The possibilities are truly endless, making this 10-minute flatbread a versatile staple in your culinary repertoire.
Storage and Reheating
These 10-minute speedy skillet flatbreads are best enjoyed fresh, warm, and straight from the pan. However, if you find yourself with leftovers (a rare occurrence, we predict!), they can be stored and reheated to maintain their deliciousness. To store, allow the flatbreads to cool completely to room temperature. Once cool, stack them and place them in an airtight container or a resealable plastic bag. They will keep well at room temperature for up to 2 days. For longer storage, you can refrigerate them for up to 4-5 days. While they can be frozen for up to 1 month, their texture might change slightly upon thawing and reheating, becoming a bit less soft.
When it comes to reheating, you have a few excellent options to bring them back to life. The best method for reheating is often the same way you cooked them: in a skillet. Heat a dry, non-stick pan or cast iron skillet over medium heat. Place a flatbread in the hot pan and heat for about 30 seconds to 1 minute per side, or until it’s warmed through and slightly pliable again. This method helps to restore some of the original texture and can even crisp up the exterior slightly. Avoid using oil unless you want a crispier finish.
Alternatively, you can reheat them in a microwave, though this method is best for speed rather than optimal texture. Place a flatbread on a microwave-safe plate and heat for 10-20 seconds. Be careful not to overheat, as microwaved flatbreads can quickly become tough or rubbery. If reheating multiple flatbreads, stack them and cover them with a damp paper towel to help retain moisture. For a slightly crispier result, you can also reheat them in a toaster oven or conventional oven. Preheat your oven to 350°F (175°C). Place the flatbreads directly on the oven rack or on a baking sheet and heat for 2-4 minutes, or until warmed through. Keep a close eye on them to prevent them from drying out.
No matter which reheating method you choose, the key is to warm them gently and quickly to prevent them from becoming dry or overly chewy. Once reheated, they’re ready to be enjoyed with your favorite dips, spreads, or as a side to your meal, offering a convenient way to enjoy the taste of freshly made bread even days later.
Frequently Asked Questions
Can I make this dough ahead of time?
While these flatbreads are designed for immediate cooking, you can prepare the dough a few hours in advance if needed. After kneading, wrap the dough tightly in plastic wrap and refrigerate for up to 2-3 hours. Allow it to come to room temperature for about 15-20 minutes before rolling and cooking for the best results. However, for true 10-minute speed, it’s best to mix and cook them right away.
Why aren’t my flatbreads puffing up?
Several factors can cause flatbreads not to puff. The most common reasons are that the skillet isn’t hot enough, the dough is rolled too thick, or the dough is too dry. Ensure your skillet is at a consistent medium-high heat. Roll the dough thinly and evenly, about 1/8 inch thick. Also, make sure your baking powder is fresh, as an expired leavening agent won’t provide the necessary lift. The dough consistency should be soft and pliable, not stiff.
Can I use whole wheat flour for this recipe?
Yes, you can substitute some of the all-purpose flour with whole wheat flour, but it might require a slight adjustment to the liquid content. Whole wheat flour absorbs more liquid, so you may need an additional tablespoon or two of water or milk to achieve the desired soft, pliable dough consistency. Using 100% whole wheat flour might result in a denser flatbread, so a 50/50 blend is often a good starting point for a balance of flavor and texture.
What if I don’t have baking powder?
If you don’t have baking powder, you can still make unleavened flatbreads. The texture will be denser and chewier, similar to a traditional tortilla or chapati, and they won’t puff up as much. Alternatively, if you have baking soda and an acidic ingredient like plain yogurt or buttermilk, you can create a leavening agent. Use 1/4 teaspoon of baking soda for every 1/2 teaspoon of baking powder, and ensure your liquid is acidic.



