
Follow Me On Social Media!
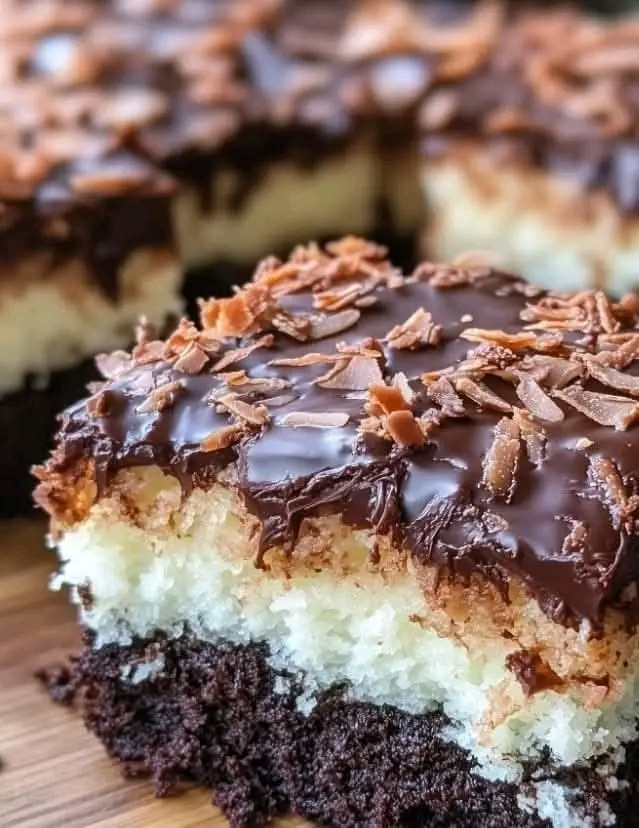
MOUNDS CAKE Dont LOSE this Recipe

Introduction
If you’ve ever craved the flavor of a classic coconut‑chocolate candy bar turned into an elegant dessert, you’re in for a treat. Here’s a detailed, fool‑proof recipe and full walkthrough for the irresistible MOUNDS CAKE—a rich chocolate cake layered with creamy coconut filling and finished with decadent chocolate icing. Whether you’re baking for a special occasion or simply treating yourself, this cake delivers on flavor, texture, and presentation. With full ingredient lists, step‑by‑step instructions, tips, and variations, you’ll be ready to bake this standout dessert with confidence.
Why this recipe stands out
This cake hits three dessert-loving flavornotes: deep chocolate, sweet coconut, and creamy filling. Many recipes call it “Mounds cake” because it captures the essence of the beloved candy bar — chocolate‑covered coconut — but in cake form. For example one version describes: “moist chocolate layers, creamy coconut filling, and rich ganache.” Another lays out the structure: chocolate cake + coconut‑cream layer + chocolate frosting.
What makes this version special:
– A moist, well‑balanced chocolate cake base.
– A luscious coconut cream or coconut‑milk‑based filling, offering both texture and flavor.
– A rich chocolate coating or ganache that ties everything together.
– Visual appeal: layered, dripped, toasted coconut topping—looks professional.
– Flexible enough for scratch bakers or shortcut lovers (cake mix versions exist) while still delivering impressive results.
As you follow along, you’ll find sections for ingredients, preparation, baking, assembly, frosting/decoration, troubleshooting, variations, storage/serving, and FAQs.
Ingredients
Here’s a comprehensive ingredient list, tailored for approximately 12 servings (two 9‑inch rounds or similar). Minor adjustments can be made depending on pan size or number of layers.
For the chocolate cake layers
- 2 cups (spooned and leveled) all‑purpose flour
- ¾ cup unsweetened cocoa powder
- 1¾ teaspoons baking powder
- 1¾ teaspoons baking soda
- 1 teaspoon table salt
- 2¼ cups granulated sugar
- 1¼ cups (≈ 1 ¼) buttermilk (room temperature)
- 2¼ teaspoons pure vanilla extract
- ⅔ cup vegetable oil
- 3 extra large eggs (room temperature)
- 1 cup boiling water
For the coconut filling
- 1½ cups sweetened condensed milk
- 2 teaspoons pure vanilla extract
- ½ teaspoon salt
- 4 cups sweetened coconut flakes
For the chocolate frosting/ganache
- 1½ cups (about) salted sweet cream butter (softened)
- 2 teaspoons pure vanilla extract
- ¾ cup unsweetened cocoa powder
- 4½ cups powdered sugar
- ½ cup whole milk
For optional decoration/toasted topping
- Sweetened coconut flakes (toasted until light golden)
- Sliced almonds or whole almonds for garnish (optional)
Preparation & baking
- Preheat your oven to 350 °F (≈ 175 °C). Prepare two 9‑inch round cake pans: spray with baking spray or grease and flour lightly. For even baking, you can use cake bands.
- In a large mixing bowl, whisk together the flour, cocoa powder, baking powder, baking soda, salt, and sugar until well combined.
- In another bowl (or in the same bowl after the dry mix), whisk in buttermilk, vanilla extract, and vegetable oil until just combined. Then whisk in the eggs one at a time, beating after each until incorporated.
- Carefully add the boiling water to the batter and whisk until smooth. The batter will be thin—that’s normal.
- Divide the batter evenly into the prepared pans. Smooth the tops as needed. Bake for approximately 30‑35 minutes or until a toothpick inserted into the centre comes out clean (or with a few moist crumbs).
- Remove the cakes from the oven and allow to cool in the pans for about 10 minutes. Then turn them out onto wire racks and allow to cool completely (rooms temperature) before filling and frosting. It’s important to fully cool so the filling and frosting don’t melt or slide.
Coconut filling and assembly
- While the cakes cool (or before frosting), prepare the coconut filling: in a large bowl, combine the sweetened condensed milk, vanilla extract, salt, and coconut flakes. Mix until the coconut is fully coated and the mixture holds together well. (Some versions may vary with cream cheese or butter, but this mix gives a rich coconut layer.)
- Once the cake layers are fully cooled, place the first layer on your serving platter or cake stand. Spread about half of the coconut filling evenly over the top of this first layer. Then place the second cake layer on top and spread the remaining half of the coconut filling on the top of the second layer (or between layers if you choose more layers).
- At this point, you may also press toasted coconut flakes around the sides or set aside for later decoration. Light toasting of flakes (see decoration section) enhances coconut flavour.
Chocolate frosting / ganache & topping
- Prepare the chocolate frosting: using a stand mixer or hand mixer, beat the softened butter until creamy. Add vanilla extract and cocoa powder, mixing until smooth. Gradually add the powdered sugar and milk, beating until you achieve a smooth, spreadable consistency. If the frosting is too thick, add a little more milk; if too thin, add a bit more powdered sugar. (Recipe based on scratch version; you may use store‑bought chocolate frosting for convenience.)
- Once the coconut filling is set on the cake, spread the chocolate frosting evenly over the top and sides (if desired) of the cake. Use an offset spatula for smoother edges and a cleaner finish.
- Optional: For a darker, glossy finish (ganache style), you can melt chocolate chips with sweetened condensed milk or cream (see alternative versions) then pour over the cake letting it drip slightly down the sides.
- Finish by pressing toasted coconut flakes around the sides and/or on the top of the cake, and add almond slices or whole almonds if desired for garnish.
Decoration & presentation tips
– To toast coconut: spread sweetened coconut flakes in a dry skillet over medium heat and toast until just lightly golden (2‑3 minutes), stirring constantly to avoid burning. Then allow to cool.
– After frosting the cake, pressing the toasted flakes into the sides while the frosting is still soft helps them adhere nicely.
– For a professional look, chill the cake for about 30 minutes after frosting so the frosting sets slightly before serving.
– Serve each slice with a dollop of whipped cream or a scoop of vanilla ice cream to complement the rich chocolate‑coconut flavors.
– For gifting or special occasions, tie a ribbon around the base of the cake stand or decorate with fresh mint leaves for a tropical touch.
Variations & shortcuts
– Cake‑mix shortcut: If you prefer to save time, you can use a boxed chocolate cake mix (such as devil’s food) in place of the scratch chocolate cake. Many “mounds cake” versions use this shortcut.
– Poke cake version: Instead of layering two rounds, you can bake a 9×13″ chocolate cake, poke holes into the warm cake, pour a mixture of sweetened condensed milk + coconut cream/cream of coconut over the top to infuse, then top with whipped topping or frosting + coconut flakes.
– Bundt version: A bundt pan version of the mounds concept uses dark chocolate cake in a bundt, filled with cream cheese or chocolate chip filling, drizzled with ganache and topped with toasted coconut.
– Almond Joy style: If you want to mimic the sibling candy bar (Almond Joy) rather than Mounds, add sliced almonds or whole almonds on top or layered inside for a nutty crunch. Some original “Mounds cake” versions incorporate almonds for garnish.
– Flavor tweaks: Add a teaspoon of coconut extract in the cake batter or frosting to intensify coconut flavor. Some recipes incorporate coconut milk in the cake batter. There are also versions with cream cheese frosting rather than butter‑only.
Troubleshooting & expert tips
– Batter too thick / cake dense? Make sure your eggs and buttermilk are room temperature; also do not over‑mix once dry ingredients are added. The addition of boiling water should thin the batter and yield a moist crumb.
– Cake not rising / dense texture? Check your baking powder & soda are fresh; oven temperature is accurate; avoid opening the oven door early.
– Filling too runny or sliding off? Let the cake layers cool completely and slightly chill the layers before adding the coconut filling so it sets well. Also make sure the filling has enough thick consistency (condensed milk + coconut helps).
– Frosting too soft / sliding off? Chill the cake for 10‑15 minutes after filling layer and before frosting to allow structure to firm up. Also ensure your frosting isn’t overly warm when applying.
– Coconut flakes not sticking to sides? Apply frosting while slightly warm/soft, then gently press toasted flakes into the sides. A thin layer of frosting acts as “glue.”
– Over‑toasted coconut — burns easily. Use medium heat, stir constantly, remove when just golden. Burned coconut tastes bitter.
– Serving slices cleanly: Use a sharp knife wiped between cuts (especially because of sticky coconut filling) for clean presentation.
Storage & serving
– After assembly, the cake can be stored in the refrigerator, covered (preferably in a cake box or with plastic wrap), for up to 3‑4 days. The coconut filling and frosting hold up well when chilled.
– If you’re serving at room temperature, take the cake out of the fridge about 30 minutes before serving so it comes to slight ambient temperature and the flavors are more vibrant.
– For best flavor, serve within 24‑48 hours. The chocolate‑coconut combination is at its peak when fresh.
– To freeze: You can freeze individual slices (wrapped tightly in plastic and foil) for up to about 1 month. Defrost in refrigerator overnight before serving.
– Serving suggestion: Pair with lightly sweetened whipped cream, vanilla ice cream, or fresh berries for contrast. A drizzle of dark chocolate sauce adds extra decadence.
Why this dessert works
There are several reasons the MOUNDS CAKE is such a winner:
– Texture contrast: The tender chocolate cake, creamy coconut filling, crisp toasted coconut flakes, and smooth chocolate frosting/ganache create a pleasing interplay.
– Flavor layering: The deep cocoa flavor anchors the sweetness of the coconut and the richness of the filling/frosting.
– Nostalgic inspiration: It mimics the beloved candy bar experience (chocolate + coconut) but in sliceable cake form—fun, indulgent, and versatile.
– Visually impressive: Vertical layers, dripped chocolate, toasted coconut topping make it look like a bakery‑quality dessert.
– Crowd‑pleaser: It works for birthdays, potlucks, holidays, or just a weekend treat. Many coconut lovers will favor it specifically.
Serving occasions & suggestions
This cake shines for many occasions: birthday celebrations, dinner parties, potlucks, holiday desserts (especially Easter, Christmas, summer gatherings), or anytime you want to impress with minimal fuss. Because the prep is straightforward and many elements can be made ahead (like filling, cake layers, toasted coconut), you can assemble closer to serving time for less day‑of stress.
Here are a few suggestions:
– For a birthday: Decorate the top with chocolate curls, whole coconut pieces, or an “Mounds” candy bar cut in half for reference.
– For a potluck: Bake a rectangular version in a 9×13 pan, layer the filling, and frost; keep simpler but still delicious.
– For a summer gathering: Add fresh pineapple wedges or mango on the side for tropical accompaniment.
– For kids: Serve each slice with a scoop of coconut ice cream and a drizzle of chocolate syrup.
– For elegant dinner: Garnish each plate with toasted coconut crumbs, a mint sprig, and fresh berries.
Frequently Asked Questions
Can I use a cake mix instead of baking from scratch?
Yes. Many versions use a boxed devil’s food or chocolate cake mix, following package directions, then layering the coconut filling and chocolate frosting. Using a mix will save time and simplify prep, though scratch yields slightly better texture and flavor control.
What if I don’t have buttermilk?
You can make a buttermilk substitute by adding 1 tablespoon white vinegar or lemon juice to a measuring cup, then add milk to equal the original buttermilk measurement. Let it stand for 5 minutes and use in place of buttermilk.
Is sweetened coconut flakes okay, or should I get unsweetened?
Sweetened coconut flakes give more of the candy‑bar flavor (sweet coconut). If you prefer a less sweet version, you can use unsweetened and adjust sugar slightly. However many recipes call explicitly for sweetened flakes.
Can I make this gluten‑free?
Yes — you could substitute a gluten‑free all‑purpose flour in place of regular flour (ensure it has baking powder/soda included as needed) and follow the rest of the recipe. Be aware texture may differ slightly.
What’s the best way to slice it cleanly?
Chill the cake for at least 30 minutes after frosting so layers set. Use a long, sharp serrated knife or a cake‑slicing knife. Wipe the knife clean between cuts for neat slices (especially because coconut filling may creep out). Warm the knife slightly (run under hot water and dry) for smoother cuts.
Can I make it in advance?
Yes. You can bake the cake layers ahead (even a day earlier), chill them wrapped. You can also make the coconut filling in advance. On the day of serving, assemble and frost, then chill until serving. If making more than a day ahead, keep covered in fridge; bring closer to room temperature before serving.
Conclusion
Don’t lose this recipe—this MOUNDS CAKE is the kind of dessert that becomes a signature. Once you’ve baked it, you’ll have a go‑to cake that brings both flavor and wow‑factor. Whether you choose the scratch route or a cake mix shortcut, you’ll end up with a moist chocolate cake layered with sweet coconut filling, finished with rich chocolate frosting (and optionally toasted coconut topping). It’s perfect for coconut lovers, chocolate lovers, and anyone who appreciates a dessert that tastes as good as it looks.



