
Follow Me On Social Media!
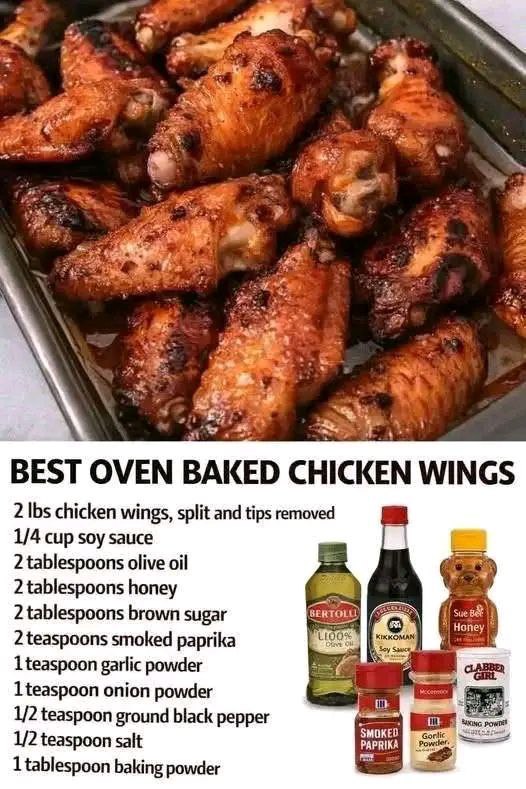
OVEN FRIED CHICKEN WINGS

Introduction
Get ready to redefine your understanding of crispy chicken wings! Forget the deep fryer, the messy oil, and the guilt that often comes with indulging in this classic appetizer. We’re about to dive into the world of “oven-fried” chicken wings – a culinary revelation that delivers all the crunch, flavor, and satisfaction you crave, all from the comfort of your oven. These aren’t just baked wings; they’re engineered for maximum crispiness, boasting a golden-brown skin that snaps with every bite, revealing succulent, juicy meat underneath. Perfect for game day, a party spread, or just a delicious weeknight treat, these wings are incredibly easy to make and guaranteed to be a crowd-pleaser.
What makes these wings truly special, and worthy of the “oven-fried” moniker? It’s a clever combination of techniques and a secret ingredient that transforms ordinary chicken skin into an irresistible, shattering crust. We’re talking about a simple pantry staple that, when combined with high heat and proper preparation, creates a magical reaction for unparalleled crispiness. Beyond the crunch, these wings are coated in a sweet and savory glaze, infused with smoky paprika, aromatic garlic, and a hint of umami from soy sauce, striking a perfect balance of flavors that will have everyone reaching for more. They’re healthier than their deep-fried counterparts but sacrifice none of the deliciousness, making them an ideal choice for guilt-free indulgence.
This recipe is designed to be straightforward and foolproof, ensuring that even novice cooks can achieve restaurant-quality wings at home. We’ll walk you through every step, from prepping the chicken to ensuring that perfect golden finish. Get ready to impress your friends and family with a batch of these irresistible Oven Fried Chicken Wings – they’re so good, you might just forget they weren’t deep-fried at all!
Nutritional Information
Per serving (approximate values):
- Calories: 350
- Protein: 30g
- Carbohydrates: 15g
- Fat: 18g
- Fiber: 1g
- Sodium: 650mg
Ingredients
- 2 lbs chicken wings (split into drumettes and flats, wing tips removed)
- 1 tablespoon baking powder (aluminum-free recommended)
- 1 teaspoon salt
- 1/2 teaspoon black pepper
- 1 tablespoon smoked paprika
- 1 teaspoon garlic powder
- 1/2 teaspoon onion powder
- 2 tablespoons olive oil
- 1/4 cup soy sauce (low sodium preferred)
- 2 tablespoons honey
- 2 tablespoons light brown sugar, packed
Instructions
- Prepare the Chicken Wings: Begin by thoroughly patting the chicken wings dry with paper towels. This step is absolutely crucial for achieving maximum crispiness. Ensure every surface of each wing piece is as dry as possible. If preferred, you can place the patted-dry wings on a wire rack set over a baking sheet and refrigerate them uncovered for at least an hour, or even overnight, to further dry out the skin. This extra drying time will significantly enhance the crispiness.
- Preheat Oven and Prepare Baking Sheet: Preheat your oven to 400°F (200°C). Line a large baking sheet with aluminum foil for easier cleanup. Place a wire rack on top of the foil-lined baking sheet. Lightly spray the wire rack with non-stick cooking spray to prevent the wings from sticking. This setup is essential for allowing air circulation around the wings, which promotes even cooking and crisping on all sides.
- Create the Dry Rub: In a large bowl, combine the baking powder, salt, black pepper, smoked paprika, garlic powder, and onion powder. Whisk these dry ingredients together until they are well combined and there are no clumps. The baking powder is the secret ingredient here; it works by raising the pH level of the chicken skin, breaking down proteins, and creating tiny air bubbles that expand during cooking, resulting in an incredibly crispy texture.
- Coat the Wings with Dry Rub: Add the dried chicken wings to the bowl with the dry rub. Toss the wings thoroughly, ensuring each piece is evenly coated with the spice mixture. Make sure there’s a thin, even layer of the rub on every surface.
- Arrange Wings on Rack: Arrange the coated chicken wings in a single layer on the prepared wire rack, making sure not to overcrowd the pan. Leave a little space between each wing piece to allow for proper air circulation. If your baking sheet is too small, use a second one or bake in batches to avoid steaming the wings instead of crisping them.
- Initial Bake: Place the baking sheet with the wings into the preheated oven. Bake for 30 minutes. During this initial baking phase, the chicken will start to cook through, and the skin will begin to render its fat and crisp up.
- Prepare the Glaze: While the wings are baking, prepare the sweet and savory glaze. In a small saucepan over medium heat, combine the olive oil, soy sauce, honey, and brown sugar. Whisk constantly until the brown sugar is fully dissolved and the mixture comes to a gentle simmer. Reduce the heat to low and let it barely simmer for 5-7 minutes, whisking occasionally, until the glaze thickens slightly. Be careful not to let it boil too vigorously, as it can burn. Remove from heat and set aside.
- Flip and Continue Baking: After 30 minutes, carefully remove the baking sheet from the oven. Using tongs, flip each chicken wing piece to ensure even browning and crispiness on both sides. Return the baking sheet to the oven and continue baking for another 20-25 minutes, or until the wings are golden brown and crispy. The internal temperature of the chicken should reach 165°F (74°C) when tested with a meat thermometer, inserted into the thickest part of the wing without touching bone.
- Glaze the Wings: Once the wings are cooked through and crispy, remove them from the oven. Transfer the hot wings to a large, clean bowl. Pour the prepared glaze over the wings. Toss gently but thoroughly with tongs until all the wings are evenly coated in the sticky, flavorful glaze.
- Final Quick Bake (Optional, for Stickier Glaze): For an extra sticky and caramelized glaze, you can return the glazed wings to the wire rack on the baking sheet and bake for an additional 5-7 minutes. This step helps the glaze to set and become even more adherent to the wings, creating a beautiful sheen and intensified flavor. Watch them closely to prevent burning.
- Serve Immediately: Remove the wings from the oven. Let them rest for a few minutes before serving. This allows the juices to redistribute and the glaze to set slightly. Serve hot with your favorite dipping sauces and sides.
Cooking Tips and Variations
Achieving truly crispy oven-fried chicken wings is all about technique and a few key secrets. First and foremost, the importance of patting your chicken wings completely dry cannot be overstated. Any excess moisture on the skin will lead to steaming rather than crisping. For an even drier skin, consider placing the wings uncovered in the refrigerator on a wire rack for several hours or overnight after patting them dry. This slight dehydration process works wonders. Secondly, don’t skimp on the baking powder. Ensure you’re using aluminum-free baking powder to avoid any metallic aftertaste. Its chemical reaction with the chicken skin is the magic behind that incredible crunch. Thirdly, the wire rack is non-negotiable. It allows hot air to circulate around the entire wing, ensuring every side crisps up beautifully and prevents a soggy bottom. Lastly, avoid overcrowding the baking sheet; give each wing its space to breathe and crisp.
For variations, the possibilities are endless. To kick up the spice, add a pinch or two of cayenne pepper or red pepper flakes to the dry rub. For a lemon pepper twist, omit the smoked paprika and onion powder, and add 1 tablespoon of lemon pepper seasoning to the dry rub, then finish with a squeeze of fresh lemon juice after glazing. If you’re a fan of garlic parmesan, skip the soy sauce and brown sugar in the glaze. Instead, melt 1/4 cup of unsalted butter with 4-5 cloves of minced garlic. Once the wings are cooked and crispy, toss them with the garlic butter and a generous amount of grated Parmesan cheese and fresh parsley. For a classic BBQ flavor, you can use your favorite BBQ sauce to glaze the wings during the last 10-15 minutes of baking, or after they’ve cooked through, tossing them in the sauce and then returning to the oven for a few minutes to caramelize. Experiment with different spice blends and sauces to find your perfect wing combination!
Storage and Reheating
Storing leftover oven-fried chicken wings properly is key to maintaining their quality and ensuring they remain delicious. Once cooled to room temperature, place the wings in an airtight container. They can be stored in the refrigerator for up to 3-4 days. To prevent them from becoming soggy, you can place a paper towel at the bottom of the container to absorb any excess moisture.
Reheating oven-fried wings to restore their crispiness is entirely possible, though they may not be quite as crunchy as when freshly made. The best method for reheating is in the oven or an air fryer. To reheat in the oven, preheat your oven to 375°F (190°C). Arrange the leftover wings in a single layer on a wire rack set over a baking sheet. Heat for 10-15 minutes, or until heated through and the skin has re-crisped. For an air fryer, preheat to 350°F (175°C) and cook for 5-8 minutes, shaking the basket halfway through, until hot and crispy. Avoid microwaving, as this will render the wings soft and rubbery, losing all their desirable crispiness.
Frequently Asked Questions
Why do I need to use baking powder for crispy wings?
Baking powder is the secret ingredient for achieving incredibly crispy oven-fried wings. It works by creating a chemical reaction on the surface of the chicken skin. The alkaline nature of baking powder raises the pH of the skin, which helps to break down proteins and create tiny air bubbles. As the wings bake, these air bubbles expand, resulting in a drier, crispier, and more brittle skin texture that mimics the crunch of deep-frying without the need for excessive oil.
Can I make these wings ahead of time?
While these wings are best enjoyed fresh out of the oven for maximum crispiness, you can do some prep work ahead of time. You can pat the wings dry and coat them with the dry rub, then refrigerate them uncovered on a wire rack for up to 24 hours. This extra drying time will actually enhance their crispiness. The glaze can also be made a day in advance and stored in an airtight container in the refrigerator; simply gently reheat it before tossing with the cooked wings.
My wings aren’t as crispy as I’d like. What went wrong?
Several factors can lead to less-than-crispy wings. The most common culprits include not patting the wings dry enough, overcrowding the baking sheet (which causes steaming instead of crisping), not using a wire rack to allow air circulation, or not baking at a high enough temperature. Ensure you’re using aluminum-free baking powder and that your oven is accurately heated to 400°F (200°C). If all else fails, a final quick blast under the broiler for 1-3 minutes (watch carefully!) can help achieve that last bit of crispiness, but be very cautious to prevent burning.
Can I use frozen wings for this recipe?
Yes, you can use frozen wings, but it’s crucial to thaw them completely before starting the recipe. Thaw them in the refrigerator overnight. Once thawed, ensure you pat them exceptionally dry, as frozen wings tend to release more moisture. Any residual ice or water will hinder the browning and crisping process. Follow all other steps as written, paying extra attention to the drying stage.



