
Follow Me On Social Media!
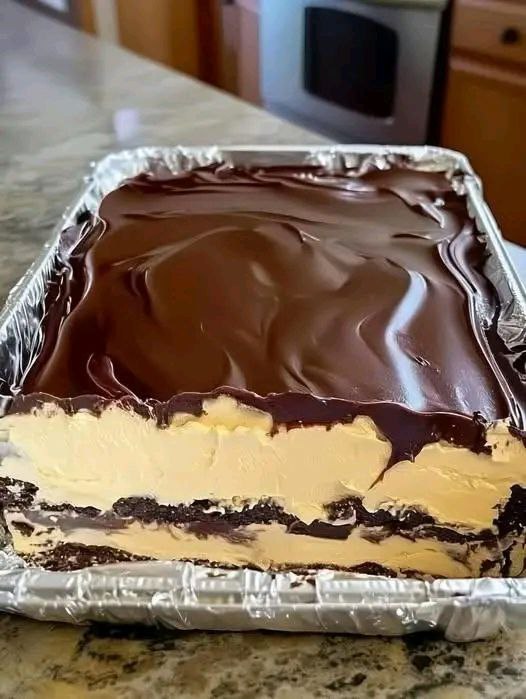
No-Bake Chocolate Eclair Cake: The Retro Dessert That Steals Every Show

Introduction
Step right up, dessert enthusiasts, and prepare to be transported back to a simpler time, a time when potlucks reigned supreme and homemade treats were the star of every gathering. Today, we’re unearthing a true culinary gem: the No-Bake Chocolate Eclair Cake. This isn’t just a dessert; it’s a delightful journey into nostalgia, a dish that effortlessly marries convenience with an explosion of flavor and texture. Forget fussy baking, preheating ovens, and complex techniques. This absolute show-stealer delivers all the decadent satisfaction of a classic eclair, but without ever turning on your oven. It’s the ultimate secret weapon for busy hosts, an instant crowd-pleaser that consistently earns rave reviews and leaves everyone asking for the recipe.
What exactly makes this No-Bake Chocolate Eclair Cake so utterly irresistible? Imagine layers of crisp, chocolatey cookie crumbs, softened to a cake-like tenderness by a rich, creamy, vanilla-infused filling. This luscious concoction is then crowned with a glossy, decadent chocolate topping that’s both smooth and intensely flavorful. Each bite offers a harmonious blend of textures: the delightful chew of the softened cookies, the silky coolness of the cream, and the rich embrace of the chocolate. It’s a dessert that feels incredibly indulgent, yet its preparation is surprisingly straightforward, making it a perfect choice for novice bakers and seasoned pros alike.
Whether you’re hosting a backyard barbecue, contributing to a family reunion, or simply craving a comforting treat that requires minimal effort but delivers maximum impact, this No-Bake Chocolate Eclair Cake is your answer. It’s a guaranteed hit, a dessert that promises to steal the show and leave a lasting impression. Prepare to delight your taste buds and impress your guests with this retro masterpiece that proves some classics truly never go out of style. Get ready to rediscover the joy of effortless, extraordinary dessert making!
Nutritional Information
Per serving (approximate values):
- Calories: 420
- Protein: 5g
- Carbohydrates: 58g
- Fat: 20g
- Fiber: 2g
- Sodium: 310mg
Ingredients
- 2 (14.3-ounce) packages chocolate sandwich cookies (like Oreos)
- 1/2 cup (1 stick) unsalted butter, melted
- 2 (3.4-ounce) packages instant vanilla pudding mix
- 4 cups cold whole milk
- 1 (8-ounce) block cream cheese, softened
- 1 cup powdered sugar
- 1 teaspoon vanilla extract
- 1 (8-ounce) container frozen whipped topping, thawed (like Cool Whip)
- 1 (16-ounce) can chocolate frosting
- 2 tablespoons whole milk (for frosting)
- Optional: Chocolate shavings, sprinkles, or fresh berries for garnish
Instructions
- Prepare the Cookie Crust: Begin by finely crushing the chocolate sandwich cookies. You can do this by placing them in a large zip-top bag and crushing them with a rolling pin, or for a finer, more even crumb, pulse them in a food processor until they resemble fine crumbs.
- Once the cookies are crushed, transfer them to a medium-sized bowl. Pour the melted butter over the cookie crumbs and mix thoroughly until all the crumbs are moistened.
- Press about two-thirds of the buttered cookie crumbs evenly into the bottom of a 9×13-inch baking dish. Use the back of a spoon or your fingers to create a firm, compact layer. Set the remaining one-third of the cookie crumbs aside for later.
- Make the Creamy Filling: In a large mixing bowl, combine the instant vanilla pudding mixes with 4 cups of cold whole milk. Whisk vigorously for about 2 minutes, or until the pudding begins to thicken. Set aside for 5 minutes to allow it to set further.
- In a separate large bowl, using an electric mixer, beat the softened cream cheese until smooth and creamy, about 1-2 minutes.
- Gradually add the powdered sugar to the cream cheese, beating until well combined and fluffy. Stir in the vanilla extract.
- Gently fold the thawed whipped topping into the cream cheese mixture until no streaks remain. Be careful not to overmix, as this can deflate the whipped topping.
- Now, carefully fold the prepared vanilla pudding into the cream cheese and whipped topping mixture. Mix until just combined and smooth. This creates your luscious, creamy filling.
- Assemble the Layers: Carefully spread half of the creamy filling evenly over the pressed cookie crumb base in the baking dish.
- Sprinkle half of the reserved cookie crumbs over the first layer of cream.
- Spread the remaining half of the creamy filling over the cookie crumbs, creating your second creamy layer.
- Finally, sprinkle the last of the reserved cookie crumbs over the top of the second creamy layer.
- Prepare the Chocolate Topping: Open the can of chocolate frosting and transfer it to a microwave-safe bowl. Add 2 tablespoons of whole milk to the frosting.
- Microwave the frosting and milk on high for 30-60 seconds, stirring every 15 seconds, until the frosting is melted and smooth enough to pour or spread easily. Be careful not to overheat it.
- Pour the warm, melted chocolate frosting evenly over the top layer of cookie crumbs, gently spreading it to cover the entire surface of the cake.
- Chill to Perfection: This is a crucial step! Cover the baking dish tightly with plastic wrap.
- Refrigerate the No-Bake Chocolate Eclair Cake for at least 6 hours, or preferably overnight. This allows the layers to set firmly, the flavors to meld beautifully, and the cookie crumbs to soften to a delightful cake-like consistency.
- Garnish and Serve: Once thoroughly chilled, remove the cake from the refrigerator. If desired, garnish with chocolate shavings, sprinkles, or fresh berries before serving. Slice into squares and enjoy your show-stopping dessert!
Cooking Tips and Variations
To ensure your No-Bake Chocolate Eclair Cake reaches its full potential, paying attention to a few key details can make all the difference. First and foremost, the chilling time is absolutely non-negotiable. While tempting to dig in earlier, allowing at least 6 hours, and ideally overnight, in the refrigerator is essential. This not only sets the creamy layers firmly but also allows the cookie crumbs to absorb moisture from the filling, transforming them from crunchy to a wonderfully tender, cake-like texture that truly defines this dessert. If you try to slice it too soon, the layers will be messy and the texture won’t be quite right.
When preparing the cookie crust, ensure your cookie crumbs are fine. A food processor is your best friend here, creating uniform crumbs that press into a solid, even base. If you don’t have one, a sturdy zip-top bag and a rolling pin will work, but aim for as fine a crumb as possible. For the creamy filling, make sure your cream cheese is truly softened to room temperature; this prevents lumps and ensures a smooth, uniform texture when beaten. Also, use cold milk for the instant pudding; it helps the pudding set faster and firmer. When folding in the whipped topping, be gentle! Overmixing can deflate it, leading to a less airy and voluminous filling.
The chocolate topping is another area where a little care goes a long way. When melting the canned frosting, do so gently in the microwave, stirring frequently. You want it smooth and pourable, not boiling hot, which could melt your careful creamy layers. If you prefer a homemade touch, a simple ganache made with equal parts good quality chocolate chips and hot heavy cream (stirred until smooth, then cooled slightly) makes a luxurious substitute. For presentation, once chilled, dipping your knife in hot water and wiping it clean between each slice will give you perfectly neat, clean cuts, showcasing those beautiful layers.
This recipe is incredibly adaptable, offering a playground for flavor variations. Instead of vanilla pudding, try instant chocolate, banana, or even cheesecake flavored pudding for a different twist. For the cookie base, while chocolate sandwich cookies are classic, you could experiment with graham crackers, shortbread cookies, or even gingersnap cookies for a unique spice note. A dash of espresso powder added to the chocolate frosting can deepen its flavor beautifully. For a minty variation, add a few drops of mint extract to the creamy filling or use mint chocolate sandwich cookies for the base. You could also swirl in some caramel sauce into the creamy filling for a salted caramel eclair cake. Garnish options are endless: mini chocolate chips, toasted coconut flakes, chopped nuts, or a dusting of cocoa powder can all elevate the visual appeal and add extra texture.
Storage and Reheating
Storing your No-Bake Chocolate Eclair Cake properly is key to maintaining its freshness and delicious texture. Since it’s a dairy-based dessert, it must always be kept refrigerated. After serving, if there are any leftovers, ensure the baking dish is covered tightly with plastic wrap or aluminum foil. This prevents the cake from absorbing odors from the refrigerator and keeps the layers from drying out. When properly stored in the refrigerator, the cake will remain fresh and delicious for 3 to 4 days. In fact, many find that the flavors continue to meld and deepen on the second day, making it even more enjoyable.
Because this is a no-bake dessert, there’s no reheating involved. It’s meant to be served chilled, straight from the refrigerator. If you’ve just pulled it out and it seems a little too firm, you can let it sit at room temperature for about 10-15 minutes before slicing and serving. This allows the creamy layers to soften slightly, making for a smoother, more pleasant mouthfeel and easier slicing. Do not leave it out for extended periods, especially in warm environments, as the dairy components will begin to separate and spoil. If you’re transporting it to a potluck or gathering, keep it in a cooler with ice packs until just before serving to maintain its chilled state.
Frequently Asked Questions
Can I use homemade whipped cream instead of frozen whipped topping?
Yes, absolutely! You can substitute 1 (8-ounce) container of frozen whipped topping with about 2 cups of freshly whipped heavy cream. For best results, whip cold heavy cream with a little powdered sugar (about 2-3 tablespoons) and a touch of vanilla extract until stiff peaks form. Gently fold this into the cream cheese and pudding mixture. Keep in mind that homemade whipped cream can be a bit more delicate and may not hold up quite as long as the stabilized frozen whipped topping, so it’s best to consume the cake within 2-3 days if using fresh cream.
Why did my chocolate topping seize or become too thick to spread?
If your chocolate frosting topping seized or became too thick, it’s likely due to overheating in the microwave or not adding enough milk to thin it out. When melting canned frosting, heat it in short bursts (15-20 seconds) and stir well after each interval. You want it warm and pourable, not boiling. If it becomes too thick, try adding another teaspoon or two of milk and stirring vigorously until it reaches the desired consistency. If it seizes completely, sometimes gently warming it again with a bit more milk can help, but prevention is easier than a fix.
Can this cake be frozen?
While technically possible to freeze, it’s not generally recommended for optimal texture. Freezing can cause the creamy filling to become a bit watery or grainy upon thawing, and the softened cookie layers might become too mushy. If you must freeze it, wrap individual slices tightly in plastic wrap and then in foil, and store in an airtight container for up to 1 month. Thaw in the refrigerator overnight before serving. For best results, however, enjoy this cake fresh and chilled from the refrigerator.



