
Follow Me On Social Media!
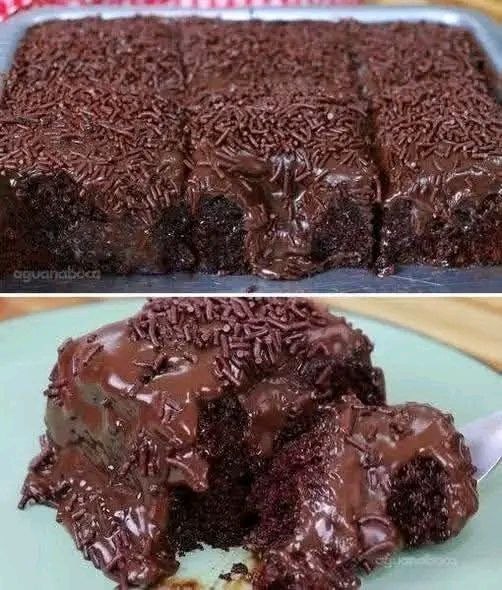
Very wet chocolate cake that melts

Introduction
Prepare to surrender to the ultimate chocolate fantasy: a “Very Wet Chocolate Cake That Melts.” This isn’t just any chocolate cake; it’s a decadent dream, a symphony of rich cocoa and unparalleled moisture that truly lives up to its name. Imagine a slice so incredibly tender, so deeply imbued with chocolate flavor, that it practically dissolves on your tongue, leaving behind a lingering taste of pure bliss. Forget dry, crumbly cakes of the past; this recipe promises a dessert experience where every bite is a journey into fudgy, melt-in-your-mouth perfection. It’s the kind of cake that makes you close your eyes in satisfaction, a true testament to the power of well-crafted chocolate indulgence.
What makes this particular chocolate cake so extraordinary? It’s a carefully orchestrated dance of ingredients and techniques designed to maximize moisture and intensify flavor. We’re talking about a super-fine, almost pudding-like crumb, drenched in a luscious chocolate glaze that seeps into every crevice, transforming the cake into a moist, gooey masterpiece. The “melting” aspect comes not just from the cake’s tender texture but also from the rich, pourable frosting that remains soft and yielding, creating an irresistible contrast with the cake itself. This dessert is a celebration of all things chocolate, designed for those who crave an intensely flavorful, deeply satisfying treat that feels both comforting and incredibly luxurious.
This recipe is a must-try for every chocolate lover, comfort food seeker, and dessert enthusiast out there. Whether you’re baking for a special occasion, a cozy family gathering, or simply to satisfy a serious chocolate craving, this “Very Wet Chocolate Cake That Melts” will undoubtedly become a cherished favorite. It’s surprisingly straightforward to make, yet yields results that taste like they came from a high-end patisserie. Get ready to impress your taste buds and everyone lucky enough to share a slice of this truly unforgettable chocolate creation.
Nutritional Information
Per serving (approximate values):
- Calories: 485
- Protein: 5g
- Carbohydrates: 65g
- Fat: 25g
- Fiber: 3g
- Sodium: 310mg
Ingredients
- For the Cake:
- 2 cups (250g) All-Purpose Flour
- 2 cups (400g) Granulated Sugar
- ¾ cup (75g) Unsweetened Cocoa Powder (Dutch-processed recommended for darker color)
- 2 teaspoons Baking Soda
- 1 teaspoon Baking Powder
- 1 teaspoon Salt
- 1 cup (240ml) Buttermilk (or 1 cup milk + 1 tablespoon white vinegar/lemon juice, let sit 5 mins)
- ½ cup (120ml) Vegetable Oil (or other neutral oil)
- 2 large Eggs
- 1 teaspoon Vanilla Extract
- 1 cup (240ml) Hot Water (or hot brewed coffee for deeper flavor)
- For the Melting Chocolate Glaze:
- ½ cup (113g) Unsalted Butter
- ½ cup (120ml) Milk
- ½ cup (75g) Unsweetened Cocoa Powder
- 3 cups (360g) Powdered Sugar (Confectioners’ Sugar)
- 1 teaspoon Vanilla Extract
- Pinch of Salt
- For Garnish:
- ¼ cup Chocolate Sprinkles (Jimmies)
Instructions
- Preheat your oven to 350°F (175°C). Grease and flour a 9×13 inch (23×33 cm) baking pan.
- In a large mixing bowl, whisk together the flour, granulated sugar, cocoa powder, baking soda, baking powder, and salt until well combined.
- In a separate medium bowl, whisk together the buttermilk, vegetable oil, eggs, and vanilla extract.
- Pour the wet ingredients into the dry ingredients and mix on low speed with an electric mixer (or by hand) until just combined. Do not overmix.
- Carefully pour in the hot water (or hot coffee) and mix until the batter is smooth. The batter will be thin, which is normal for this type of cake.
- Pour the batter evenly into the prepared 9×13 inch baking pan.
- Bake for 30-35 minutes, or until a wooden skewer or toothpick inserted into the center of the cake comes out with moist crumbs, but not wet batter. Be careful not to overbake, as this will dry out the cake.
- While the cake is baking, prepare the Melting Chocolate Glaze. In a medium saucepan, combine the unsalted butter, milk, and cocoa powder. Heat over medium heat, stirring constantly, until the butter is melted and the mixture comes to a gentle simmer.
- Remove the saucepan from the heat. Add the powdered sugar, vanilla extract, and pinch of salt. Whisk vigorously until the glaze is completely smooth and free of lumps. It should be thick but pourable.
- As soon as the cake comes out of the oven, while it’s still hot, poke holes all over the top of the cake using a wooden skewer or the handle of a spoon. Make sure the holes go deep into the cake.
- Immediately pour the warm chocolate glaze evenly over the hot, poked cake. The glaze will seep into the holes and coat the top, creating that “wet” and “melting” effect.
- Allow the cake to cool completely in the pan on a wire rack. As it cools, the glaze will set slightly but remain soft and gooey.
- Once cooled, sprinkle generously with chocolate sprinkles before serving.
- Cut into squares and serve directly from the pan.
Cooking Tips and Variations
For the deepest chocolate flavor, always opt for a good quality Dutch-processed cocoa powder. It provides a darker color and a less bitter, smoother chocolate taste that truly shines in this cake. When mixing the batter, resist the urge to overmix; overmixing develops gluten, which can lead to a tough, dry cake. Mix until just combined, even if a few small lumps remain. The hot water or coffee added at the end helps dissolve the cocoa powder and sugar, contributing to the cake’s fine crumb and intense flavor. If using coffee, it doesn’t make the cake taste like coffee, but rather amplifies the chocolate notes beautifully.
The key to the “very wet” and “melting” texture is applying the warm glaze to the hot cake. The heat helps the glaze penetrate deeply, creating an internal moistness that’s unparalleled. Don’t skip poking holes; this is crucial for the glaze to soak in. For an extra layer of decadence, consider adding a teaspoon of instant espresso powder to the cake batter along with the dry ingredients. This will further enhance the chocolate flavor without making it taste like coffee. For a hint of spice, a pinch of cayenne pepper in the cake batter can add a subtle, warming kick that complements the chocolate wonderfully. You can also experiment with different extracts in the glaze, such as almond extract for a nutty twist, or a dash of peppermint extract for a festive touch.
If you don’t have buttermilk, you can easily make your own by adding 1 tablespoon of white vinegar or lemon juice to a measuring cup, then filling it up to the 1-cup mark with regular milk. Let it sit for 5 minutes until it curdles slightly. This acidity reacts with the baking soda to create a light and tender crumb. For a gluten-free variation, you can substitute the all-purpose flour with a 1:1 gluten-free baking flour blend that contains xanthan gum. Ensure all other ingredients are also gluten-free. For a dairy-free version, use non-dairy milk (like almond or soy) for the buttermilk substitute and the glaze, and use a plant-based butter alternative for the glaze.
Storage and Reheating
This “Very Wet Chocolate Cake That Melts” is best stored at room temperature, covered tightly with plastic wrap or in an airtight container, for up to 3-4 days. Storing it in the refrigerator can sometimes dry out cakes, but given the extreme moisture level of this particular recipe, it holds up reasonably well in the fridge for up to a week. However, for optimum “melting” texture, bringing it back to room temperature before serving is recommended.
To reheat individual slices, you can gently warm them in the microwave for 10-20 seconds. Be careful not to overheat, as this can make the cake tough. The goal is to just warm it through enough to bring back that soft, gooey, melt-in-your-mouth quality, especially for the glaze. You can also place an entire cake (if still in the pan) in a very low oven (around 200°F or 95°C) for 10-15 minutes, or until just warm, but this method is less precise and risks drying the cake if left too long. For best results, enjoy it at room temperature on the day it’s made, but rest assured, it remains delicious for several days when stored correctly.
Frequently Asked Questions
Why is my cake dry?
The most common reason for a dry cake is overbaking. Keep a close eye on the baking time and rely on the toothpick test: it should come out with moist crumbs, not completely clean. Also, ensure your oven temperature is accurate; an oven thermometer can be very helpful. Using the correct amount of wet ingredients (buttermilk, oil, eggs, hot water) as specified in the recipe is also crucial for moisture.
Can I make this cake ahead of time?
Absolutely! This cake is excellent for making ahead. In fact, many people find that the flavors and moisture deepen even further on the second day. Prepare the cake and glaze as instructed, and let it cool completely. Cover it tightly and store at room temperature. It will remain wonderfully moist and “melting” for several days, making it perfect for parties or events.
What if my glaze is too thick or too thin?
If your glaze is too thick, you can thin it out by adding a small amount (1 tablespoon at a time) of warm milk until it reaches the desired pourable consistency. If your glaze is too thin, you can thicken it by whisking in more powdered sugar, 1-2 tablespoons at a time, until it’s just right. Remember, the glaze should be thick enough to coat the cake but still very pourable to seep into the holes.



