
Follow Me On Social Media!
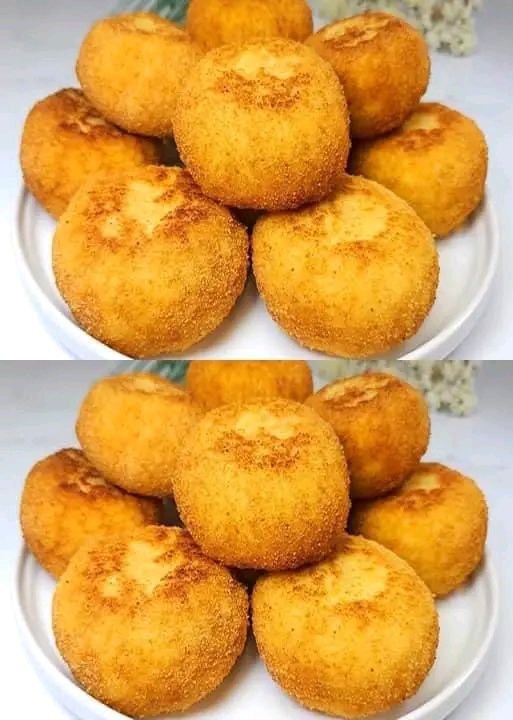
Crispy Golden Potato Balls

Introduction
Prepare to fall in love with the ultimate comfort food: Crispy Golden Potato Balls! These irresistible bites are a celebration of everything wonderful about potatoes – a crunchy, golden-brown exterior giving way to a soft, fluffy, and perfectly seasoned interior. Whether you’re looking for a crowd-pleasing appetizer, a delightful snack, or a unique side dish to elevate any meal, these potato balls are guaranteed to impress.
What makes them so special? It’s that magical contrast of textures. The deep-fried coating achieves an unparalleled crispness, creating a satisfying “CRUNCH!” with every bite, while the mashed potato inside remains wonderfully creamy and tender. They’re incredibly versatile, easy to customize with your favorite seasonings or fillings, and surprisingly simple to prepare, making them a fantastic addition to your culinary repertoire. Get ready to create a dish that will have everyone asking for the recipe!
This recipe will guide you through crafting these golden gems, ensuring you achieve that perfect balance of crispy exterior and melt-in-your-mouth interior. We’ll cover everything from selecting the right potatoes to the crucial breading and frying techniques, along with plenty of tips and tricks to make your potato balls truly spectacular. So, grab your apron, and let’s dive into making these delicious, golden spheres of potato perfection!
Nutritional Information
Per serving (approximate values, based on 3 potato balls):
- Calories: 320
- Protein: 7g
- Carbohydrates: 35g
- Fat: 18g
- Fiber: 4g
- Sodium: 350mg
Ingredients
- 2 lbs Russet or Idaho potatoes, peeled and quartered
- 1/4 cup unsalted butter, melted
- 1/4 cup whole milk (or half-and-half for richer flavor)
- 1 teaspoon salt, plus more for seasoning
- 1/2 teaspoon black pepper, plus more for seasoning
- 1/2 teaspoon garlic powder
- 1/4 teaspoon onion powder
- 1/4 cup finely chopped fresh chives (optional)
- 2 large eggs, beaten
- 1/2 cup all-purpose flour
- 1 1/2 cups panko breadcrumbs (or regular breadcrumbs)
- 4-6 cups vegetable oil, canola oil, or peanut oil, for deep frying
Instructions
- Prepare the Potatoes: Place the peeled and quartered potatoes in a large pot. Cover with cold water by about an inch. Add 1 teaspoon of salt to the water. Bring to a boil over medium-high heat, then reduce heat to medium and simmer until the potatoes are fork-tender, about 15-20 minutes.
- Mash the Potatoes: Drain the cooked potatoes thoroughly. Return them to the hot, empty pot over low heat for 1-2 minutes, shaking occasionally, to dry out any excess moisture. This step is crucial for fluffy mashed potatoes. Remove from heat.
- Add the melted butter, milk, 1 teaspoon salt, 1/2 teaspoon black pepper, garlic powder, and onion powder to the potatoes. Using a potato masher or a fork, mash until smooth and lump-free. If using, stir in the fresh chives. Taste and adjust seasoning as needed. The mixture should be well-seasoned.
- Chill the Potato Mixture: Transfer the mashed potato mixture to a bowl, cover with plastic wrap, and refrigerate for at least 1 hour, or preferably 2-3 hours. Chilling helps the potato balls hold their shape during forming and frying.
- Set Up Breading Station: Prepare three shallow dishes or bowls. In the first dish, place the all-purpose flour. In the second dish, place the beaten eggs. In the third dish, place the panko breadcrumbs.
- Form the Potato Balls: Once the potato mixture is chilled, scoop out about 1 1/2 to 2 tablespoons of the mixture (or use a small cookie scoop) and roll it gently between your palms to form a smooth, uniform ball, about 1 1/2 inches in diameter. Repeat with the remaining potato mixture.
- Bread the Potato Balls: Working one at a time, first roll a potato ball in the flour, shaking off any excess. Then, dip it into the beaten egg, ensuring it’s fully coated, letting any excess drip off. Finally, roll it thoroughly in the panko breadcrumbs, pressing gently to ensure an even and firm coating. Place the breaded potato balls on a clean plate or baking sheet.
- Pre-heat Oil for Frying: In a large, heavy-bottomed pot or Dutch oven, pour enough vegetable oil to reach a depth of about 3 inches. Heat the oil over medium-high heat until it reaches 350°F (175°C). Use a kitchen thermometer to monitor the temperature; this is essential for crispy, non-greasy potato balls.
- Fry the Potato Balls: Carefully lower 4-6 potato balls into the hot oil using a slotted spoon or spider. Do not overcrowd the pot, as this will lower the oil temperature and result in soggy potato balls.
- Fry for 3-5 minutes, turning occasionally, until they are evenly golden brown and crispy on all sides.
- Drain and Season: Once golden, remove the potato balls from the oil with a slotted spoon and transfer them to a wire rack set over a baking sheet lined with paper towels to drain excess oil. Immediately sprinkle lightly with a little extra salt while they are hot.
- Serve: Repeat the frying process with the remaining potato balls, ensuring the oil returns to 350°F (175°C) between batches. Serve the Crispy Golden Potato Balls warm with your favorite dipping sauce.
Cooking Tips and Variations
Achieving the Ultimate Crispiness: The secret to truly crispy potato balls lies in a few key steps. Firstly, ensure your mashed potatoes are as dry as possible before forming; steaming them for a minute or two after draining can help. Secondly, chilling the formed balls is non-negotiable – it helps them firm up and prevents them from falling apart in the hot oil. Lastly, maintain the oil temperature at a consistent 350°F (175°C). Too low, and they’ll be greasy; too high, and they’ll burn before cooking through. Fry in small batches to keep the oil temperature stable.
Preventing Soggy Potato Balls: The enemy of crispiness is moisture and excess oil. Always drain your fried potato balls on a wire rack set over paper towels immediately after removing them from the oil. This allows air to circulate around them and prevents them from sitting in their own oil. Serve them as soon as possible after frying for the best texture.
Flavor Boosters for Your Mashed Potato Base: Don’t be shy with seasoning! Besides salt, pepper, garlic, and onion powder, consider adding a pinch of smoked paprika for a subtle smokiness, a dash of cayenne pepper for a hint of heat, or finely chopped fresh parsley or dill for herbaceous notes. A tablespoon of grated Parmesan cheese mixed into the mash can also add a savory depth.
Exciting Filling Ideas: Transform these into a delightful surprise by adding a filling! Before forming the balls, take a small portion of the mashed potato, flatten it, place a small cube of cheese (cheddar, mozzarella, or even a cream cheese dollop) in the center, and then wrap the potato around it to seal. Other fillings could include a pinch of cooked, crumbled bacon, finely diced jalapeños, or even a tiny amount of seasoned ground meat. Just be sure the filling is fully enclosed to prevent leakage during frying.
Alternative Breading: While panko breadcrumbs offer superior crispiness, you can experiment with seasoned breadcrumbs for added flavor. For a gluten-free option, use gluten-free flour and gluten-free breadcrumbs. You could also try adding a tablespoon of grated Parmesan cheese to your breadcrumbs for a cheesy crust.
Serving Suggestions: These potato balls are fantastic on their own, but they truly shine with a good dipping sauce. Classic options include ketchup, sour cream, or a zesty homemade aioli. For something different, try a spicy sriracha mayo, a sweet chili sauce, or a creamy herb dip. They also make an excellent side dish for roasted chicken, grilled steak, or a hearty stew.
Baking Option (for a Lighter Version): While frying yields the crispiest result, you can bake these for a healthier alternative. After breading, place the potato balls on a baking sheet lined with parchment paper. Lightly mist or brush them with oil. Bake in a preheated oven at 400°F (200°C) for 20-25 minutes, or until golden brown and heated through, flipping halfway. Note that the texture will be less intensely crispy than fried, but still delicious.
Storage and Reheating
Make-Ahead Prep: You can prepare the mashed potato mixture and form the balls up to 24 hours in advance. After forming, either bread them immediately and place them in a single layer on a baking sheet, cover loosely with plastic wrap, and refrigerate, or store the unbreaded balls and bread right before frying. If breaded and chilled, they might require an extra minute or two in the fryer.
Storing Leftovers: Cooked potato balls are best enjoyed fresh, but leftovers can be stored in an airtight container in the refrigerator for up to 3-4 days. Be aware that the crispiness will diminish significantly upon cooling.
Reheating Tips: To restore some of their crispiness, avoid the microwave, as it will make them soggy. The best way to reheat is in an oven or air fryer. Preheat your oven to 375°F (190°C) and bake the potato balls for 10-15 minutes, or until heated through and crispy again. In an air fryer, cook at 350°F (175°C) for 5-8 minutes, shaking the basket occasionally, until hot and crisp. They won’t be quite as perfect as fresh, but still very enjoyable.
Frequently Asked Questions
Can I bake them instead of frying?
Yes, you can bake them for a lighter option, though the texture will be slightly different. After breading, place the potato balls on a parchment-lined baking sheet. Lightly spray or brush with oil. Bake in a preheated oven at 400°F (200°C) for 20-25 minutes, flipping halfway through, until golden brown. They will be crispy, but not quite as intensely crunchy as their deep-fried counterparts.
What kind of potatoes are best for this recipe?
Starchy potatoes like Russet or Idaho are ideal for making potato balls. Their high starch content results in a fluffy, dry, and light mash, which is perfect for forming balls that hold their shape and have a creamy interior. Waxy potatoes tend to be gummier when mashed, which isn’t what we want for this recipe.
How can I prevent my potato balls from falling apart in the oil?
There are a few key steps to ensure your potato balls stay intact. First, make sure your mashed potato mixture is not too wet; over-boiled or insufficiently drained potatoes can lead to a loose mixture. Second, thoroughly chill the potato mixture for at least an hour before forming the balls. This firms them up. Third, ensure a complete and even breading (flour, egg, then breadcrumbs), which acts as a protective shell. Finally, maintain the oil temperature at a consistent 350°F (175°C); oil that is too cool can cause them to absorb too much oil and disintegrate.
Can I add cheese or other fillings to the potato balls?
Absolutely! Adding fillings is a fantastic way to customize these potato balls. Before forming each ball, take a small amount of the mashed potato mixture, flatten it into a disc, place a small cube of cheese (like cheddar, mozzarella, or even a mini cream cheese ball) or a pinch of cooked bacon bits, and then carefully mold the potato around the filling to seal it completely. Be sure the filling is fully enclosed to prevent it from leaking out during frying.
Conclusion: Enjoy Your Delicious Creation!
There you have it – the complete guide to crafting your very own batch of Crispy Golden Potato Balls! From the moment you take that first bite, you’ll understand why these humble potato spheres are such a beloved treat. The satisfying crackle of the golden crust giving way to the warm, fluffy, and perfectly seasoned potato interior is an experience that’s hard to beat. They’re proof that simple ingredients can create truly extraordinary flavors and textures.
Whether you’re serving them as a show-stopping appetizer at your next gathering, a fun and flavorful snack for the family, or a unique side dish to complement any meal, these potato balls are guaranteed to be a hit. Their versatility means you can experiment with different seasonings and fillings, making each batch uniquely yours.
So go ahead, give this recipe a try! Don’t be afraid to get your hands a little messy – the delicious reward is well worth it. We’re confident that once you master these Crispy Golden Potato Balls, they’ll become a cherished addition to your recipe collection. We’d love to hear how your creations turn out, so feel free to share your experiences and any clever variations you come up with in the comments below. Happy cooking, and most importantly, happy eating!



