
Follow Me On Social Media!
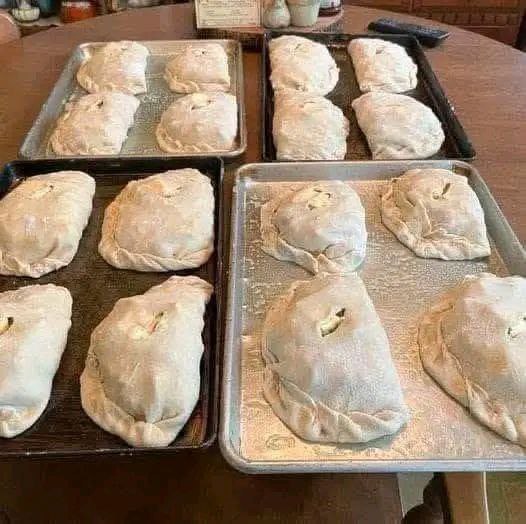
These are my husband’s favorite lunch! A couple of old school Yoopers, we make them as often as we can

Introduction
There are some tastes that immediately transport you back in time, to a specific place, or to the warmth of family tradition. For my husband and me, both old school Yoopers through and through, few things evoke that feeling quite like a freshly baked pasty. These savory hand pies aren’t just a meal; they’re a cornerstone of Upper Peninsula culture, a delicious legacy born from the rugged mining days, and for us, they’re my husband’s absolute favorite lunch. The moment that flaky crust gives way to the hearty, steaming filling of meat and vegetables, it’s like a warm hug from home, a taste of the U.P. that we cherish and recreate as often as we can.
For those unfamiliar with this Northern Michigan delicacy, a pasty (pronounced PASS-tee, not PAY-stee!) is essentially a self-contained, portable pot pie, traditionally filled with diced beef, potatoes, rutabaga, and onion, all encased in a sturdy, tender pastry crust. Historically, they were the ultimate miner’s lunch, designed to stay warm and provide sustained energy during long, cold shifts underground. The thick crust could be held by dirty hands, and the filling was a complete, balanced meal. While our mining days are long past, the pasty remains a beloved staple, a symbol of resilience, resourcefulness, and incredible flavor.
This recipe isn’t just about ingredients and steps; it’s about sharing a piece of our heritage, a culinary tradition passed down through generations. We’ve honed this recipe over years, striving for that perfect balance of a flaky yet robust crust and a deeply flavorful, moist filling. Whether you’re a fellow Yooper craving a taste of home or a curious food adventurer looking for authentic comfort food, we invite you to roll up your sleeves, embrace the spirit of the Upper Peninsula, and discover why these pasties are not just my husband’s favorite lunch, but a beloved classic for so many.
Nutritional Information
Per serving (approximate values):
- Calories: 720 kcal
- Protein: 35g
- Carbohydrates: 60g
- Fat: 38g
- Fiber: 6g
- Sodium: 680mg
Ingredients
- For the Pasty Dough:
- 4 cups all-purpose flour, plus more for dusting
- 1 teaspoon salt
- 1 cup (2 sticks) unsalted butter, very cold and cut into 1/2-inch cubes
- 1/2 cup cold vegetable shortening, cut into 1/2-inch cubes
- 3/4 to 1 cup ice water
- For the Pasty Filling:
- 1 1/2 pounds beef chuck roast, trimmed and cut into 1/2-inch cubes (or lean ground beef)
- 1 large rutabaga, peeled and cut into 1/2-inch cubes (about 2 cups)
- 2 large russet potatoes, peeled and cut into 1/2-inch cubes (about 3 cups)
- 1 large yellow onion, finely diced (about 1 1/2 cups)
- 1/4 cup unsalted butter, melted
- 1 teaspoon salt, or to taste
- 1/2 teaspoon black pepper, or to taste
- 1/4 teaspoon garlic powder (optional, but recommended)
- For Assembly:
- 1 large egg, beaten (for egg wash)
Instructions
- Prepare the Pasty Dough: In a large mixing bowl, whisk together the flour and salt. Add the cold butter and shortening. Using a pastry blender, your fingertips, or a food processor (pulsing), cut the fats into the flour until the mixture resembles coarse crumbs with some pea-sized pieces of butter remaining.
- Gradually add the ice water, 1 tablespoon at a time, mixing until the dough just comes together. Be careful not to overmix. The dough should be shaggy but hold together when squeezed. Divide the dough into 6 equal portions, flatten each into a disc, wrap tightly in plastic wrap, and refrigerate for at least 30 minutes, or up to 2 days.
- Prepare the Pasty Filling: In a very large bowl, combine the cubed beef (or ground beef), rutabaga, potatoes, and onion. Pour the melted butter over the mixture. Season generously with salt, black pepper, and garlic powder (if using). Toss gently but thoroughly to ensure all ingredients are evenly coated.
- Assemble the Pasties: Preheat your oven to 375°F (190°C). Line two large baking sheets with parchment paper.
- On a lightly floured surface, roll out one disc of dough into a roughly 10-inch circle, about 1/8-inch thick.
- Place about 1 1/2 cups of the raw filling mixture onto one half of the dough circle, leaving a 1-inch border around the edge. Make sure not to overfill.
- Brush the edges of the dough circle with a little water or egg wash. Carefully fold the other half of the dough over the filling, creating a semicircle.
- Crimp the edges tightly to seal the pasty. You can use a fork to press the edges together or use your fingers to create a decorative, rope-like crimp. Ensure there are no gaps for steam to escape from the sides.
- Cut a small slit (about 1/2-inch) in the top of each pasty to allow steam to escape during baking. This is crucial for preventing soggy pasties and ensuring even cooking.
- Carefully transfer the assembled pasty to the prepared baking sheet. Repeat with the remaining dough and filling.
- Bake the Pasties: Brush the tops of the pasties with the beaten egg wash.
- Bake for 50-60 minutes, or until the crust is deeply golden brown and the filling is tender. If the crust starts to brown too quickly, you can loosely tent the pasties with aluminum foil.
- Remove from the oven and let rest on the baking sheets for 10-15 minutes before serving. This allows the juices to redistribute and prevents the filling from spilling out when cut.
Cooking Tips and Variations
Dough Consistency is Key: For the flakiest crust, ensure your butter and shortening are very cold. Don’t overwork the dough, as this develops gluten and can make it tough. The less you handle it, the more tender your pasties will be. If using a food processor, pulse just until the mixture is crumbly, then add water by hand.
Uniform Chopping: Cut all filling ingredients (meat, rutabaga, potatoes, onion) into similar-sized 1/2-inch cubes. This ensures they cook evenly and are tender by the time the crust is perfectly golden. This is especially important for the rutabaga, which can be tougher than potatoes.
The Rutabaga Factor: While some variations omit rutabaga, it’s a non-negotiable for an authentic Yooper pasty. Its slightly bitter, earthy flavor perfectly complements the richness of the meat and potatoes. Don’t skip it!
Fat in the Filling: Don’t be shy with the melted butter in the filling. As the pasty bakes, the fat renders, moistening the filling and creating that rich, savory flavor that soaks into the vegetables. Some traditional recipes even use suet (beef fat) for an even richer taste.
Crimping for Success: A tight crimp is essential to seal in all the delicious juices. If the pasty leaks during baking, the crust can become soggy. Practice makes perfect, but a fork is a foolproof way to ensure a good seal.
Serving Suggestions: While some eat pasties plain, the classic Yooper way is often with a dollop of ketchup or, for the truly traditional, a side of rich beef gravy. Pickles or a simple coleslaw make a great accompaniment to cut through the richness.
Meat Variations: While beef chuck or lean ground beef is traditional, you can experiment with venison or a mix of beef and pork for a different flavor profile. For a vegetarian option, swap the meat for mushrooms, lentils, or a hearty mix of root vegetables like carrots and parsnips, adjusting cooking time as needed.
Spice it Up: Feel free to add a pinch of dried thyme or a dash of Worcestershire sauce to the filling for an extra layer of savory depth.
Storage and Reheating
Cool Completely: Allow baked pasties to cool completely on a wire rack before storing. This prevents condensation from making the crust soggy.
Refrigeration: Store leftover baked pasties in an airtight container in the refrigerator for up to 3-4 days.
Freezing Baked Pasties: Once completely cooled, wrap individual pasties tightly in plastic wrap, then in aluminum foil. Place them in a freezer-safe bag or container. They can be frozen for up to 3 months.
Freezing Unbaked Pasties: Assemble the pasties up to the point of brushing with egg wash. Place them on a parchment-lined baking sheet and freeze until solid. Once frozen, transfer them to a freezer-safe bag, separating layers with parchment paper. Freeze for up to 3 months. When ready to bake, brush with egg wash and bake from frozen at 375°F (190°C) for 60-75 minutes, or until golden brown and cooked through. You may need to tent them with foil to prevent over-browning.
Reheating from Refrigerator: For best results, reheat pasties in a preheated oven or toaster oven at 300-350°F (150-175°C) for 15-20 minutes, or until heated through and the crust is crisp. Microwaving is possible but will result in a softer crust.
Reheating from Frozen: Reheat frozen baked pasties in a preheated oven at 350°F (175°C) for 30-40 minutes, or until heated through. For a crispier crust, you can finish with a few minutes at a higher temperature.
Frequently Asked Questions
What is the difference between a pasty and a pot pie?
While both contain a savory filling encased in pastry, a pasty is a handheld, individual serving, completely enclosed in crust, designed to be eaten on the go. A pot pie is typically baked in a dish and often has a crust only on top (or sometimes top and bottom), requiring a fork and plate to eat.
Can I make pasties ahead of time?
Absolutely! Pasties are excellent for meal prep. You can prepare the dough and filling a day or two in advance. You can also assemble and freeze them unbaked, or bake them and then freeze for quick meals later. See our storage and reheating tips for detailed instructions.
Why did my pasty crust turn out soggy?
A soggy crust can be caused by several factors. Ensure your filling isn’t too wet; drain any excess liquid if necessary. Make sure to cut a vent hole in the top of the pasty to allow steam to escape during baking. Overcrowding the baking sheet can also trap steam. Finally, ensure your oven is at the correct temperature and the pasties are baked until deeply golden brown, indicating a fully cooked and crisp crust.



