
Follow Me On Social Media!
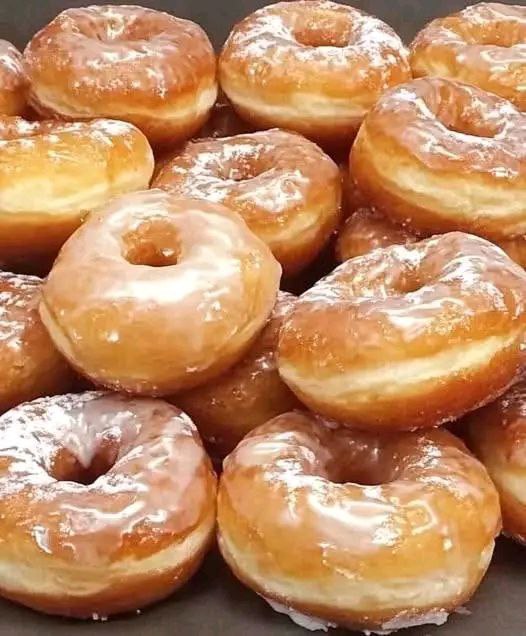
Homemade Krispy Kremes Style Donuts

Introduction
Imagine biting into a cloud-light, melt-in-your-mouth donut, still warm from the fryer, with a glistening, sweet glaze that shatters delicately with each bite. That’s the magic of a Krispy Kreme style donut, and today, we’re bringing that enchantment right into your kitchen! For decades, the iconic “Hot Now” sign has beckoned donut lovers to experience this unique confection. Their signature yeast-raised donuts are legendary for their impossibly airy texture and that perfectly thin, sweet glaze that seems to dissolve on your tongue.
Many believe that achieving this level of donut perfection at home is an impossible feat, a closely guarded secret reserved for professional bakers. But we’re here to tell you that it’s not only possible but incredibly rewarding! With a few key techniques and a little patience, you can recreate that beloved Krispy Kreme experience, filling your home with the intoxicating aroma of freshly fried dough and sweet vanilla. Forget those dense, cakey imposters; we’re talking about true yeast-raised masterpieces that are light as air, fluffy, and utterly irresistible.
This recipe will guide you through every step, from activating the yeast to achieving that perfect golden-brown fry and, of course, that signature, almost transparent glaze. Prepare to impress your family and friends, and perhaps even start your own “Hot Now” tradition right in your own home. Get ready to embark on a delicious journey that culminates in the ultimate homemade donut experience!
What Makes Them “Krispy Kreme Style”?
The allure of a Krispy Kreme style donut lies in its distinctive characteristics, setting it apart from other donuts. First and foremost is the texture: an incredibly light, fluffy, and airy interior, almost like a sweet cloud. This isn’t a dense, crumbly cake donut; it’s a true yeast-raised donut, which means the dough undergoes a fermentation process that creates those wonderful air pockets. The exterior is delicately crisp from the frying, providing a subtle contrast to the tender inside. You’ll often notice a pale “white ring” around the middle of a perfectly fried donut, a tell-tale sign that it has been properly proofed and fried at the correct temperature, indicating a light, airy crumb.
Then there’s the glaze – the crown jewel of the Krispy Kreme experience. It’s a thin, sweet, almost translucent sugar glaze that coats the donut without overpowering it. The magic happens when this glaze is applied to the donuts while they are still warm, allowing it to melt slightly, absorb into the surface, and create that iconic shiny, slightly crackled finish. This warm glazing process is crucial for achieving that melt-in-your-mouth sensation and ensuring the glaze adheres perfectly. The flavor is sweet, yeasty, and deeply comforting, a simple yet profound combination that has won hearts worldwide.
Gathering Your Tools & Ingredients
To embark on your homemade donut adventure, having the right tools and ingredients is essential. Don’t worry, most of these are standard kitchen items, but a few specialized pieces can make a big difference in achieving professional results.
Essential Equipment List:
- Stand Mixer with Dough Hook Attachment: While you can knead by hand, a stand mixer makes the dough process much easier and more consistent.
- Large Mixing Bowls: For dough rising.
- Deep, Heavy-Bottomed Pot or Dutch Oven: Ideal for deep frying, as it helps maintain a consistent oil temperature.
- Deep-Fry Thermometer: Absolutely crucial for monitoring oil temperature. This is non-negotiable for perfectly fried donuts.
- Donut Cutter (with a hole in the middle): For classic ring-shaped donuts. A biscuit cutter and a small round cutter (like a piping tip) can be improvised.
- Slotted Spoon or Spider Skimmer: For safely removing donuts from hot oil.
- Wire Cooling Racks: For draining excess oil and cooling donuts before glazing. Place them over baking sheets to catch drips.
- Baking Sheets: For proofing cut donuts and catching glaze drips.
- Pastry Brush (optional): For oiling bowls or brushing off excess flour.
Ingredient Breakdown:
Each ingredient plays a vital role in creating the perfect Krispy Kreme style donut:
- All-Purpose Flour: The structural backbone of the donut. Using a good quality, unbleached all-purpose flour will yield the best results.
- Active Dry Yeast: The leavening agent that makes these donuts light and airy. Fresh, active yeast is key to a good rise.
- Granulated Sugar: Sweetens the dough and provides food for the yeast, aiding in fermentation.
- Whole Milk: Adds richness and moisture to the dough. Warm milk (not hot!) is used to activate the yeast.
- Unsalted Butter: Contributes to the tender crumb and rich flavor of the donuts.
- Large Eggs: Add richness, color, and help with the dough’s structure and elasticity.
- Salt: Balances the sweetness and enhances the overall flavor of the dough.
- Vanilla Extract: A crucial flavor enhancer for both the dough and the glaze. Use good quality pure vanilla extract.
- Vegetable Shortening or Neutral Frying Oil (e.g., Canola, Peanut, Vegetable Oil): For deep frying. Shortening often results in a slightly less greasy finish, but neutral oil works well.
- Powdered Sugar (Confectioners’ Sugar): The base for our signature thin glaze. It dissolves easily for a smooth consistency.
Nutritional Information
Per serving (approximate values):
- Calories: 280-350
- Protein: 4-6g
- Carbohydrates: 35-45g
- Fat: 15-25g
- Fiber: 1-2g
- Sodium: 150-250mg
Ingredients
- 2 ¼ teaspoons (1 packet) active dry yeast
- ½ cup warm whole milk (105-115°F / 40-46°C)
- ¼ cup granulated sugar, divided
- 2 ½ cups all-purpose flour, plus more for dusting
- ½ teaspoon salt
- 2 large eggs, at room temperature
- ¼ cup (½ stick) unsalted butter, melted and cooled slightly
- 1 teaspoon vanilla extract
- 6-8 cups vegetable shortening or neutral frying oil, for frying
- 2 cups powdered sugar
- ¼ cup warm water or milk
- ½ teaspoon vanilla extract
Instructions
- Activate the Yeast: In the bowl of a stand mixer, combine the warm milk, yeast, and 1 tablespoon of the granulated sugar. Stir gently and let sit for 5-10 minutes until foamy. This indicates the yeast is active.
- Prepare the Dough: To the yeast mixture, add the remaining granulated sugar, flour, salt, eggs, melted butter, and 1 teaspoon vanilla extract. Attach the dough hook.
- Knead the Dough: Mix on low speed for 2 minutes until a shaggy dough forms. Increase speed to medium-low and knead for 8-10 minutes. The dough should be smooth, elastic, and slightly sticky but should pull away from the sides of the bowl.
- First Rise (Bulk Fermentation): Lightly grease a large bowl. Transfer the dough to the greased bowl, turning once to coat. Cover the bowl tightly with plastic wrap or a clean kitchen towel. Place in a warm, draft-free place for 1 to 1.5 hours, or until doubled in size.
- Roll and Cut the Dough: Once risen, gently punch down the dough to release the air. Lightly flour a clean work surface. Roll the dough out to about ½-inch thickness. Using a 3-inch donut cutter, cut out donuts and donut holes. Reroll scraps gently, let rest for 5 minutes, then cut more donuts.
- Second Rise (Proofing): Line two baking sheets with parchment paper and lightly flour them. Carefully transfer the cut donuts and donut holes to the prepared baking sheets, leaving some space between each. Cover loosely with plastic wrap or a clean kitchen towel. Let rise in a warm, draft-free place for 30-45 minutes, or until visibly puffy and almost doubled in size. This is crucial for their airiness.
- Prepare for Frying: While the donuts are proofing, pour the frying oil into your deep, heavy-bottomed pot or Dutch oven. The oil should be 3-4 inches deep. Heat the oil over medium heat until it reaches 350°F (175°C) on your deep-fry thermometer.
- Fry the Donuts: Carefully lower 2-3 donuts into the hot oil using a slotted spoon or spider skimmer. Do not overcrowd the pot, as this will lower the oil temperature. Fry for 60-90 seconds per side, until golden brown. The donuts should puff up nicely and develop a pale “white ring” around their middle.
- Drain the Donuts: Once golden brown on both sides, remove the donuts from the oil with the slotted spoon, allowing excess oil to drip off. Transfer them to a wire cooling rack placed over a baking sheet to drain further. Fry the remaining donuts and donut holes in batches, ensuring the oil temperature stays consistent between batches.
- Make the Glaze: While the donuts are still warm (but not piping hot), prepare the glaze. In a medium bowl, whisk together the powdered sugar, ¼ cup warm water or milk, and ½ teaspoon vanilla extract until smooth and free of lumps. The glaze should be thin enough to drip but thick enough to coat the back of a spoon. Add more liquid a teaspoon at a time if too thick, or more powdered sugar if too thin.
- Glaze the Donuts: Dip each warm donut into the glaze, turning to coat both sides. Let any excess glaze drip off, then return the glazed donuts to the wire cooling rack to set. For an extra Krispy Kreme touch, you can dust some with additional powdered sugar once the glaze has set slightly.
- Serve Immediately: Serve your homemade Krispy Kreme style donuts warm and enjoy the pure delight!
Cooking Tips and Variations
Achieving donut perfection requires attention to detail, but a few tricks can make all the difference:
- Yeast Activation is Key: Ensure your milk is the right temperature (105-115°F / 40-46°C). Too cold, and the yeast won’t activate; too hot, and it will kill the yeast. If your yeast doesn’t foam after 10 minutes, start over with fresh yeast.
- Don’t Over-Flour: A slightly sticky dough is a good thing for light, airy donuts. Resist the urge to add too much extra flour during kneading or rolling.
- Patience with Proofing: The two rising stages are crucial. Don’t rush them. A warm, draft-free spot (like a slightly warm oven that’s been turned off) is ideal. Properly proofed donuts will be light and airy; under-proofed ones will be dense.
- Oil Temperature is Critical: Invest in a deep-fry thermometer. If the oil is too cool, the donuts will absorb too much oil and be greasy. If it’s too hot, they’ll brown too quickly on the outside and be raw in the middle. Maintain 350°F (175°C) for best results.
- Don’t Overcrowd the Fryer: Frying too many donuts at once will cause the oil temperature to drop significantly, leading to greasy donuts. Fry in small batches.
- Glaze While Warm: This is the secret to that classic Krispy Kreme sheen. The warmth of the donut helps the thin glaze melt slightly and adhere beautifully.
Variations:
- Chocolate Glaze: Whisk together 1 ½ cups powdered sugar, ¼ cup unsweetened cocoa powder, 3 tablespoons warm milk, and ½ teaspoon vanilla extract until smooth.
- Maple Glaze: Substitute 2 tablespoons of the liquid in the glaze with pure maple syrup for a delicious maple flavor.
- Sprinkles: Add colorful sprinkles immediately after glazing for a festive touch, especially on donut holes.
- Powdered Sugar Donuts: For a simple variation, skip the wet glaze and simply toss the warm donuts in a bag with powdered sugar.
Storage and Reheating
Homemade donuts, especially Krispy Kreme style, are truly at their best when enjoyed fresh and warm, right after they’ve been glazed. The light, airy texture and delicate glaze are unparalleled in this state.
If you have any leftovers, which is a rare occurrence, here are some tips:
- Short-Term Storage: Store donuts in an airtight container at room temperature for up to 1-2 days. While they won’t be as light and fluffy as fresh, they will still be delicious. Avoid refrigerating them, as this can dry them out and make them stale faster.
- Reheating: To bring some life back to day-old donuts, you can gently warm them. Place them on a microwave-safe plate and microwave for 10-15 seconds. Be careful not to overheat, as this can make the glaze melt completely and the donut tough. Alternatively, you can warm them in a preheated oven at 275°F (135°C) for 5-7 minutes, until just warmed through.
Frequently Asked Questions
What if my dough isn’t rising?
There are a few common culprits. First, check your yeast. It might be expired or inactive. Make sure your milk was the correct temperature (105-115°F); too hot kills the yeast, too cold doesn’t activate it. Also, ensure your proofing environment is warm and draft-free. Patience is key; sometimes dough just needs a little more time.
Why are my donuts greasy?
Greasy donuts are almost always a sign that your frying oil was not hot enough. When the oil temperature drops below 350°F (175°C), the donuts absorb more oil instead of cooking quickly on the outside. Use a deep-fry thermometer and maintain the oil temperature between 350-360°F (175-182°C). Also, avoid overcrowding the pot, which can lower the oil temperature.
Can I make these donuts ahead of time?
While best fresh, you can prepare the dough the night before. After the first rise, punch down the dough, cover it tightly, and refrigerate overnight. The next morning, let the dough come to room temperature for about 30 minutes, then proceed with rolling, cutting, and the second rise. You can also fry the donuts ahead of time, let them cool completely, and then glaze them just before serving after a quick warm-up.
My glaze is too thin/too thick. How do I fix it?
The glaze consistency is easily adjustable. If your glaze is too thin and runny, whisk in a tablespoon or two more of powdered sugar until it reaches the desired consistency. If it’s too thick and clumpy, add warm water or milk, a teaspoon at a time, whisking well after each addition, until it’s smooth and pourable yet still coats the back of a spoon.



