
Follow Me On Social Media!
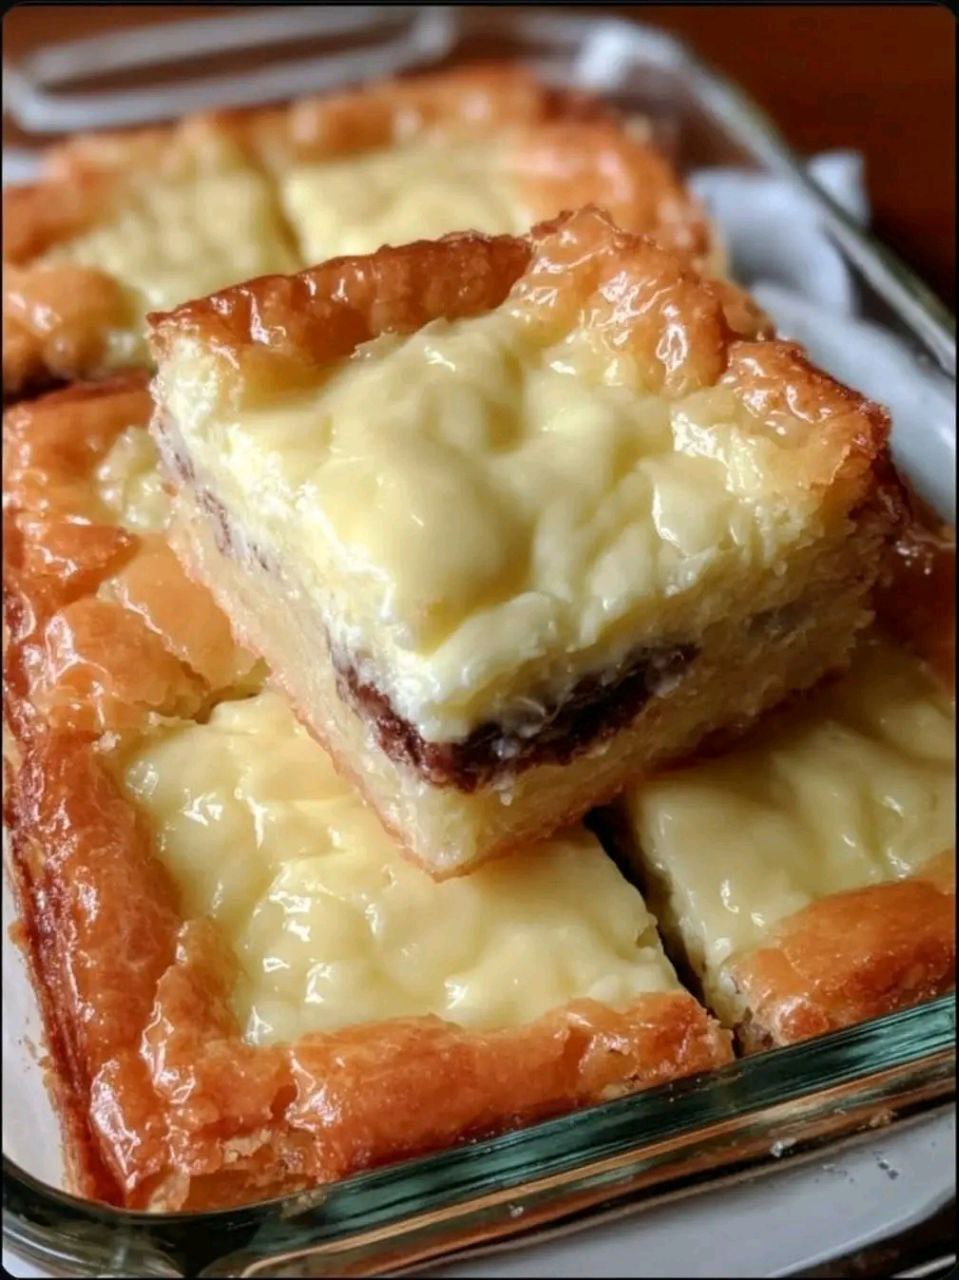
Chewy Gooey Bars The Ultimate Sweet Treat That Lives Up to Its Name

Introduction
Prepare your taste buds for an unforgettable journey into the realm of pure, unadulterated sweetness and textural bliss. We’re talking about Chewy Gooey Bars – a dessert so aptly named, it practically sings its own praises. Imagine sinking your teeth into a perfectly crafted square: first, a delicate resistance from a golden, buttery crust, then a yielding embrace from a luscious, melt-in-your-mouth filling, and finally, a delightful surprise of a rich, hidden layer that ties it all together. These aren’t just bars; they’re an experience, a symphony of textures and flavors designed to satisfy every sweet craving you never knew you had.
What makes these Chewy Gooey Bars the “ultimate” sweet treat? It’s their uncanny ability to deliver on every promise. The chewiness isn’t just an afterthought; it’s a foundational characteristic, embedded in the very structure of the bar. The gooeyness? Oh, it’s legendary – a warm, yielding center that practically oozes with decadent flavor, creating a delightful contrast with the slightly firmer crust. They’re incredibly easy to make, yet they present like a gourmet pastry, making them an instant crowd-pleaser for potlucks, parties, or simply a cozy night in. This dessert effortlessly marries simplicity with sophistication, proving that sometimes, the most profoundly satisfying treats are born from straightforward ingredients and a dash of culinary magic.
These bars are more than just a dessert; they’re a celebration of indulgence. Each bite offers a harmonious blend of sweet, rich, and comforting notes. The distinct layers – a sturdy base, a decadent filling, and a surprise middle – work in concert to create a complex flavor profile that belies their humble origins. Whether you’re a seasoned baker or a kitchen novice, you’ll find joy in bringing these Chewy Gooey Bars to life. They’re resilient, forgiving, and guaranteed to earn you rave reviews. Get ready to discover your new favorite sweet obsession, because once you taste these, there’s no going back.
Nutritional Information
Per serving (approximate values):
- Calories: 350-400
- Protein: 4-6g
- Carbohydrates: 45-55g
- Fat: 18-25g
- Fiber: 1-2g
- Sodium: 150-200mg
Ingredients
For the Crust:
- 1 ½ cups (180g) all-purpose flour
- ½ cup (100g) granulated sugar
- ¼ teaspoon salt
- ¾ cup (1 ½ sticks or 170g) unsalted butter, melted
For the Middle Layer (Chocolate/Fudge Layer):
- 1 cup (170g) semi-sweet chocolate chips
- ½ cup (100g) granulated sugar
- ¼ cup (55g) unsalted butter, melted
- 1 large egg
- 1 teaspoon vanilla extract
- ¼ teaspoon salt
For the Gooey Filling:
- 8 ounces (226g) cream cheese, softened
- 1 (14-ounce/397g) can sweetened condensed milk
- 1 large egg yolk
- 1 teaspoon vanilla extract
- ¼ teaspoon salt
Instructions
- Prepare Your Baking Dish: Preheat your oven to 350°F (175°C). Line a 9×13-inch baking dish with parchment paper, leaving an overhang on the longer sides. This will make it incredibly easy to lift the bars out later. Lightly grease the parchment paper for extra non-stick insurance.
- Make the Crust: In a medium bowl, combine the all-purpose flour, ½ cup granulated sugar, and ¼ teaspoon salt. Pour in the ¾ cup melted butter and mix with a fork or your hands until coarse crumbs form and the mixture is evenly moistened. Press this mixture firmly and evenly into the bottom of the prepared 9×13-inch baking dish. Use the back of a spoon or your fingers to create a compact, flat layer.
- Partially Bake the Crust: Place the baking dish with the crust into the preheated oven and bake for 12-15 minutes, or until the edges are lightly golden. This partial bake helps ensure a crisp crust that won’t be soggy. Remove from the oven and set aside while you prepare the other layers. Keep the oven on.
- Prepare the Middle Layer (Chocolate/Fudge): While the crust is baking, melt the semi-sweet chocolate chips. You can do this in a microwave-safe bowl in 30-second intervals, stirring between each, until smooth, or over a double boiler. Once melted, set aside to cool slightly. In another medium bowl, whisk together the ½ cup granulated sugar, ¼ cup melted butter, 1 large egg, 1 teaspoon vanilla extract, and ¼ teaspoon salt until well combined. Stir in the slightly cooled melted chocolate until the mixture is smooth and uniform. This creates a rich, fudgy layer.
- Spread the Middle Layer: Carefully pour and spread the chocolate mixture evenly over the partially baked crust. Use an offset spatula or the back of a spoon to ensure it covers the entire surface of the crust.
- Prepare the Gooey Filling: In a large bowl, using an electric mixer (handheld or stand mixer with paddle attachment), beat the softened cream cheese on medium speed until smooth and creamy, about 1-2 minutes. Scrape down the sides of the bowl as needed. Gradually add the sweetened condensed milk, mixing until just combined. Be careful not to overmix. Beat in the egg yolk, vanilla extract, and ¼ teaspoon salt until the mixture is smooth and uniform.
- Assemble the Bars: Gently pour the gooey cream cheese filling over the chocolate layer in the baking dish. Use an offset spatula to carefully spread it evenly to the edges.
- Bake to Gooey Perfection: Return the baking dish to the preheated oven. Bake for 30-35 minutes, or until the edges are set and a very slight golden color, but the center still has a noticeable jiggle when gently shaken. This jiggle is key to achieving that ultimate gooey texture. Do not overbake, or the bars will be less gooey.
- Cool Completely: This is a crucial step! Remove the baking dish from the oven and place it on a wire rack to cool completely at room temperature. This will take at least 2-3 hours. For the cleanest cuts and best texture, it’s highly recommended to refrigerate the bars for an additional 2-4 hours (or even overnight) once they’ve cooled to room temperature. Chilling allows all the layers to firm up and meld beautifully.
- Slice and Serve: Once completely chilled, use the parchment paper overhang to lift the entire slab of bars out of the baking dish. Place it on a cutting board. Using a sharp knife (dip it in hot water and wipe clean between cuts for extra neatness), cut the bars into desired squares or rectangles. Serve and enjoy the ultimate chewy, gooey experience!
Cooking Tips and Variations
For the best Chewy Gooey Bars that truly live up to their name, attention to a few details can make all the difference. Firstly, do not overbake! This is the most critical tip for achieving that signature gooey texture. The center should still have a slight jiggle when you remove it from the oven; it will continue to set as it cools. Overbaking will result in a firmer, more cake-like bar, losing that delightful goo. Secondly, ensure your cream cheese is truly softened before mixing the gooey filling. Cold cream cheese will result in lumps and a less smooth texture. Take it out of the fridge at least an hour before you plan to use it, or gently soften it in the microwave for 10-15 seconds. Thirdly, cooling and chilling are non-negotiable for clean cuts and optimal taste. While it’s tempting to dive in warm, allowing the bars to cool completely at room temperature and then chilling them in the refrigerator for several hours (or overnight) allows the layers to firm up and the flavors to meld beautifully. This patience is rewarded with perfectly structured, irresistibly gooey squares.
When it comes to variations, these Chewy Gooey Bars are incredibly versatile. To enhance the chocolate layer, consider adding a pinch of espresso powder to the chocolate mixture – it deepens the cocoa flavor without making it taste like coffee. For a nutty twist, sprinkle a ½ cup of chopped pecans or walnuts over the chocolate layer before adding the gooey topping. If you’re a fan of fruit, a thin layer of raspberry or cherry preserves can be spread over the partially baked crust before the chocolate layer, adding a burst of tartness that beautifully complements the sweetness. For an extra decadent touch, try drizzling melted white chocolate or caramel over the cooled bars before serving. You can also experiment with different extracts in the gooey filling; almond extract instead of vanilla offers a unique flavor profile, or a touch of orange zest can brighten the entire bar. For a holiday spin, add a teaspoon of pumpkin pie spice to the gooey filling and a sprinkle of cinnamon on top.
Storage and Reheating
Proper storage is key to maintaining the delicious texture and freshness of your Chewy Gooey Bars. Once completely cooled and cut, store the bars in an airtight container at room temperature for up to 2-3 days. For longer freshness, or if your kitchen is particularly warm, it’s best to store them in the refrigerator. In the fridge, they will stay fresh for up to 5-7 days. When storing in layers, place a sheet of parchment paper between the bars to prevent them from sticking together. While they are delightful chilled, many people prefer them at room temperature or slightly warmed. If you’re storing them in the refrigerator, allow them to come to room temperature for about 30 minutes before serving for the best gooey experience, or gently warm them.
For reheating, if you prefer your bars warm and extra gooey, you have a couple of options. To reheat individual bars, place one on a microwave-safe plate and microwave on high for 10-15 seconds. Be careful not to overheat, as this can dry them out. The goal is just to warm the center and bring back that lovely gooeyness. Alternatively, you can warm a few bars in a preheated oven at 250°F (120°C) for about 5-10 minutes, or until just warmed through. This method can help maintain a slightly crispy crust while warming the interior. These bars also freeze beautifully. Wrap individual bars tightly in plastic wrap, then place them in a freezer-safe bag or container. They can be frozen for up to 2-3 months. Thaw frozen bars overnight in the refrigerator or at room temperature for a few hours before serving, then warm as desired.
Frequently Asked Questions
What if my bars aren’t gooey enough?
The most common reason for bars not being gooey is overbaking. The center should still have a noticeable jiggle when you remove them from the oven. They will continue to set as they cool. If you baked them too long, they might be firmer. For future batches, reduce the baking time by 5-7 minutes. Also, ensuring your oven temperature is accurate with an oven thermometer can help prevent overbaking.
Can I make these bars gluten-free?
Yes, you can! For the crust, simply substitute the all-purpose flour with a 1:1 gluten-free baking flour blend that contains xanthan gum. No other changes should be necessary for the crust. The other layers are naturally gluten-free. Always double-check ingredient labels, especially for chocolate chips, to ensure they are certified gluten-free if cross-contamination is a concern.
Why did my crust turn out hard or dry?
A hard or dry crust can be due to several factors. First, ensure you’re using the correct amount of melted butter; it’s crucial for binding and moisture. Second, pressing the crust too firmly into the pan can result in a very dense, hard texture. While you want it compact, avoid excessive force. Lastly, overbaking the crust during its initial bake can also dry it out. Aim for just a light golden color before adding the other layers.
Can I use different types of chocolate for the middle layer?
Absolutely! While semi-sweet chocolate chips provide a classic flavor, you can experiment with milk chocolate chips for a sweeter, creamier middle layer, or dark chocolate chips (60-70% cocoa) for a more intense, slightly bitter contrast. You could also use chopped chocolate bars for a richer mouthfeel. Avoid using unsweetened baking chocolate without adjusting the sugar content in that layer, as it would be too bitter.



