Follow Me On Social Media!
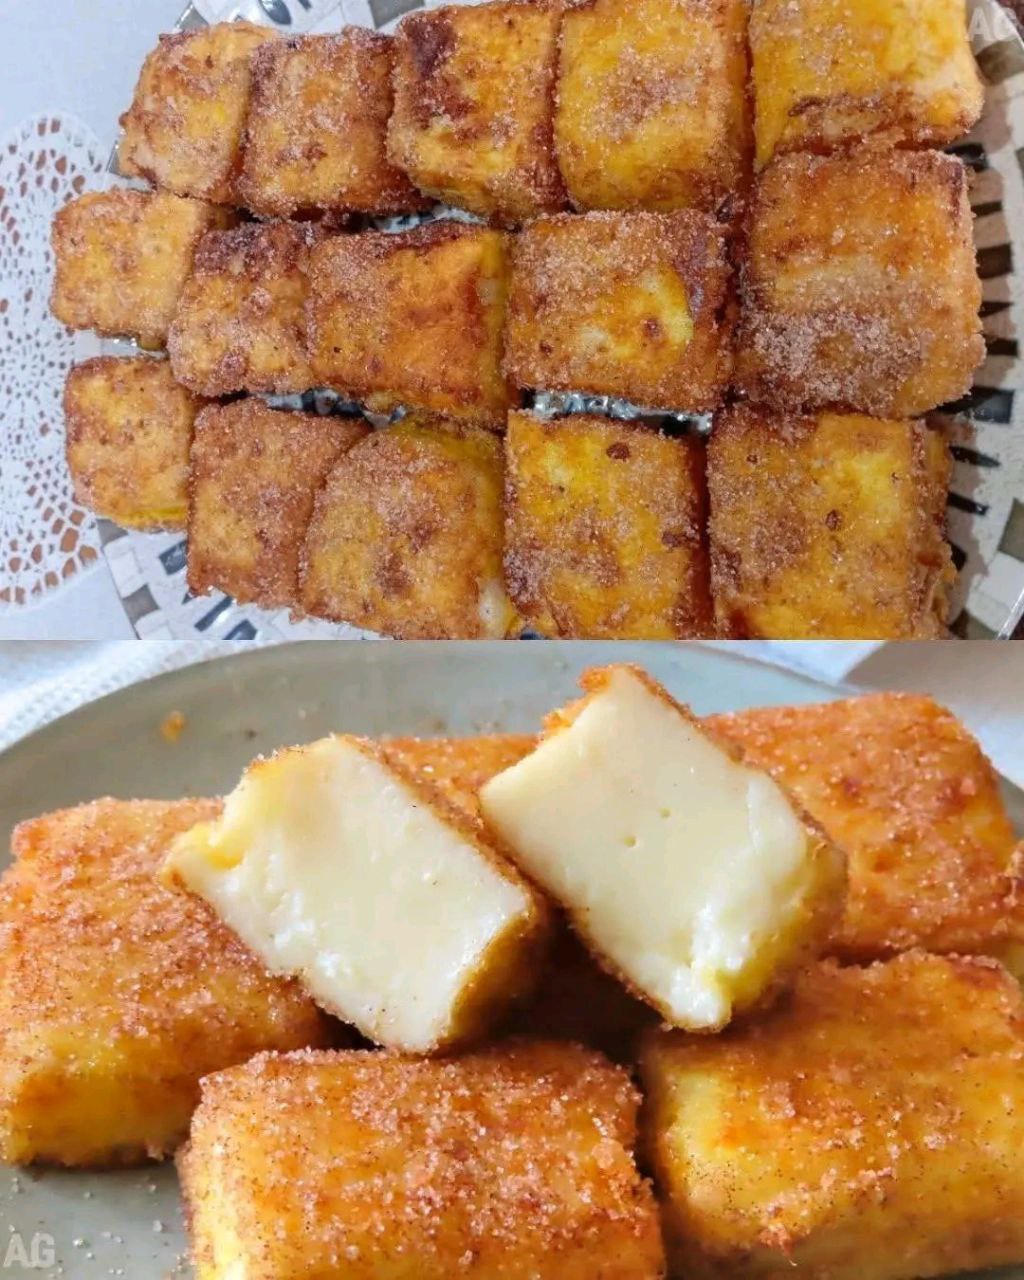
Fried Milk

Introduction
Prepare to have your dessert perceptions delightfully shattered! Fried Milk, a dish that sounds like an oxymoron, is in fact a culinary revelation. Imagine a golden, crispy exterior giving way to a warm, unbelievably creamy, and sweet custard-like interior that simply melts in your mouth. This isn’t just a dessert; it’s an experience, offering a comforting flavor profile often enhanced with vanilla and cinnamon, making it a truly unique and irresistible treat.
While its exact origins are debated, Fried Milk boasts a rich heritage, particularly in Spanish cuisine as “Leche Frita” and in various forms across Asia, notably as a popular dessert in Chinese dim sum. Regardless of its birthplace, the allure of Fried Milk lies in its unexpected textures and straightforward, yet profoundly satisfying, taste. It’s a dish that consistently surprises and delights, proving that some of the most innovative creations come from simple, wholesome ingredients transformed through clever techniques.
You’ll fall in love with this recipe because it’s surprisingly approachable for such an impressive dessert. It allows home cooks to create something truly special with a modest list of ingredients. The preparation involves a delightful two-stage process: first, crafting a silky-smooth milk pudding, chilling it until firm, and then, the exciting transformation as it gets coated and fried to golden perfection. The result is a dessert that’s not only delicious but also a fantastic conversation starter, perfect for impressing guests or simply treating yourself to an extraordinary sweet escape.
Nutritional Information
Per serving (approximate values, based on 10 servings):
- Calories: 320 kcal
- Protein: 7g
- Carbohydrates: 40g
- Fat: 15g
- Fiber: 1g
- Sodium: 120mg
Ingredients
For the Creamy Milk Base:
- 4 cups whole milk
- 1/2 cup granulated sugar, plus 2 tablespoons
- 1/2 cup cornstarch
- 4 large egg yolks
- 1 teaspoon vanilla extract
- 1 cinnamon stick (optional, for infusing)
- 1 strip lemon zest (optional, for infusing)
For the Crispy Coating:
- 1 cup all-purpose flour
- 2 large eggs, beaten
- 1 1/2 cups Panko breadcrumbs (or regular breadcrumbs)
For Frying & Finishing:
- 4-6 cups vegetable oil (or other neutral-flavored, high smoke point oil) for frying
- 1/4 cup granulated sugar, for dusting
- 1 teaspoon ground cinnamon, for dusting
Instructions
Part 1: Making the Milk Pudding
- In a large, heavy-bottomed saucepan, combine 3 1/2 cups of the whole milk with 1/2 cup granulated sugar. If using, add the cinnamon stick and lemon zest.
- Heat the milk mixture over medium heat, stirring occasionally, until it just begins to simmer and steam. Do not let it boil vigorously. Remove from heat and, if using, remove and discard the cinnamon stick and lemon zest.
- In a separate medium bowl, whisk together the remaining 1/2 cup whole milk, 2 tablespoons granulated sugar, cornstarch, and egg yolks until smooth and no lumps remain. This creates a slurry.
- Slowly pour about half of the warm milk mixture into the cornstarch-egg yolk slurry, whisking constantly to temper the eggs. This prevents the eggs from scrambling.
- Pour the tempered egg mixture back into the saucepan with the remaining warm milk.
- Return the saucepan to medium-low heat. Cook, whisking constantly and vigorously, especially scraping the bottom and corners of the pan, until the mixture thickens considerably into a very thick pudding-like consistency. This usually takes 5-8 minutes. It should be thick enough to hold its shape when a spoon is drawn through it. Do not stop whisking, or it will scorch and become lumpy.
- Remove from heat and stir in the vanilla extract.
- Lightly grease an 8×8 inch (or similar sized) baking dish with a neutral oil or cooking spray. Line the bottom with parchment paper, leaving an overhang on two sides for easy removal.
- Pour the hot milk pudding into the prepared dish, spreading it evenly with a spatula.
- Cover the surface of the pudding directly with plastic wrap to prevent a skin from forming.
- Refrigerate for at least 4 hours, or preferably overnight, until the pudding is completely firm and chilled.
Part 2: Preparing for Frying
- Once the milk pudding is thoroughly chilled and firm, use the parchment paper overhang to lift it out of the dish and onto a cutting board.
- Using a sharp knife, trim the edges if desired, then cut the pudding into desired shapes. Popular choices are squares (about 1.5-2 inches), rectangles, or even triangles. You should get approximately 10-12 pieces.
- Set up a dredging station: Place the all-purpose flour in a shallow dish, the beaten eggs in another shallow dish, and the Panko breadcrumbs in a third shallow dish.
- Working with one piece of milk pudding at a time, first dredge it lightly in the flour, shaking off any excess.
- Next, dip the floured piece into the beaten egg, ensuring it’s fully coated. Let any excess egg drip off.
- Finally, transfer the egg-coated piece to the breadcrumbs, pressing gently to ensure a thorough and even coating on all sides. Repeat with all remaining pieces. Place the coated pieces on a plate or baking sheet.
Part 3: Frying the Milk
- In a deep, heavy-bottomed pot or Dutch oven, pour enough vegetable oil to reach a depth of about 2-3 inches.
- Heat the oil over medium-high heat until it reaches a temperature of 350-375°F (175-190°C). Use a kitchen thermometer for accuracy. If you don’t have a thermometer, you can test the oil by dropping a small pinch of breadcrumbs in; they should sizzle and turn golden in about 30 seconds.
- Carefully place a few coated milk pudding pieces into the hot oil, making sure not to overcrowd the pan. Fry in batches to maintain the oil temperature and ensure even cooking.
- Fry for 2-3 minutes per side, or until golden brown and crispy all over.
- Using a slotted spoon or spider, carefully remove the fried milk pieces from the oil and transfer them to a plate lined with paper towels to drain any excess oil.
- Repeat with the remaining batches, allowing the oil to come back up to temperature between batches if necessary.
Part 4: Finishing Touches
- In a small bowl, combine the 1/4 cup granulated sugar and 1 teaspoon ground cinnamon.
- While the fried milk pieces are still warm, gently toss or sprinkle them generously with the cinnamon sugar mixture.
- Serve immediately and enjoy the incredible contrast of crispy exterior and creamy interior!
Cooking Tips and Variations
For the richest, most decadent fried milk, always opt for whole milk. Its higher fat content contributes significantly to the creamy texture and flavor of the pudding. Don’t skimp on the chilling time for the milk pudding; it’s absolutely crucial for the pudding to firm up properly so it can be cut and handled without falling apart during dredging and frying. An undermilled pudding will lead to frustration and a messy outcome. When making the pudding, consistent and vigorous whisking is your best friend. This prevents lumps from forming and ensures a silky-smooth custard. Pay extra attention to the bottom and corners of the pan where the mixture tends to stick and scorch. The oil temperature is paramount for perfect fried milk. If the oil isn’t hot enough, the coating will absorb too much oil, resulting in a greasy, soggy product. If it’s too hot, the coating will burn before the interior has a chance to warm through. A deep-fry thermometer is highly recommended for best results. Fry in small batches to prevent the oil temperature from dropping too drastically and to allow each piece enough space to brown evenly. Overcrowding the pan is a common mistake that leads to uneven cooking and a less crispy result. The fried milk is undeniably at its best when served warm, immediately after frying and dusting with cinnamon sugar. The contrast between the hot, crispy crust and the warm, creamy interior is what makes this dessert so special.
Feel free to get creative with the flavor of your milk base. Infuse the milk with other citrus zests like orange or lime for a brighter note. Add a pinch of other warm spices such as nutmeg, cardamom, or even a tiny bit of star anise during the initial milk heating stage. For a chocolate lover’s dream, replace some of the milk with cocoa powder or use chocolate milk as the base (adjusting sugar as needed). A sophisticated twist can be achieved by adding a tablespoon or two of a liqueur like rum, brandy, or Grand Marnier to the milk pudding mixture after it has thickened and been removed from the heat. For a different texture, try incorporating finely chopped nuts into the breadcrumb coating for an extra layer of crunch. A drizzle of honey or maple syrup over the finished fried milk can add another dimension of sweetness and flavor. You can also experiment with different dusting sugars; try powdered sugar for a more delicate finish, or even a spiced sugar blend with ginger or allspice.
Storage and Reheating
Fried milk is truly best enjoyed immediately after it’s prepared. The crispy exterior and warm, creamy interior are at their peak right off the frying pan. However, if you do have leftovers, they can be stored. Place any leftover fried milk in an airtight container in the refrigerator for up to 2-3 days. Be aware that the crispy coating will soften significantly in the fridge.
To reheat, the best method is to use an oven, toaster oven, or air fryer. Preheat your oven or toaster oven to 350°F (175°C), or your air fryer to 325°F (160°C). Place the fried milk pieces in a single layer on a baking sheet or in the air fryer basket. Reheat for about 8-12 minutes in the oven/toaster oven, or 5-8 minutes in the air fryer, or until they are heated through and the coating has crisped up again. Keep a close eye on them to prevent burning. Avoid reheating in the microwave, as this will result in a very soggy and unappetizing texture, completely losing the desirable crispness.
Frequently Asked Questions
Why is my fried milk pudding not firm enough to cut?
There are a few common reasons for this. The most likely culprit is insufficient chilling time; it needs at least 4 hours, but overnight is always best to ensure it’s completely set. Another reason could be not cooking the pudding long enough to reach the correct thickness during the initial stovetop preparation. The mixture needs to be very thick, almost like a paste, before chilling. Lastly, ensure you’re using the correct amount of cornstarch as specified in the recipe; it’s the primary thickener.
My coating keeps falling off during frying, what am I doing wrong?
This usually happens if the dredging steps aren’t executed properly. Make sure each piece of milk pudding is thoroughly coated in flour first, with any excess shaken off. The flour provides a dry surface for the egg to adhere to. Then, ensure it’s fully submerged in the beaten egg. Finally, press the breadcrumbs firmly onto all sides of the egg-coated piece. Don’t rush this step. Also, avoid handling the coated pieces too much after breading, and fry them relatively soon after coating to prevent the breadcrumbs from becoming damp.
Can I bake or air fry the fried milk instead of deep frying?
While deep frying gives the most traditional and crispy result, you can certainly try baking or air frying for a lighter alternative. To bake, preheat your oven to 400°F (200°C). Lightly spray the breaded pieces with cooking oil and bake for 15-20 minutes, flipping halfway, until golden brown and crispy. For air frying, preheat your air fryer to 375°F (190°C), spray the pieces with oil, and air fry for 8-12 minutes, shaking the basket halfway through, until golden and crisp. The texture won’t be exactly the same as deep-fried, but it will still be delicious.
Can I make the milk pudding base ahead of time?
Absolutely! The milk pudding base is perfect for making ahead. You can prepare it up to 2-3 days in advance and keep it tightly covered with plastic wrap (directly on the surface to prevent a skin) in the refrigerator. This makes the final frying step much quicker and easier when you’re ready to serve, as all the chilling and setting is already done.