Follow Me On Social Media!
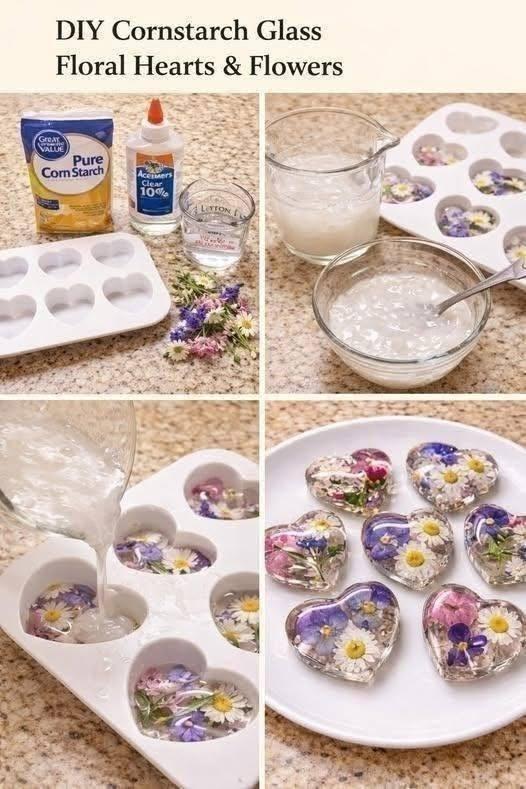
Cornstarch Glass Floral Hearts & Flowers

Introduction
Welcome to a truly enchanting craft project that brings the delicate beauty of nature into your home in a unique, lasting way! Today, we’re diving into the delightful world of “Cornstarch Glass Floral Hearts & Flowers.” While my blog usually celebrates edible creations, sometimes a project is so visually appealing and creatively satisfying that it simply has to be shared. This isn’t a recipe for your palate, but a recipe for your imagination, transforming simple household items into stunning, translucent decorative pieces that resemble delicate stained glass.
Imagine tiny, ethereal hearts and flowers, each embedding a real pressed bloom, catching the light as if suspended in time. That’s exactly what we’re creating with our cornstarch glass. This project is incredibly popular for its accessibility, using readily available materials like cornstarch and clear glue, and for the absolutely charming results. It’s a fantastic way to preserve the fleeting beauty of your garden flowers, or even those special blooms from a memorable occasion, turning them into keepsakes or thoughtful handmade gifts. These translucent pieces can be used as window clings, delicate ornaments, unique jewelry components, or simply as beautiful decorative accents to brighten any space.
The magic happens when a simple mixture of cornstarch, water, and clear glue dries to a wonderfully transparent, glass-like finish, encasing your chosen flowers in a durable, flexible medium. The beauty of this craft lies in its simplicity and the stunning visual impact of the finished product. Each piece is unique, a tiny window into nature’s artistry, making it a perfect activity for crafters of all ages (with adult supervision, especially when handling glue). So, gather your supplies, prepare to be charmed, and let’s create some breathtaking Cornstarch Glass Floral Hearts & Flowers!
Nutritional Information
Per serving (approximate values):
- Calories: 0
- Protein: 0g
- Carbohydrates: 0g
- Fat: 0g
- Fiber: 0g
- Sodium: 0mg
Ingredients
- 1/2 cup Pure Corn Starch (Great Value or similar brand)
- 1/2 cup Cold Water
- 1/2 cup Elmer’s Clear Glue (or similar non-toxic, clear school glue)
- Assorted small, pressed flowers (ensure they are fully dried)
- Silicone molds (heart, flower, or other desired shapes)
- Small mixing bowls
- Spoon or whisk for mixing
- Measuring cups
- Optional: Wax paper or parchment paper for drying
- Optional: Tweezers for flower placement
- Optional: Toothpicks for bubble removal
Instructions
- Prepare Your Workspace: Lay down some wax paper or a protective mat on your work surface. This project can be a little messy, and having a clean, protected area makes cleanup much easier. Ensure good ventilation.
- Gather and Press Flowers: If you haven’t already, prepare your flowers. For best results, use small, flat flowers that have been thoroughly pressed and dried. This prevents moisture issues and ensures they lie flat within your “glass” pieces. You can press flowers between sheets of paper in a heavy book for a few weeks, or use a dedicated flower press.
- Measure Ingredients: Using your measuring cups, precisely measure out 1/2 cup of pure corn starch, 1/2 cup of cold water, and 1/2 cup of Elmer’s Clear Glue into separate containers. Accuracy here helps achieve the right consistency for your cornstarch glass.
- Combine Cornstarch and Water: In one of your mixing bowls, combine the 1/2 cup of pure corn starch with the 1/2 cup of cold water. Stir them together thoroughly until the cornstarch is completely dissolved and you have a smooth, milky slurry with no lumps. This might take a minute or two of continuous stirring.
- Add the Clear Glue: Pour the 1/2 cup of Elmer’s Clear Glue into the cornstarch and water mixture. Stir continuously and gently until all three ingredients are fully incorporated. The mixture should be smooth, slightly viscous, and uniformly milky-white. Avoid over-stirring or vigorous whisking, as this can introduce too many air bubbles.
- Prepare Your Molds: Place your clean silicone molds on your protected work surface. Silicone molds are ideal because their flexibility allows for easy demolding of the finished pieces.
- Arrange Flowers in Molds: This is where your creativity shines! Using tweezers (if desired), carefully place your pressed flowers into the bottom of your silicone molds. Arrange them aesthetically, considering how they will look once encased. You can layer small petals, use whole tiny flowers, or create intricate patterns. Remember that the side facing down will be the “front” of your finished piece.
- Pour the Cornstarch Glass Mixture: Slowly and carefully pour the cornstarch glass mixture over your arranged flowers in the molds. Fill each mold to your desired thickness, ensuring the mixture completely covers the flowers. Aim for an even pour to prevent air pockets.
- Remove Air Bubbles: After pouring, gently tap the silicone mold against your work surface a few times. This helps any trapped air bubbles rise to the surface and escape, leading to a clearer finish. You can also use a toothpick to gently pop any stubborn surface bubbles.
- Drying Process: This is the most crucial step and requires patience. Place your filled molds in a dry, well-ventilated area away from direct sunlight or excessive humidity. Allow the cornstarch glass pieces to air dry completely. This can take anywhere from 24 to 72 hours, or even longer, depending on the thickness of your pieces, the humidity in your environment, and the specific glue used.
- Monitor Drying: As the pieces dry, they will gradually become translucent and firm. The milky-white appearance will transform into a clear, glass-like finish. Do not rush this process by attempting to heat dry, as it can cause cracking or uneven drying.
- Demold the Finished Pieces: Once the cornstarch glass pieces are completely dry and hard, carefully demold them from the silicone molds. Gently flex the silicone to release the edges, then pop out your beautiful, translucent floral hearts and flowers. They should be flexible yet firm.
- Finishing Touches (Optional):
- If you plan to use them as ornaments, you can carefully poke a small hole with a needle or awl (before they are fully dry but firm) to insert a string or hook.
- For a glossier, more durable finish, you can brush a thin layer of clear sealant (like Mod Podge Dimensional Magic or a clear acrylic spray sealant) over the dried pieces.
- Attach them to jewelry findings, glue them onto cards, or use them as decorative accents.
- Enjoy Your Creations: Your Cornstarch Glass Floral Hearts & Flowers are now ready to be displayed, gifted, or incorporated into other craft projects!
Cooking Tips and Variations
While this isn’t a culinary endeavor, there are plenty of “crafting tips” that will ensure your Cornstarch Glass Floral Hearts & Flowers turn out perfectly! First and foremost, the quality of your pressed flowers is paramount. Ensure they are completely dry before embedding them. Any residual moisture can lead to mold or discoloration within your finished piece over time. Small, flat flowers like violas, pansies, tiny ferns, or individual flower petals work best, as bulkier flowers can create air pockets or uneven surfaces. Experiment with different colors and textures of flowers to create a truly unique collection.
For the cornstarch glass mixture itself, consistency is key. Ensure you’re using cold water initially, as this helps dissolve the cornstarch without clumping. Stir thoroughly until the cornstarch slurry is smooth before adding the glue. When incorporating the clear glue, stir gently to minimize air bubbles. If you find your mixture has too many bubbles, let it sit for 10-15 minutes before pouring; many bubbles will rise and dissipate on their own. For an extra clear finish, some crafters gently warm the glue slightly before mixing (not hot, just slightly warm to thin it), but always test a small batch first.
Don’t be afraid to experiment with your molds! While hearts and flowers are lovely, silicone molds come in an endless variety of shapes – leaves, geometric patterns, even tiny animal shapes. The thinner your pour, the more delicate and glass-like your finished piece will be, but also more prone to tearing before fully dry. Thicker pieces will be more durable but might take longer to dry and be slightly less translucent. For a subtle tint, you can try adding a tiny drop of liquid watercolor or gel food coloring to your cornstarch mixture. Start with a very small amount, as a little goes a long way, and too much can make the mixture opaque. Always mix a small test batch to check the color before committing to your main project.
When placing your flowers, consider using tweezers for precision. Arrange them artistically, keeping in mind that the side facing down in the mold will be the front of your finished piece. You can create layers of flowers or even add tiny bits of glitter or gold leaf for an extra touch of sparkle. Lastly, patience during the drying process is non-negotiable. Resist the urge to touch or move the pieces until they are fully dry and firm. Premature demolding can lead to distortion or tearing. If you live in a humid environment, consider using a dehumidifier in the drying room to speed up the process slightly and ensure proper hardening.
Storage and Reheating
Since these beautiful creations are decorative craft pieces and not food, traditional “storage and reheating” instructions don’t apply. However, proper care and storage will ensure your Cornstarch Glass Floral Hearts & Flowers remain beautiful for a long time.
Once your cornstarch glass pieces are completely dry and demolded, they are quite durable but can still be susceptible to damage if not handled with care. Store them in a cool, dry place away from direct sunlight. Prolonged exposure to intense sunlight can potentially fade the colors of the pressed flowers over time, and extreme heat might cause the glue component to become sticky or warp slightly. Avoid storing them in areas with high humidity, as excessive moisture could cause the pieces to become tacky or even reabsorb moisture, leading to a loss of firmness.
To keep them clean, simply wipe them gently with a soft, dry cloth. Avoid using harsh chemicals or abrasive cleaners, which could damage the surface or the embedded flowers. If they become dusty, a soft brush or a light puff of air can help remove debris. If you’ve applied a sealant, that will offer an extra layer of protection against dust and minor scuffs.
When transporting or storing multiple pieces, it’s best to layer them between sheets of wax paper or tissue paper to prevent them from sticking together or scratching each other. Store them flat in a sturdy box or container. These pieces are not designed to be reheated or exposed to high temperatures, as this could melt the glue, damage the flowers, and ruin the translucent finish. Treat them as you would any delicate decorative item, and they will bring you joy for years to come.
Frequently Asked Questions
What kind of flowers work best for this project?
Small, flat, and thoroughly pressed flowers are ideal. Think tiny violas, pansy petals, small ferns, individual rose petals, or delicate wildflowers. Thicker flowers or those with high moisture content will not press well, can cause bumps in your finished piece, and may introduce mold if not completely dry. Always ensure your flowers are fully pressed and dried before use.
Why are my cornstarch glass pieces still cloudy or sticky after drying?
Cloudiness or stickiness usually indicates that the pieces are not fully dry. Drying time can vary significantly based on thickness, humidity, and ventilation. Ensure your pieces are in a dry, well-ventilated area and give them more time, potentially 48-72 hours or even longer for thicker pieces. High humidity can greatly extend drying time. Also, ensure you used the correct ratio of ingredients; too much glue or not enough cornstarch can affect the final texture and transparency.
Can I add color to my cornstarch glass?
Yes, you can! For a subtle tint, add a very small drop of liquid watercolor or gel food coloring to your cornstarch mixture after all other ingredients are combined. Start with just a tiny amount and mix well, as a little goes a long way. Too much dye can make the mixture opaque instead of translucent. Always test a small batch first to ensure the color and transparency are to your liking.
Is this project safe for children?
This project can be a fun craft for children with adult supervision. Emphasize that the finished pieces are for decoration only and are not edible, especially due to the inclusion of Elmer’s clear glue. Ensure children understand not to ingest any of the materials. Adults should handle the pouring of the mixture and ensure proper ventilation during the drying process.