
Follow Me On Social Media!
Search Results for Millionnaire s Shortbread

Introduction
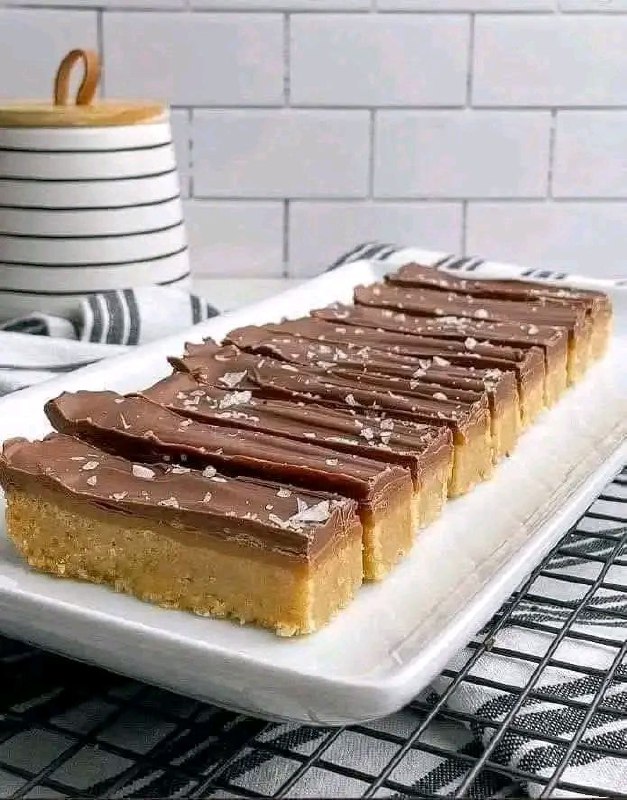
Prepare your taste buds for a symphony of textures and flavors because today, we’re diving into the decadent world of Millionaire’s Shortbread! This isn’t just any sweet treat; it’s a legendary layered dessert that promises pure indulgence with every bite. Imagine a rich, buttery shortbread base, topped with a thick, gooey layer of golden caramel, and crowned with a generous coating of snappy chocolate, often finished with a delicate sprinkle of sea salt to perfectly balance the sweetness. It’s a true masterpiece of confectionery, offering an irresistible combination that has captivated dessert lovers for generations.
Millionaire’s Shortbread, sometimes known as Millionaire Bars or Caramel Shortbread, is a beloved classic that originated in Scotland but has since conquered palates worldwide. Its popularity stems from its harmonious blend of textures—the crumbly melt-in-your-mouth shortbread, the chewy and luxurious caramel, and the satisfying snap of the chocolate. This trifecta of deliciousness makes it an absolute showstopper, perfect for impressing guests at parties, gifting to loved ones, or simply treating yourself to an extraordinary moment of bliss. It’s a dessert that feels incredibly luxurious, yet with our step-by-step guide, it’s surprisingly achievable in your own kitchen.
If you’re searching for a dessert that delivers on richness, sweetness, and ultimate satisfaction, look no further. This recipe is designed to help you create perfect Millionaire’s Shortbread every single time, ensuring that each layer is a testament to culinary perfection. From achieving the ideal crumbly shortbread to crafting that luscious, smooth caramel and topping it with a glossy chocolate finish, we’ve got you covered. So, roll up your sleeves, gather your ingredients, and get ready to bake a treat that tastes like a million bucks!
Nutritional Information
Per serving (approximate values):
- Calories: 350-450
- Protein: 3-5g
- Carbohydrates: 40-55g
- Fat: 20-30g
- Fiber: 1-2g
- Sodium: 100-150mg
Ingredients
For the Shortbread Base:
- 1 ½ cups (180g) all-purpose flour
- ½ cup (60g) powdered sugar (confectioners’ sugar)
- ¾ cup (170g) unsalted butter, softened and cut into cubes
- ¼ teaspoon salt
For the Caramel Layer:
- ½ cup (113g) unsalted butter
- ¼ cup (50g) granulated sugar
- ¼ cup (50g) light brown sugar, packed
- 1 (14-ounce) can (397g) sweetened condensed milk
- 2 tablespoons golden syrup or light corn syrup (optional, for extra chewiness and shine)
- ½ teaspoon vanilla extract
- ¼ teaspoon salt
For the Chocolate Topping:
- 1 ½ cups (250g) good quality semi-sweet or milk chocolate chips or chopped chocolate
- 1 tablespoon unsalted butter or 1 teaspoon coconut oil (optional, for shine)
- Flaked sea salt, for sprinkling (optional, but highly recommended)
Instructions
Equipment You’ll Need:
- 9×9 inch (23×23 cm) square baking pan
- Parchment paper
- Large mixing bowls
- Electric mixer (stand or hand-held, optional but helpful for shortbread)
- Saucepan
- Whisk
- Rubber spatula or offset spatula
- Measuring cups and spoons
- Wire rack
A. The Perfect Shortbread Base:
- Preheat your oven to 350°F (175°C). Line a 9×9 inch (23×23 cm) square baking pan with parchment paper, leaving an overhang on two sides to easily lift the shortbread out later.
- In a large mixing bowl, combine the all-purpose flour, powdered sugar, and salt. Whisk briefly to combine.
- Add the softened, cubed unsalted butter to the dry ingredients.
- Using your fingertips, a pastry blender, or an electric mixer on low speed, cut the butter into the flour mixture until it resembles coarse crumbs. Continue mixing until the dough comes together and forms a soft ball. Be careful not to overmix, as this can make the shortbread tough.
- Press the shortbread dough evenly into the bottom of the prepared baking pan. Use the back of a spoon or your fingers to ensure it’s compact and smooth. Prick the surface all over with a fork.
- Bake for 20-25 minutes, or until the edges are lightly golden and the center is set. The shortbread should be pale but cooked through.
- Remove from the oven and let it cool completely in the pan on a wire rack while you prepare the caramel.
B. Luscious Caramel Layer:
- In a medium-sized heavy-bottomed saucepan, combine the unsalted butter, granulated sugar, light brown sugar, sweetened condensed milk, golden syrup (if using), and salt.
- Place the saucepan over medium-low heat. Stir constantly with a whisk or rubber spatula until the butter has melted and the sugars have dissolved.
- Increase the heat to medium and bring the mixture to a gentle boil, stirring continuously to prevent it from sticking to the bottom of the pan and burning.
- Once boiling, reduce the heat to low and continue to cook, stirring constantly, for 5-8 minutes. The caramel should thicken considerably and turn a rich golden-brown color. It should be thick enough to coat the back of a spoon. Be patient and keep stirring to achieve a smooth, rich caramel.
- Remove the saucepan from the heat and stir in the vanilla extract.
- Pour the hot caramel evenly over the cooled shortbread base in the baking pan.
- Gently spread the caramel to the edges using a rubber spatula or offset spatula.
- Allow the caramel layer to cool at room temperature for about 30 minutes, then transfer the pan to the refrigerator to chill for at least 1-2 hours, or until the caramel is completely set and firm to the touch. This is crucial for clean cuts later.
C. Silky Chocolate Topping:
- Once the caramel layer is firm, prepare the chocolate topping. In a microwave-safe bowl, combine the chocolate chips (or chopped chocolate) and the optional tablespoon of butter or teaspoon of coconut oil.
- Microwave on medium power in 30-second intervals, stirring well after each interval, until the chocolate is melted and smooth. Alternatively, you can melt the chocolate in a double boiler over simmering water, stirring until smooth.
- Pour the melted chocolate evenly over the chilled caramel layer, spreading it quickly to the edges using a rubber spatula or offset spatula.
- If desired, immediately sprinkle flaked sea salt generously over the melted chocolate.
- Return the pan to the refrigerator for at least 30-60 minutes, or until the chocolate topping is completely set and firm.
D. Chilling and Cutting:
- Once all layers are completely chilled and firm, use the parchment paper overhangs to carefully lift the Millionaire’s Shortbread out of the baking pan and onto a cutting board.
- Using a large, sharp knife, trim the edges for a neat finish (optional).
- Heat the knife under hot running water, wipe it dry, and then make clean cuts into squares or bars. Reheat and wipe the knife clean between each cut for the cleanest slices.
- Serve and enjoy your homemade Millionaire’s Shortbread!
Cooking Tips and Variations
- Don’t Overbake the Shortbread: The shortbread should be pale and just set, not deeply golden. Overbaking will make it dry and hard.
- Patience with Caramel: The key to perfect caramel is consistent stirring and not rushing the process. It needs time to thicken and deepen in color. A candy thermometer can be helpful; aim for 220-230°F (104-110°C) for a chewy caramel.
- Chill, Chill, Chill: Each layer, especially the caramel and the final product, benefits immensely from thorough chilling. This ensures clean, defined layers and easy, neat cutting.
- Hot Knife for Clean Cuts: This is a game-changer! Dipping your knife in hot water and wiping it dry between each cut will give you beautifully smooth edges on your chocolate.
- Quality Ingredients Matter: Since there are so few ingredients, the quality of your butter, chocolate, and condensed milk will directly impact the final taste.
- Salt is Essential: The flaked sea salt isn’t just for garnish; it cuts through the sweetness of the caramel and chocolate, elevating the overall flavor profile. Don’t skip it!
- Vary the Chocolate: Feel free to use dark chocolate for a more intense, less sweet topping, or even white chocolate for a different aesthetic. You can also drizzle melted white or dark chocolate in a contrasting pattern over the set chocolate layer for extra flair.
- Add Extracts to Caramel: A few drops of almond extract, coffee extract, or even a hint of rum extract can add an interesting twist to the caramel layer.
- Nutty Crunch: Sprinkle finely chopped nuts (pecans, walnuts, or almonds) over the caramel layer before pouring the chocolate for added texture.
- Different Pan Sizes: While a 9×9 inch pan is standard, you can use a 9×13 inch pan for thinner bars (adjust baking times accordingly) or even a mini muffin tin for individual bites.
Storage and Reheating
Millionaire’s Shortbread is an excellent make-ahead dessert, and it stores beautifully.
- Room Temperature: Store leftover Millionaire’s Shortbread in an airtight container at room temperature for up to 3-4 days. This is often preferred as the caramel remains soft and chewy.
- Refrigerator: For longer storage or if your kitchen is particularly warm, store the bars in an airtight container in the refrigerator for up to 1 week. If refrigerated, allow them to come to room temperature for about 15-20 minutes before serving for the best texture, especially the caramel.
- Freezing: Millionaire’s Shortbread freezes exceptionally well. Once completely set and cut into bars, arrange them in a single layer on a baking sheet and freeze until solid. Then, transfer the frozen bars to an airtight freezer-safe container or freezer bag, separating layers with parchment paper. They can be frozen for up to 2-3 months. Thaw at room temperature for several hours or overnight in the refrigerator before serving.
- Reheating: There’s generally no need to reheat Millionaire’s Shortbread. It’s best enjoyed at room temperature or slightly chilled, as reheating can cause the chocolate to melt and the caramel to become too soft.
Frequently Asked Questions
What makes my caramel too hard or too runny?
The consistency of your caramel is crucial. If your caramel turns out too hard, it was likely cooked for too long or at too high a temperature, causing too much moisture to evaporate. For a perfect chewy caramel, ensure you cook it until it’s a rich golden-brown and thick enough to coat the back of a spoon, typically around 5-8 minutes of gentle boiling after the initial melt. If it’s too runny, it wasn’t cooked long enough, and there’s too much moisture remaining. Continue to cook and stir until it reaches the desired thickness and color.
Can I use any type of chocolate for the topping?
While you can use various types of chocolate, the best results come from good quality baking chocolate or chocolate chips. Semi-sweet chocolate is a popular choice as it provides a nice balance to the sweetness of the caramel. Milk chocolate will result in a sweeter topping, while dark chocolate will offer a more intense, less sweet contrast. For a smoother, shinier finish, consider adding a teaspoon of coconut oil or a tablespoon of butter to your melting chocolate, as this helps with its spreadability and gives it a professional sheen. Avoid using compound chocolate or candy melts if you want the best flavor and texture.
Why did my shortbread crumble when I cut it?
Shortbread is designed to be crumbly, but excessive crumbling during cutting can be due to a few factors. Firstly, ensure your shortbread base is baked thoroughly and cooled completely. An underbaked base will be too soft. Secondly, make sure the entire dessert, especially the shortbread and caramel, is thoroughly chilled before cutting. This firms up all the layers. Lastly, using a hot, sharp knife and wiping it clean between each cut is essential. A dull or cold knife will drag through the layers, causing them to break and crumble.
Can I make this recipe gluten-free?
Yes, you can absolutely adapt this Millionaire’s Shortbread recipe to be gluten-free. For the shortbread base, simply substitute the all-purpose flour with a good quality 1:1 gluten-free all-purpose flour blend that contains xanthan gum. No other ingredient substitutions are typically needed for the caramel or chocolate layers, as they are naturally gluten-free. Always double-check ingredient labels to ensure all components, especially chocolate, are certified gluten-free if you are catering to severe allergies or intolerances.



