
Follow Me On Social Media!
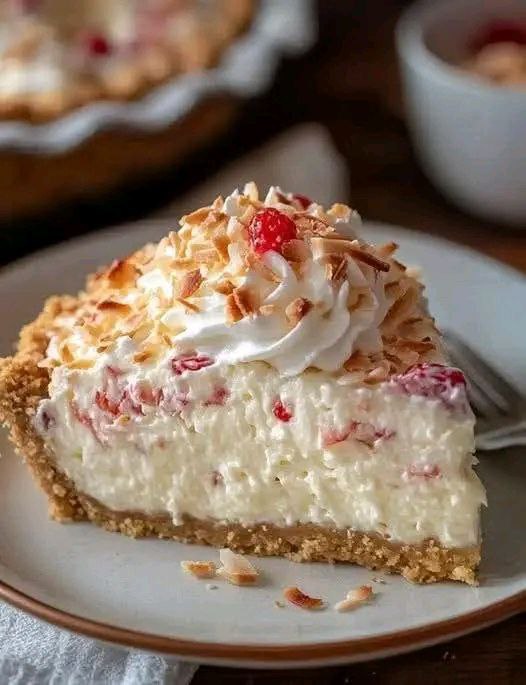
Diabetic Friendly Cake That Melts in Your Mouth

Introduction
Who says managing diabetes means sacrificing delicious desserts? For far too long, the idea of enjoying a rich, creamy, melt-in-your-mouth cake has felt like a distant dream for those navigating blood sugar levels. We’ve all experienced that craving for something sweet, something indulgent, especially when friends and family are enjoying a decadent treat. The good news is, that dream is now a delicious reality! We’re thrilled to introduce you to a dessert that redefines what “diabetic-friendly” can be: a creamy, dreamy “cake” that truly lives up to its name, melting effortlessly on your tongue and leaving you utterly satisfied, without the guilt or the blood sugar spike.
This isn’t just any dessert; it’s a celebration of flavor and texture, meticulously crafted to be both safe and incredibly satisfying. Imagine a velvety smooth filling, studded with bright, fresh fruit, all nestled in a slightly crunchy, subtly sweet crust. Each bite offers a harmonious blend of creamy, fruity, and nutty notes, culminating in that irresistible “melt-in-your-mouth” sensation. What makes this recipe truly special is its clever use of ingredients that cater to diabetic dietary needs without compromising on the luxurious experience. We’ve swapped traditional sugars for smart alternatives, opted for wholesome crust options, and focused on fresh, low-glycemic fruits, transforming a classic indulgence into a guilt-free pleasure.
Whether you’re looking for a special occasion dessert, a comforting weeknight treat, or simply a way to enjoy sweets without the worry, this “Diabetic Friendly Cake That Melts in Your Mouth” is your answer. It’s surprisingly easy to make, requires no baking, and promises to be a crowd-pleaser for everyone, regardless of their dietary needs. Prepare to impress your taste buds and redefine your dessert expectations with every delightful slice!
Nutritional Information
Per serving (approximate values):
- Calories: 280
- Protein: 8g
- Carbohydrates: 25g
- Fat: 18g
- Fiber: 4g
- Sodium: 150mg
Ingredients
- For the Crust:
- 1 ½ cups almond flour (or finely crushed sugar-free graham cracker crumbs)
- ¼ cup unsalted butter, melted
- 2 tablespoons erythritol or monk fruit sweetener blend
- ½ teaspoon ground cinnamon (optional)
- For the Creamy Filling:
- 8 ounces cream cheese, softened (full-fat or Neufchâtel for lower fat)
- 1 cup heavy whipping cream, chilled
- ½ cup powdered erythritol or powdered monk fruit sweetener blend
- 1 teaspoon vanilla extract
- ½ teaspoon almond extract (optional, for added depth)
- 1 cup fresh strawberries, hulled and finely diced
- ½ cup fresh raspberries (optional, for extra fruitiness)
- 1 packet (0.25 oz) unflavored gelatin (optional, for a firmer set)
- ¼ cup cold water (if using gelatin)
- For the Topping & Garnish:
- ½ cup heavy whipping cream, chilled
- 2 tablespoons powdered erythritol or powdered monk fruit sweetener blend
- ¼ teaspoon vanilla extract
- ¼ cup toasted unsweetened shredded coconut
- Fresh whole strawberries or a maraschino cherry (sugar-free, if possible) for garnish
Instructions
- Prepare the Crust: In a medium bowl, combine the almond flour (or crushed crumbs), melted butter, 2 tablespoons sweetener, and cinnamon (if using). Mix until well combined and the mixture resembles wet sand.
- Press the crust mixture evenly into the bottom of a 9-inch pie plate or springform pan. Use the back of a spoon or your fingers to create a firm, even layer. Place the crust in the refrigerator to chill while you prepare the filling.
- Prepare the Gelatin (if using): If you want a firmer set for your filling, sprinkle the unflavored gelatin over ¼ cup cold water in a small microwave-safe bowl. Let it sit for 5 minutes to bloom. Then, microwave for 10-15 seconds, or until the gelatin is fully dissolved and clear. Set aside to cool slightly (do not let it set).
- Make the Creamy Filling: In a large mixing bowl, beat the softened cream cheese with an electric mixer on medium speed until smooth and creamy, about 2-3 minutes.
- Add ½ cup powdered sweetener, 1 teaspoon vanilla extract, and almond extract (if using) to the cream cheese. Beat until thoroughly combined and fluffy.
- In a separate, chilled bowl, whip 1 cup of cold heavy whipping cream until stiff peaks form. Be careful not to over-whip.
- Gently fold the whipped cream into the cream cheese mixture until just combined. If using, slowly drizzle in the cooled, dissolved gelatin mixture while gently folding until fully incorporated.
- Gently fold in the finely diced strawberries and raspberries (if using) into the creamy filling. Be careful not to crush the fruit too much.
- Assemble the “Cake”: Retrieve the chilled crust from the refrigerator. Pour the creamy fruit filling over the crust and spread it evenly with a spatula.
- Cover the pie plate or springform pan loosely with plastic wrap and refrigerate for at least 4-6 hours, or preferably overnight, to allow the “cake” to set completely.
- Prepare the Topping: Just before serving, whip the remaining ½ cup of chilled heavy whipping cream with 2 tablespoons powdered sweetener and ¼ teaspoon vanilla extract until stiff peaks form.
- Garnish and Serve: Carefully remove the “cake” from the springform pan (if using) or prepare to slice directly from the pie plate. Pipe or spoon dollops of whipped cream onto the top of the “cake.”
- Sprinkle generously with toasted unsweetened shredded coconut. Garnish with fresh whole strawberries or a sugar-free maraschino cherry.
- Slice and serve immediately. Enjoy your melt-in-your-mouth, diabetic-friendly treat!
Cooking Tips and Variations
Achieving that perfect “melt-in-your-mouth” texture and optimal diabetic-friendliness requires a few key considerations. For the crust, using almond flour not only keeps the carbohydrate count lower but also adds a wonderful nutty flavor and a satisfying crunch. If you prefer a more traditional crumb crust, ensure you choose sugar-free graham crackers or a similar low-carb cookie alternative. When making the crust, pressing it firmly into the pan is crucial for a stable base; a flat-bottomed glass or measuring cup can help achieve an even, compact layer. Chilling the crust before adding the filling prevents it from becoming soggy and helps it set properly.
For the creamy filling, ensure your cream cheese is truly softened to room temperature. This will prevent lumps and ensure a silky-smooth texture when beaten. Chilling your mixing bowl and whisk attachment for the heavy cream can significantly aid in achieving stiff peaks quickly and efficiently. When folding the whipped cream into the cream cheese mixture, do so gently and in stages to maintain the airiness of the cream, which contributes to the light, melt-in-your-mouth quality. The addition of unflavored gelatin, while optional, is highly recommended, especially if you live in a warmer climate or plan to transport the dessert. It provides extra stability and helps the “cake” hold its shape beautifully without altering the taste or texture significantly. Just be sure to dissolve it completely and let it cool slightly before incorporating it into the filling, to avoid cooking the cream cheese.
Don’t be afraid to experiment with fruit! While strawberries and raspberries are classic and lower in glycemic index, other great diabetic-friendly options include blueberries, blackberries, or even finely diced kiwi or peaches (in moderation). For an extra burst of flavor, consider adding a teaspoon of lemon or orange zest to the filling; citrus brightens the overall taste beautifully. If you’re looking for a dairy-free alternative, you can substitute the cream cheese with a dairy-free cream cheese alternative and use full-fat coconut cream (chilled overnight, scoop out the thick cream) in place of heavy whipping cream for both the filling and topping. The toasted coconut is a must for both flavor and texture, but if you’re not a fan, sugar-free chocolate shavings or a sprinkle of chopped pecans or walnuts can make excellent substitutions. Remember that proper chilling time is non-negotiable for this no-bake dessert; patience will be rewarded with a perfectly set, deliciously creamy treat.
Storage and Reheating
This “Diabetic Friendly Cake That Melts in Your Mouth” is a no-bake dessert, so reheating is not applicable. Proper storage is key to maintaining its creamy texture and freshness.
To store, cover the pie plate or springform pan tightly with plastic wrap or aluminum foil. This prevents the “cake” from absorbing odors from the refrigerator and keeps the surface from drying out. Store it in the refrigerator for up to 3-4 days. The flavors tend to meld and deepen over time, so it can even taste better on the second day!
If you have added fresh fruit to the filling, it’s best to consume the “cake” within 2-3 days, as some fruits can release moisture over time. For the freshest appearance of the whipped cream topping, it’s ideal to add it just before serving. If you’ve already added the whipped cream and toasted coconut, the topping may soften slightly over time, but the “cake” will still be delicious.
Freezing this dessert is generally not recommended as the creamy filling, especially with fresh fruit and without significant stabilizers, can change in texture upon thawing, potentially becoming watery or grainy. For the best experience, enjoy it chilled from the refrigerator.
Frequently Asked Questions
Can I use other sugar substitutes?
Yes, you can experiment with other granulated or powdered sugar substitutes that are suitable for baking, such as stevia, monk fruit, or a blend. Be sure to check the conversion ratios on your specific product, as sweetness levels can vary significantly between brands and types of sweeteners. Always taste and adjust to your preference, keeping in mind that some sweeteners can have an aftertaste if used in very large quantities.
Is this recipe suitable for a keto diet?
This recipe is very keto-friendly, especially if you use almond flour for the crust and stick to low-carb fruits like strawberries and raspberries. The use of cream cheese, heavy cream, and sugar substitutes aligns well with keto principles. Always verify the carb count of your specific ingredients, particularly fruits and any processed sugar-free items, to ensure it fits within your daily macros.
Can I make this dessert ahead of time for a party?
Absolutely! This “Diabetic Friendly Cake” is an excellent make-ahead dessert. In fact, it requires a minimum of 4-6 hours of chilling, and ideally overnight, to set properly and allow the flavors to fully develop. You can prepare the entire “cake” a day in advance. Just hold off on adding the whipped cream topping and toasted coconut until about an hour before you plan to serve it, to ensure they look and taste their freshest.



