
Follow Me On Social Media!
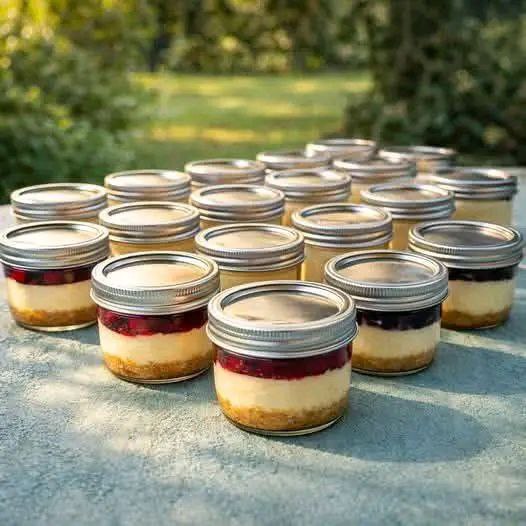
Charming Mini Cheesecake Jars Perfect for Any Occasion

Introduction
Picture this: a bustling party, a cozy picnic, or a thoughtful homemade gift. What’s the one dessert that effortlessly elevates any occasion from ordinary to utterly enchanting? These charming mini cheesecake jars, of course! Forget the fuss of slicing and serving a whole cheesecake; these individual portions are a dream come true for hosts and guests alike. They’re not just desserts; they’re tiny, edible works of art, promising a perfect bite every single time without the worry of crumbs or uneven slices. Their inherent cuteness factor makes them an instant hit, drawing smiles and eager hands wherever they appear.
What makes these mini cheesecake jars truly special is their delightful combination of convenience, elegance, and incredible flavor. Each jar is a self-contained little world of creamy, dreamy cheesecake, nestled atop a perfectly crumbly crust and crowned with a vibrant, fruity topping. They’re incredibly versatile, allowing for endless customization to suit any palate or dietary preference. Whether you’re a seasoned baker or just starting out, this recipe is designed to be approachable and rewarding, ensuring that you can whip up a batch of these beauties with confidence. Plus, the individual serving size means no more awkward dessert dilemmas – everyone gets their own delightful treat!
Beyond their practicality, there’s an undeniable charm to serving desserts in jars. It evokes a sense of rustic elegance, a nod to homemade goodness, and a touch of whimsy that store-bought desserts simply can’t replicate. These mini cheesecake jars aren’t just food; they’re an experience. They invite you to slow down, savor each spoonful, and appreciate the thoughtful effort put into their creation. So, get ready to impress your friends, delight your family, and add a touch of charming sophistication to your next gathering with these irresistible mini cheesecake jars – truly perfect for any occasion!
Nutritional Information
Per serving (approximate values):
- Calories: 380
- Protein: 7g
- Carbohydrates: 35g
- Fat: 24g
- Fiber: 1g
- Sodium: 250mg
Ingredients
- 1 ½ cups graham cracker crumbs (or digestive biscuits, shortbread, or Oreo crumbs)
- ¼ cup granulated sugar (for crust)
- 6 tablespoons unsalted butter, melted
- 2 (8-ounce) packages cream cheese, softened
- ¾ cup granulated sugar (for filling)
- 2 large eggs
- 1 teaspoon vanilla extract
- 1 tablespoon fresh lemon juice (optional, for brightness)
- ¼ cup sour cream or full-fat Greek yogurt
- 1 cup fresh or frozen mixed berries (strawberries, raspberries, blueberries)
- ¼ cup granulated sugar (for topping)
- 1 tablespoon cornstarch
- 2 tablespoons water
- 12 (4-ounce) or 6 (8-ounce) mason jars or small glass jars
- Optional garnishes: fresh mint leaves, whipped cream, chocolate shavings, extra fresh berries
Instructions
- Prepare the Crust: In a medium bowl, combine the graham cracker crumbs and ¼ cup granulated sugar. Pour in the melted butter and stir until well combined and the crumbs are moistened.
- Press the Crust: Divide the crumb mixture evenly among your chosen jars. For 4-ounce jars, use about 1 heaping tablespoon per jar; for 8-ounce jars, use about 2 heaping tablespoons. Press the crumbs firmly into the bottom of each jar using the back of a spoon or a small tamper. Place the jars in the refrigerator to chill while you prepare the filling.
- Preheat Oven (if baking): If you are baking your cheesecakes, preheat your oven to 325°F (160°C). If you are making a no-bake version, skip this step.
- Prepare the Cheesecake Filling: In a large mixing bowl, using an electric mixer on medium speed, beat the softened cream cheese until smooth and creamy, about 2-3 minutes.
- Add Sugar to Filling: Gradually add ¾ cup granulated sugar to the cream cheese, beating until just combined and smooth, scraping down the sides of the bowl as needed.
- Incorporate Eggs: Add the eggs one at a time, beating on low speed until just incorporated after each addition. Be careful not to overmix, as overmixing can introduce too much air and cause cracks in baked cheesecakes.
- Stir in Flavorings: Stir in the vanilla extract, lemon juice (if using), and sour cream or Greek yogurt until just combined. The filling should be smooth and lump-free.
- Fill the Jars: Carefully spoon or pipe the cheesecake filling over the chilled crusts in each jar, filling them to about ¾ full. Leave some space at the top for the topping.
- Bake (Optional): If baking, place the filled jars on a baking sheet. Bake for 20-25 minutes for 4-ounce jars, or 30-35 minutes for 8-ounce jars, or until the edges are set and the center has a slight jiggle when gently shaken. Do not overbake.
- Cool and Chill: If baked, remove the jars from the oven and let them cool completely on a wire rack at room temperature. Once cool (or immediately if no-bake), cover the jars loosely and refrigerate for at least 4 hours, or preferably overnight, to allow the cheesecake to set completely.
- Prepare the Berry Topping: In a small saucepan, combine the mixed berries and ¼ cup granulated sugar. Cook over medium heat, stirring occasionally, until the berries soften and release their juices, about 5-7 minutes.
- Thicken the Topping: In a small separate bowl, whisk together the cornstarch and water until smooth. Pour the cornstarch slurry into the simmering berry mixture, stirring constantly. Continue to cook for another 1-2 minutes, until the sauce thickens. Remove from heat and let cool completely.
- Assemble and Serve: Once the cheesecakes are fully chilled and set, and the berry topping is cool, spoon a generous amount of berry topping over the top of each cheesecake jar. Garnish with fresh mint, a dollop of whipped cream, or chocolate shavings if desired. Serve chilled.
Cooking Tips and Variations
For the best results with your charming mini cheesecake jars, always start with cream cheese that is truly at room temperature. This ensures a smooth, lump-free filling without overmixing, which can lead to cracks in baked cheesecakes. When pressing the crust, use a small, flat-bottomed object like a shot glass or the end of a wooden spoon to get an even, firm layer at the bottom of each jar. This prevents the crust from crumbling too much when you dig in. If you’re baking your cheesecakes, a water bath isn’t strictly necessary for individual jars, but placing them on a baking sheet with about half an inch of hot water can help create a more moist and crack-free cheesecake, especially for larger jars.
The beauty of these jars lies in their adaptability! For the crust, experiment beyond graham crackers: try crushed Oreos for a chocolatey base, shortbread cookies for a buttery richness, or even gingersnaps for a spiced twist. For the cheesecake filling itself, consider adding citrus zest (lemon, lime, or orange) for an extra bright flavor, or swap out vanilla extract for almond, coconut, or even a touch of bourbon for an adult twist. You can also swirl in a tablespoon of fruit puree, caramel sauce, or melted chocolate into the filling before chilling or baking for an added layer of flavor.
The toppings offer endless possibilities. Instead of the berry compote, try a luscious homemade lemon curd, a rich chocolate ganache, or a simple caramel sauce. Fresh fruit like sliced peaches, kiwi, or mango also make beautiful and delicious toppings. For a holiday twist, use pumpkin puree and spices in the filling, topped with a dollop of whipped cream and a sprinkle of cinnamon. Or, for a truly decadent treat, layer with crushed candy bars, toasted nuts, or a drizzle of hot fudge. Provide a small spoon for each jar, and perhaps tie a pretty ribbon around the neck for an extra touch of charm, especially if you’re giving them as gifts.
Storage and Reheating
These mini cheesecake jars are fantastic make-ahead desserts, and proper storage is key to keeping them fresh and delicious. Once fully assembled with their toppings, cover each jar tightly with its lid or plastic wrap. Store them in the refrigerator for up to 3-4 days. The airtight seal prevents them from absorbing odors from other foods in the fridge and helps maintain their creamy texture.
If you plan to prepare them further in advance, you can store the cheesecake jars (without the topping) in the refrigerator for up to 5 days. Prepare the fruit topping fresh on the day of serving or up to one day in advance, storing it separately in an airtight container in the fridge. Assemble the jars with the topping just a few hours before serving for the freshest look and taste.
Freezing is also an option for longer storage. To freeze, ensure the cheesecakes are completely chilled and set. Skip the fresh fruit topping for freezing, as it can become watery upon thawing. Cover each jar tightly with plastic wrap, then either place the lid on or wrap again in aluminum foil. They can be frozen for up to 1 month. To thaw, transfer the frozen jars to the refrigerator overnight. Once thawed, you can add your fresh fruit topping or other garnishes before serving. These cheesecakes are designed to be served chilled, so reheating is not recommended as it will alter their delicate texture.
Frequently Asked Questions
What kind of jars are best for these mini cheesecakes?
Small glass jars, specifically 4-ounce or 8-ounce mason jars, are ideal for these mini cheesecakes. Their wide mouth makes it easy to layer the crust, filling, and topping, and they come with lids, which are perfect for storage and portability. You can also use other small glass containers or even ramekins, but ensure they are oven-safe if you plan to bake the cheesecakes.
Can I make these mini cheesecakes without baking them?
Absolutely! This recipe can easily be adapted for a no-bake version. Simply omit the eggs from the filling and increase the amount of sour cream or Greek yogurt to about ½ cup to achieve a firmer set. You may also want to add 1-2 tablespoons of powdered sugar to the filling for extra sweetness. After filling the jars, chill them for at least 6-8 hours, or preferably overnight, until fully set. The no-bake version often has a lighter, fluffier texture compared to baked cheesecakes.
How far in advance can I make these mini cheesecake jars?
These mini cheesecake jars are excellent for making ahead! You can prepare the cheesecake base (crust and filling) up to 3-4 days in advance and store them covered in the refrigerator. The berry topping can also be made 1-2 days ahead and stored separately. For the best presentation and texture, assemble the final jars with the topping and any fresh garnishes a few hours before you plan to serve them.
What if I don’t have fresh berries for the topping?
No problem at all! If fresh berries aren’t available, frozen mixed berries work perfectly for the compote. You can also use store-bought fruit preserves, jams, or pie filling as a quick and easy topping. Other delicious alternatives include caramel sauce, chocolate ganache, lemon curd, or even a simple dollop of whipped cream with a sprinkle of cinnamon or chocolate shavings. The possibilities are endless to match your preference or what you have on hand.



