
Follow Me On Social Media!
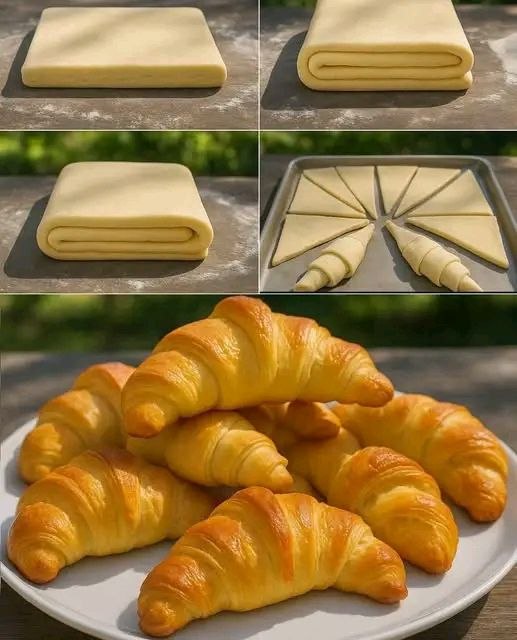
Super soft croissants recipe

Introduction
Imagine biting into a pastry so impossibly light, so exquisitely tender, that it practically melts in your mouth. That, my friends, is the promise of a super soft croissant. Far from the often-dense or dry versions you might encounter, these homemade beauties are a testament to patience and precision, delivering a cloud-like texture and a buttery aroma that will transport you straight to a Parisian patisserie. While croissants have a reputation for being a challenging bake, this recipe aims to demystify the process, breaking down each step to ensure even a novice baker can achieve golden, flaky, and unbelievably soft results.
The magic of a croissant lies in its delicate layers, a marvel of culinary engineering known as lamination. This technique, where butter is meticulously folded into dough, creates hundreds of distinct strata that puff up in the oven, yielding that iconic honeycomb interior. But what makes these “super soft”? It’s a combination of careful ingredient ratios, optimal hydration, and gentle handling, all working in harmony to prevent a tough crumb and encourage an ethereal tenderness. Prepare to be amazed as you transform simple ingredients into a breakfast masterpiece that’s both impressive and incredibly rewarding to bake.
This journey into super soft croissant making might seem daunting at first glance, but rest assured, the detailed, step-by-step instructions presented here are designed to guide you through every fold, every chill, and every triumphant moment. We’ll explore the science behind the softness, the art of lamination, and the simple tricks that elevate a good croissant to a truly unforgettable one. Get ready to fill your kitchen with the irresistible scent of freshly baked pastries and savor the unparalleled joy of a homemade, super soft croissant.
Nutritional Information
Per serving (approximate values):
- Calories: 350
- Protein: 7g
- Carbohydrates: 35g
- Fat: 20g
- Fiber: 2g
- Sodium: 280mg
Ingredients
- 500g (about 4 cups) strong bread flour, plus extra for dusting
- 60g (1/4 cup) granulated sugar
- 10g (1.5 teaspoons) fine sea salt
- 10g (1 tablespoon) instant dry yeast
- 250ml (1 cup) cold water
- 50ml (1/4 cup) cold whole milk
- 50g (1/4 cup) unsalted butter, melted and cooled, for the dough
- 250g (1 cup + 2 tablespoons) high-quality unsalted butter, very cold, for lamination
- 1 large egg, whisked with 1 tablespoon water, for egg wash
Instructions
- Prepare the Dough (Détrempe): In a large mixing bowl, combine the bread flour, granulated sugar, fine sea salt, and instant dry yeast. Whisk them together thoroughly to ensure even distribution.
- In a separate bowl, combine the cold water and cold whole milk. Pour the wet ingredients into the dry ingredients, along with the 50g of melted and cooled unsalted butter.
- Mix with a wooden spoon or your hands until a shaggy dough forms. Turn the dough out onto a lightly floured surface and knead for about 8-10 minutes, or until the dough is smooth and elastic. It should pass the windowpane test (stretch a small piece until it’s thin enough to see light through without tearing).
- Form the dough into a ball, place it back in the bowl, cover with plastic wrap, and refrigerate for at least 2 hours, or preferably overnight. This chilling period is crucial for developing flavor and relaxing the gluten, making it easier to work with.
- Prepare the Butter Block (Beurrage): Take the 250g of very cold unsalted butter for lamination. Place it between two sheets of parchment paper. Using a rolling pin, pound and roll the butter into a flat, even rectangle, approximately 18cm x 18cm (7×7 inches). Aim for an even thickness. Return the butter block to the refrigerator while you prepare the dough.
- First Turn (Single Fold): Remove the chilled dough from the refrigerator. On a lightly floured surface, roll the dough into a rectangle roughly 20cm x 40cm (8×16 inches). The dough should be twice as long as your butter block.
- Place the cold butter block squarely on one half of the rolled-out dough, leaving a small border around the edges. Fold the other half of the dough over the butter, carefully sealing the edges to fully encase the butter. Pinch the seams tightly to prevent butter from escaping during rolling.
- Gently roll the dough into a long rectangle, about 20cm x 60cm (8×24 inches), maintaining an even thickness. Brush off any excess flour.
- Perform a single fold: Fold one-third of the dough over the middle section, then fold the remaining third over that, like folding a letter. This creates three layers of dough and two layers of butter.
- Wrap the folded dough tightly in plastic wrap and refrigerate for 30-45 minutes. This allows the butter to firm up and the gluten to relax.
- Second Turn (Single Fold): Remove the dough from the refrigerator. Place it on a lightly floured surface with the open seam facing you (like a book spine).
- Roll the dough again into a rectangle of similar dimensions as before (approx. 20cm x 60cm).
- Repeat the single fold: Fold one-third of the dough over, then the remaining third over that.
- Wrap the dough tightly in plastic wrap and refrigerate for another 30-45 minutes.
- Third Turn (Single Fold): Repeat the process for the third and final single fold. Roll the dough into a rectangle, perform the single fold, wrap, and refrigerate for at least 1-2 hours, or up to overnight. This longer chill is beneficial for the final texture.
- Shape the Croissants: Remove the well-chilled dough from the refrigerator. On a lightly floured surface, roll the dough into a large rectangle, approximately 30cm x 80cm (12×32 inches), and about 3-4mm (1/8 inch) thick. It’s important to roll evenly to ensure consistent layers.
- Using a sharp knife or pizza cutter, trim the edges of the rectangle to make them straight and neat.
- Cut the dough into triangles. For classic croissants, cut long strips about 10-12cm (4-5 inches) wide, then cut these strips diagonally to form triangles with a base of about 10-12cm (4-5 inches).
- To shape each croissant, make a small slit (about 1-2cm or 1/2-3/4 inch) in the center of the base of each triangle. Gently pull the two corners of the base outwards to slightly widen it, then starting from the base, roll the dough tightly towards the point, creating a crescent shape.
- Place the shaped croissants on a baking sheet lined with parchment paper, leaving ample space between them as they will expand significantly.
- Proofing: This is a critical step for super soft croissants. Create a warm, humid environment. You can do this by placing the baking sheets in a turned-off oven with a pan of hot water on the rack below. Alternatively, cover them loosely with plastic wrap and let them rise in a warm room (around 24-26°C or 75-80°F).
- Proof for 2-3 hours, or until the croissants are visibly puffy, jiggly, and have nearly doubled in size. When gently jiggled, they should feel light and airy. The layers should be distinct but not separated. Do not over-proof, or the butter may melt out during baking.
- Baking: Preheat your oven to 200°C (400°F) with a rack in the middle position.
- Just before baking, gently brush the proofed croissants with the egg wash (whisked egg and water). Be careful not to deflate them.
- Bake for 15-20 minutes, or until deeply golden brown and puffed. If they are browning too quickly, you can reduce the oven temperature slightly after the first 10 minutes.
- Transfer the baked croissants to a wire rack to cool slightly before serving.
Cooking Tips and Variations
Use Cold Ingredients: This cannot be stressed enough. Cold water, cold milk, and especially cold butter are paramount for successful lamination. If your kitchen is warm, chill your flour in the freezer for 15-20 minutes before starting.
Quality Butter Matters: The butter is a star ingredient here. Use a high-fat, unsalted butter (European-style butter often has a higher fat content) for the lamination process. Its pliability and flavor are superior.
Don’t Overwork the Dough: While kneading is necessary for gluten development, once the butter is incorporated, handle the dough gently. Overworking can lead to tough croissants and butter tearing through the layers.
Flour Your Surface Wisely: Use just enough flour to prevent sticking, but not so much that it gets incorporated into the dough, which can make it dry and tough.
Resting is Key: The chilling periods between turns are non-negotiable. They allow the butter to firm up and the gluten to relax, preventing shrinkage and tearing during rolling.
Proofing Environment: A warm, humid environment is ideal for proofing. If your oven has a “proof” setting, use it. Otherwise, the hot water method in a turned-off oven works wonders. Avoid drafts.
Even Rolling: Try to roll the dough to an even thickness throughout each turn and the final roll out. This ensures uniform layers and even baking.
Chocolate Croissants (Pain au Chocolat): Before rolling the triangles, cut the dough into rectangles (about 10x15cm or 4×6 inches). Place two batons of good quality dark chocolate at one end, roll once, place two more batons, then roll to enclose. Bake as directed.
Almond Croissants: After baking, slice cooled croissants horizontally. Fill with frangipane (almond cream), brush with simple syrup, dip the tops in flaked almonds, and bake again until golden.
Savory Croissants: Fill with a small amount of cheese (gruyere, cheddar) and ham before rolling. Adjust salt levels in the dough slightly if using very salty fillings.
Mini Croissants: Simply cut smaller triangles for delightful bite-sized pastries.
Storage and Reheating
Storing Baked Croissants: Super soft croissants are best enjoyed on the day they are baked, ideally still slightly warm. If you have leftovers, store them at room temperature in an airtight container or a paper bag (to allow some air circulation and prevent sogginess) for up to 1-2 days. Avoid refrigerating baked croissants, as this can dry them out and make them stale faster.
Freezing Baked Croissants: For longer storage, allow baked croissants to cool completely. Place them in a single layer on a baking sheet and freeze until solid. Once frozen, transfer them to a freezer-safe bag or airtight container. They can be stored in the freezer for up to 1 month.
Reheating Baked Croissants: To bring baked croissants back to life, place them on a baking sheet and reheat in a preheated oven at 170°C (340°F) for 5-10 minutes, or until warmed through and slightly crispy on the outside. If reheating from frozen, you can place them directly in the oven (no need to thaw) and bake for 10-15 minutes, or until golden and heated through.
Freezing Unbaked Croissants (After Shaping): This is a fantastic option for having fresh croissants on demand. After shaping the croissants but before the final proofing, place them on a parchment-lined baking sheet and freeze until solid. Once frozen, transfer them to a freezer-safe bag or container. They can be stored for up to 2-3 weeks.
Baking from Frozen: When you’re ready to bake, arrange the frozen croissants on a parchment-lined baking sheet. Cover loosely with plastic wrap and let them thaw and proof at room temperature (or in a warm, humid environment) for 6-8 hours, or even overnight in the refrigerator, followed by a couple of hours at room temperature. They should be visibly puffy and jiggly before baking. Once proofed, egg wash and bake as directed.
Frequently Asked Questions
Can I make the dough ahead of time?
Absolutely! In fact, making the dough and completing the lamination steps over two days can often yield better results and make the process less rushed. You can prepare the initial dough and refrigerate it overnight, then perform the folds the next day, chilling the dough for an extended period (up to 24 hours) after the final fold before shaping and proofing.
Why did my butter leak out during baking?
Butter leakage, often called “butter blow-out,” is usually due to the butter not being cold enough during lamination, the dough being too warm, or most commonly, over-proofing. If the croissants proof for too long or in too warm an environment, the butter can melt and separate from the dough before it hits the hot oven, leading to a greasy mess. Ensure proper chilling between folds and monitor your proofing carefully.
My croissants aren’t flaky, they’re dense. What went wrong?
Several factors can lead to dense croissants. Overworking the dough can develop too much gluten, making it tough. Insufficient proofing won’t allow the yeast to produce enough gas to create an airy structure. Also, if the butter was too soft during lamination, it might have incorporated into the dough rather than forming distinct layers, preventing flakiness. Ensure your dough is properly kneaded but not overworked, and pay close attention to the proofing stage.
What’s the best way to get a perfectly golden-brown crust?
A good egg wash is key! A mixture of one egg whisked with a tablespoon of water (or milk for a richer color) brushed gently over the croissants just before baking provides a beautiful sheen and contributes to that desirable deep golden-brown color. Ensure your oven is preheated to the correct temperature, as a hot oven helps set the crust quickly.



