
Follow Me On Social Media!
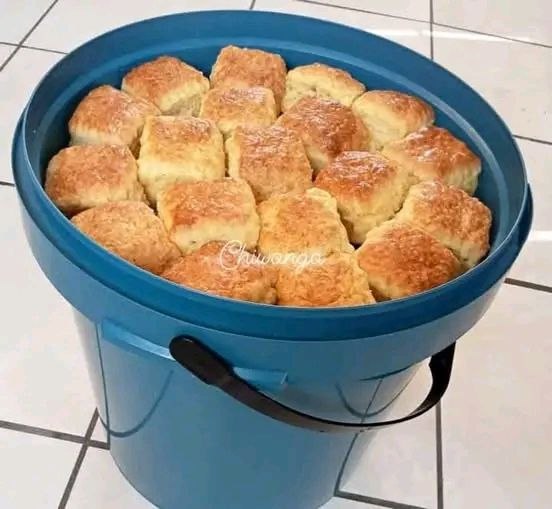
Delicious Homemade Biscuits in a Surprise Bucket

Introduction
There’s something undeniably comforting about a warm, flaky biscuit, fresh from the oven. But what if that comfort came with a side of delightful surprise? Today, we’re not just making delicious homemade biscuits; we’re elevating the experience by tucking them into a “surprise bucket,” making them perfect for potlucks, picnics, gifting, or simply a fun family breakfast. Biscuits, in their simplest form, are a quick bread leavened with baking powder or baking soda, creating a tender, often layered texture. While British biscuits are what Americans call cookies or crackers, we’re focusing on the beloved American version – soft, savory, and utterly irresistible.
Homemade biscuits stand head and shoulders above anything you can buy pre-made. The aroma alone as they bake is enough to draw everyone to the kitchen! Our recipe is designed for maximum flakiness and a tender crumb, ensuring every bite is pure bliss. And the “surprise bucket” presentation? It’s a game-changer. Imagine arriving at a brunch with a cute, unassuming bucket, only to reveal a bounty of warm, golden biscuits inside. It’s a guaranteed conversation starter and a memorable way to share your baking prowess.
This recipe isn’t just easy; it’s foolproof, even for beginner bakers. We’ll walk you through every step, from selecting the right ingredients to mastering the technique for perfectly tender, melt-in-your-mouth biscuits. Get ready to impress your taste buds and everyone around you with these delightful homemade biscuits, served with a twist!
Nutritional Information
Per serving (approximate values):
- Calories: 280
- Protein: 5g
- Carbohydrates: 35g
- Fat: 14g
- Fiber: 1g
- Sodium: 450mg
Ingredients
- 2 ½ cups (300g) all-purpose flour, plus more for dusting
- 1 tablespoon baking powder
- ½ teaspoon baking soda
- 1 teaspoon granulated sugar (optional, for a hint of sweetness)
- ¾ teaspoon fine sea salt
- 8 tablespoons (1 stick or 113g) unsalted butter, very cold and cut into ½-inch cubes
- 1 cup (240ml) cold buttermilk (or regular whole milk mixed with 1 tablespoon lemon juice or white vinegar, let sit 5 minutes)
- 2 tablespoons melted unsalted butter, for brushing after baking (optional)
- 1 large egg, beaten with 1 teaspoon water (for egg wash, optional, for golden tops)
Instructions
- Prepare Your Workspace and Preheat Oven: Preheat your oven to 425°F (220°C). Line a baking sheet with parchment paper. If using an egg wash, have it ready.
- Combine Dry Ingredients: In a large mixing bowl, whisk together the flour, baking powder, baking soda, sugar (if using), and salt. Make sure all ingredients are evenly distributed.
- Cut in the Cold Butter: Add the very cold, cubed butter to the dry ingredients. Using a pastry blender, two knives, or your fingertips, cut the butter into the flour mixture until it resembles coarse crumbs with some pea-sized pieces of butter remaining. The key here is to keep the butter as cold as possible; this creates steam in the oven, leading to flaky layers.
- Add the Buttermilk: Make a well in the center of the flour and butter mixture. Pour in the cold buttermilk. With a wooden spoon or spatula, gently stir until just combined. Be careful not to overmix; the dough should still look shaggy and a bit sticky. Overmixing develops gluten, which results in tough biscuits.
- Turn Out and Knead Briefly: Lightly flour a clean work surface. Turn the dough out onto the floured surface. Gently knead the dough 5-6 times, just enough to bring it together. You can also pat it into a rectangle, fold it in thirds (like a letter), and repeat this process 2-3 times. This layering technique also helps create flaky biscuits.
- Shape the Biscuits: Pat the dough into a rectangle about ½ to ¾ inch thick. Using a sharp knife or a bench scraper, cut the dough into 12-16 squares or rectangles (approximately 2×2 inches). You can also use a biscuit cutter, but for these “surprise bucket” biscuits, a rustic square shape is charming and minimizes waste. Avoid twisting the cutter if using one, as this can seal the edges and prevent rising.
- Arrange on Baking Sheet: Place the cut biscuits on your prepared baking sheet. For softer sides, place them close together (touching). For crispier sides, space them out slightly.
- Apply Egg Wash (Optional): If you desire a beautiful golden-brown top, gently brush the tops of the biscuits with the egg wash (1 beaten egg mixed with 1 teaspoon water).
- Bake: Bake for 12-15 minutes, or until the tops are golden brown and a biscuit tester inserted into the center comes out clean. Baking time may vary depending on your oven.
- Brush with Melted Butter (Optional): Once baked, remove the biscuits from the oven. For an extra touch of richness and shine, immediately brush the tops with 2 tablespoons of melted unsalted butter.
- Prepare the Surprise Bucket: While the biscuits are baking, prepare your bucket. Ensure it is clean and food-safe. Line the bottom and sides with parchment paper or a clean, thick kitchen towel. This will help absorb moisture and keep the biscuits warm.
- Load the Bucket: Carefully transfer the warm biscuits into the prepared bucket. If using a towel, you can wrap them gently. Place the lid on the bucket to keep them cozy until serving.
Cooking Tips and Variations
Achieving biscuit perfection is all about a few key techniques. First and foremost, keep your ingredients, especially the butter and buttermilk, as cold as possible. Cold butter creates pockets of steam during baking, which is what gives biscuits their characteristic flaky layers. If your kitchen is warm, you can even pop your flour in the freezer for 15-20 minutes before starting. Another crucial tip is to avoid overmixing the dough. Once the wet ingredients are added, mix just until combined. A shaggy, slightly sticky dough is exactly what you want. Overworking the dough develops gluten, leading to tough, dense biscuits instead of light and airy ones.
When shaping, if you’re not using a biscuit cutter, a sharp knife or bench scraper helps create clean cuts without tearing the dough. For truly tall biscuits, pat the dough to at least a ¾-inch thickness. For a subtle sweetness, you can increase the sugar to 2 tablespoons. For a savory twist, consider adding ½ teaspoon of garlic powder and a sprinkle of dried chives to the dry ingredients. If you don’t have buttermilk, don’t fret! You can easily make a substitute by adding 1 tablespoon of lemon juice or white vinegar to a cup of regular milk (whole milk works best) and letting it sit for 5-10 minutes until it slightly curdles. This acidity reacts with the baking soda to help the biscuits rise.
For an extra-rich flavor, some bakers like to use half butter and half shortening. Shortening has a higher melting point, which can contribute to even flakier results. If you prefer a richer, more golden crust without the egg wash, you can brush the tops of the unbaked biscuits with a little extra buttermilk or melted butter before baking. Experiment with these variations to find your perfect biscuit!
Storage and Reheating
Homemade biscuits are always best enjoyed fresh and warm from the oven, especially when served from their surprise bucket! However, if you find yourself with leftovers (a rare occurrence!), proper storage will help maintain their freshness. Once cooled completely, store biscuits in an airtight container at room temperature for up to 2 days. For longer storage, you can freeze baked biscuits for up to 2-3 months. Wrap them individually in plastic wrap, then place them in a freezer-safe bag or container.
To reheat biscuits, there are a few excellent methods. For best results, preheat your oven to 350°F (175°C). If reheating from room temperature, place biscuits directly on a baking sheet and heat for 5-7 minutes, or until warmed through. If reheating from frozen, you can place them directly on a baking sheet (no need to thaw) and bake for 15-20 minutes, or until hot and tender. You can also lightly tent them with foil to prevent over-browning. For a quick reheat, you can use a toaster oven for a few minutes. While not ideal for texture, a microwave can also warm a biscuit in 15-30 seconds, but it may result in a softer, less crisp exterior. Always aim to reheat gently to prevent them from drying out.
Frequently Asked Questions
Why are my biscuits tough?
Tough biscuits are almost always a result of overmixing the dough. When you overmix, you develop the gluten in the flour too much, which makes the biscuits dense and chewy instead of light and flaky. Remember to mix just until the ingredients are combined and the dough is shaggy.
Can I make biscuit dough ahead of time?
While fresh is best, you can prepare biscuit dough ahead of time. Once you’ve cut the biscuits, place them on a parchment-lined baking sheet and cover tightly with plastic wrap. Refrigerate for up to 24 hours. You can bake them straight from the fridge, adding a minute or two to the baking time. For longer storage, freeze the cut biscuits on a baking sheet until solid, then transfer to a freezer-safe bag. Bake from frozen, adding about 5-8 minutes to the baking time.
What’s the secret to flaky layers?
The secret lies in two things: very cold butter and minimal handling. The cold butter melts slowly in the oven, releasing steam that creates pockets and layers. Also, gently folding the dough a few times before cutting helps create additional layers without overworking it. Avoid twisting your biscuit cutter, as this can seal the edges and prevent the layers from rising properly.
Can I use regular milk instead of buttermilk?
Yes, you can! If you don’t have buttermilk, you can easily make a substitute. For every cup of regular milk (whole milk works best), add 1 tablespoon of lemon juice or white vinegar. Stir gently and let it sit for 5-10 minutes until it slightly curdles. This acidified milk will react with the baking soda in the recipe, providing the necessary leavening for light, fluffy biscuits.



