
Follow Me On Social Media!
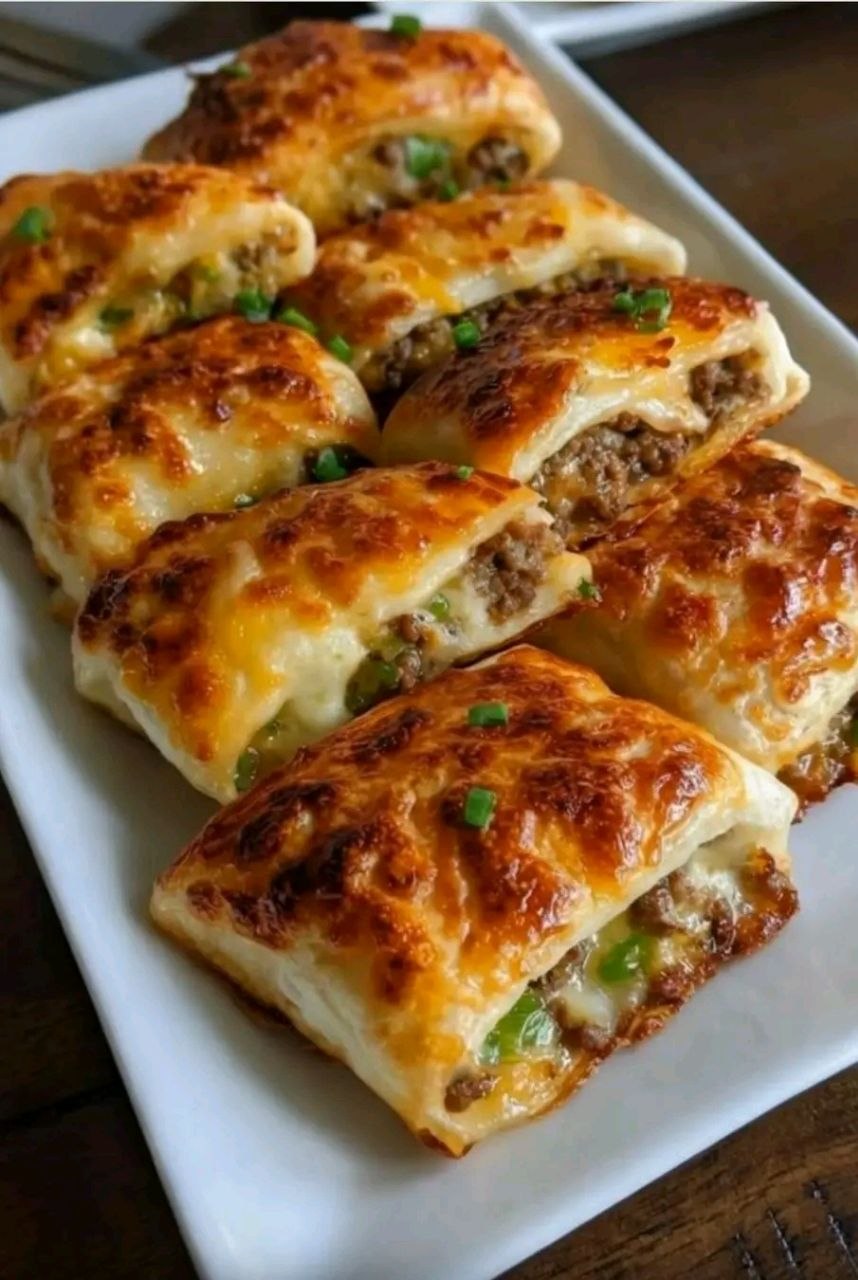
Loaded Cheesy Pocket Tacos The Ultimate Snack Upgrade

Introduction
Get ready to revolutionize your snack game, because we’re diving headfirst into the world of Loaded Cheesy Pocket Tacos! Forget everything you thought you knew about appetizers and quick meals; this recipe is the ultimate snack upgrade you’ve been craving. Imagine all the robust, savory flavors of your favorite taco – seasoned ground meat, melty cheese, and vibrant veggies – all tucked snugly inside a golden, flaky puff pastry pocket. It’s a handheld marvel, a flavor explosion, and frankly, a stroke of genius.
These aren’t just any tacos; they’re convenient, mess-free, and utterly irresistible. Perfect for game day gatherings, impromptu parties, or even a fun, quick dinner when you want something more exciting than the usual fare. The beauty of the Loaded Cheesy Pocket Taco lies in its ingenious design: a crispy, buttery crust encasing a gooey, generously stuffed interior. Every bite delivers that perfect crunch followed by a burst of seasoned meat and stretchy, melted cheese. It’s a complete package, designed for maximum enjoyment with minimal fuss.
What makes these pocket tacos truly special is their “loaded” nature. We’re not skimping on the good stuff here. We’re talking about a hearty, flavor-packed filling that ensures every single pocket is bursting with deliciousness. The combination of textures – the flaky pastry, the tender meat, the soft cheese, and the slight crunch of fresh vegetables – creates an experience that’s far superior to your average snack. Prepare to impress your taste buds and your guests with this innovative and utterly delicious creation that will have everyone reaching for more!
Nutritional Information
Per serving (approximate values):
- Calories: 420-480
- Protein: 25-30g
- Carbohydrates: 25-30g
- Fat: 25-35g
- Fiber: 2-4g
- Sodium: 600-800mg
Ingredients
- 1 tablespoon olive oil
- 1 pound ground beef (80/20 lean recommended)
- 1 medium yellow onion, finely diced
- 1 green bell pepper, finely diced
- 2 cloves garlic, minced
- 1 packet (1 ounce) taco seasoning mix
- 1/2 cup water
- 1/2 teaspoon salt (adjust to taste)
- 1/4 teaspoon black pepper (adjust to taste)
- 2 sheets frozen puff pastry, thawed according to package directions
- 2 cups shredded cheddar cheese or Mexican cheese blend
- 1 large egg, beaten (for egg wash)
- 2 tablespoons chopped fresh green onions, for garnish (optional)
- Sour cream, salsa, or guacamole, for serving (optional)
Instructions
- Preheat your oven to 400°F (200°C). Line two large baking sheets with parchment paper.
- In a large skillet, heat the olive oil over medium-high heat. Add the ground beef and cook, breaking it up with a spoon, until browned and cooked through. Drain any excess grease.
- Add the finely diced yellow onion and green bell pepper to the skillet with the cooked beef. Cook for 5-7 minutes, stirring occasionally, until the vegetables are softened.
- Stir in the minced garlic and cook for another minute until fragrant.
- Add the taco seasoning mix, 1/2 cup water, salt, and black pepper to the skillet. Stir well to combine. Bring the mixture to a simmer and cook for 3-5 minutes, or until most of the liquid has evaporated and the mixture has thickened. Remove from heat and set aside to cool slightly. This step is crucial for preventing a soggy pastry.
- While the filling cools, unroll one sheet of thawed puff pastry onto a lightly floured surface. Gently roll it out slightly with a rolling pin to smooth any creases and make it a bit larger, if desired.
- Cut the puff pastry sheet into 4 equal squares. Repeat with the second sheet of puff pastry, yielding 8 squares in total.
- Spoon about 1/4 cup of the cooled beef mixture onto one half of each puff pastry square, leaving a small border around the edges.
- Sprinkle approximately 1/4 cup of shredded cheese over the beef mixture on each square.
- Fold the other half of the puff pastry square over the filling to create a pocket. Press the edges firmly together to seal. You can use the tines of a fork to crimp the edges for an extra secure seal and a decorative finish.
- Carefully transfer the sealed pocket tacos to the prepared baking sheets, making sure they are not touching.
- In a small bowl, beat the egg to create an egg wash. Brush the tops of each puff pastry pocket with the egg wash. This will help them turn golden brown and shiny.
- Bake for 18-22 minutes, or until the puff pastry is puffed, golden brown, and cooked through. The exact baking time may vary depending on your oven.
- Once baked, remove the pocket tacos from the oven and let them cool on the baking sheets for 5 minutes before serving. This allows the cheese to set slightly and prevents burns from the extremely hot filling.
- Garnish with chopped fresh green onions, if desired. Serve hot with your favorite dips like sour cream, salsa, or guacamole.
Cooking Tips and Variations
Achieving the perfect Loaded Cheesy Pocket Taco is all about a few key techniques and knowing how to play with flavors. First and foremost, always ensure your beef filling is cooled before assembling. Placing hot filling into the puff pastry will cause it to soften and become soggy, preventing that glorious flaky crust we’re aiming for. Draining excess grease from the beef and cooking off the liquid from the taco seasoning mixture is also critical for a non-soggy interior. Don’t be shy with the egg wash! A generous brushing ensures a beautiful golden-brown finish and a lovely subtle sheen that makes these pockets even more appealing. When sealing the edges, pressing firmly and then crimping with a fork creates a secure seal, preventing any cheesy explosions during baking.
For variations, the possibilities are virtually endless. If you’re not a fan of beef, ground chicken or turkey can be used as a leaner alternative; just be sure to season them well. Vegetarian? A hearty black bean and corn salsa mixture, seasoned with taco spices, makes an excellent filling. You could even add sautéed mushrooms or finely chopped zucchini to the vegetable mix for extra nutrition and texture. Spice lovers can kick things up a notch by adding diced jalapeños or a pinch of cayenne pepper to the beef mixture. Experiment with different cheeses too – Monterey Jack, pepper jack for a spicy kick, or even a smoked gouda for a unique flavor twist. For an even more “loaded” experience, consider adding a tiny sprinkle of cooked crumbled bacon or a dash of hot sauce directly into the filling before sealing. You can also vary the shape; instead of squares, cut the puff pastry into circles and fold them into half-moons for a different look. Just be sure to adjust baking time if you make them significantly smaller or larger.
Another great tip for party planning is to prepare the beef filling ahead of time. It can be made a day or two in advance and stored in the refrigerator. This significantly cuts down on prep time on the day of your event. Just reheat the filling slightly before assembling to make it easier to work with, but ensure it cools again before going into the pastry. Also, avoid overfilling the pockets. While the temptation to load them up is strong, too much filling can make them difficult to seal and prone to bursting during baking, leading to a messy, albeit still delicious, outcome. Finally, for an extra crispy bottom, consider placing the assembled pockets on a wire rack set inside a baking sheet. This allows air to circulate around the entire pastry, promoting even browning.
Storage and Reheating
Loaded Cheesy Pocket Tacos are best enjoyed fresh out of the oven, when the pastry is at its crispiest and the cheese is perfectly gooey. However, if you find yourself with leftovers, they can be stored and reheated while still maintaining much of their deliciousness.
To store, allow the pocket tacos to cool completely to room temperature. This is crucial to prevent condensation, which can make the pastry soggy. Once cooled, place them in an airtight container. They can be stored in the refrigerator for up to 3-4 days. For longer storage, you can freeze them. Place the cooled pockets in a single layer on a baking sheet and freeze until solid (about 2-3 hours). Once frozen, transfer them to a freezer-safe bag or container. They can be kept in the freezer for up to 1-2 months. When freezing, it’s a good idea to separate individual pockets with parchment paper to prevent them from sticking together.
Reheating is best done in a way that helps restore the crispness of the pastry. For refrigerated pockets, preheat your oven or a toaster oven to 350°F (175°C). Place the pocket tacos directly on a baking sheet and heat for 10-15 minutes, or until they are warmed through and the pastry is crisp again. Avoid using a microwave for reheating, as it tends to make the pastry soft and chewy rather than flaky.
If reheating from frozen, you can either thaw them in the refrigerator overnight or bake them directly from frozen. If baking from frozen, preheat your oven to 375°F (190°C) and place the frozen pockets on a baking sheet. Bake for 20-30 minutes, or until thoroughly heated through and the pastry is golden and crisp. The exact time will depend on your oven and the size of the pockets. Always ensure the internal temperature reaches a safe level before serving, especially since they contain meat and cheese. A quick check with a food thermometer should register around 165°F (74°C).
Frequently Asked Questions
What kind of puff pastry should I use?
Most recipes, including this one, refer to store-bought frozen puff pastry sheets. These are readily available in the freezer section of most grocery stores. Ensure you follow the package directions for thawing, as it’s crucial for the pastry to be pliable but still cold enough to work with. Avoid using phyllo dough, as it has a different texture and fat content that won’t yield the same flaky, buttery result.
Can I make these ahead of time?
Absolutely! You can prepare the beef filling up to 2-3 days in advance and store it in an airtight container in the refrigerator. When you’re ready to assemble, simply reheat the filling slightly until it’s pliable, then let it cool completely before spooning it into the puff pastry. You can also assemble the entire pocket tacos (without baking) and refrigerate them for a few hours, or even freeze them unbaked for later. If baking from frozen unbaked pockets, you might need to add an extra 5-10 minutes to the baking time.
My puff pastry pockets aren’t getting golden brown; what went wrong?
Several factors could contribute to this. First, ensure your oven is preheated to the correct temperature. An accurate oven thermometer can be very helpful. Second, don’t skip the egg wash! Brushing the tops of the pockets with a beaten egg is essential for achieving that beautiful golden-brown, shiny finish. Finally, baking time can vary by oven; if they’re still pale after the recommended time, continue baking for a few more minutes, keeping a close eye on them until they reach your desired level of goldenness.
What are some good dipping sauces for these pocket tacos?
The beauty of these Loaded Cheesy Pocket Tacos is their versatility with dips! Classic choices include sour cream, guacamole, and your favorite salsa (mild, medium, or hot). For something a little different, consider a creamy cilantro-lime sauce, a spicy queso dip, or even a simple ranch dressing. A chipotle aioli or a cool avocado crema would also complement the flavors wonderfully, adding another layer of creaminess and tang.



