Follow Me On Social Media!
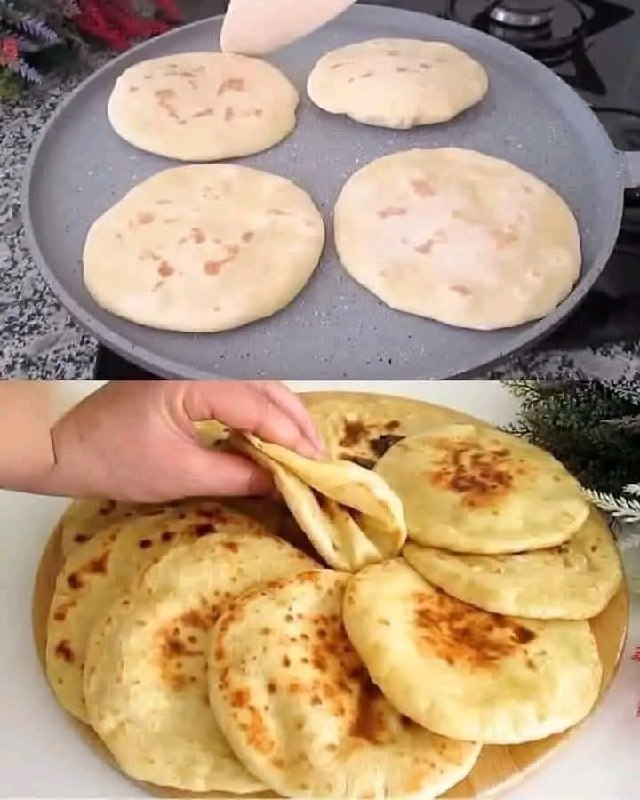
Sandwich Crust Garlic Rolls

Introduction
Welcome to a culinary adventure that transforms the humble bread crust into something truly extraordinary: Sandwich Crust Garlic Rolls! Forget everything you thought you knew about garlic bread, because these rolls are about to redefine your expectations. Imagine soft, chewy, incredibly flavorful morsels, bursting with the aromatic punch of fresh garlic, all nestled in a convenient, skillet-cooked package. This isn’t just a recipe; it’s an innovation, a delightful way to elevate your everyday meals with minimal fuss and maximum flavor.
What makes these “Sandwich Crust Garlic Rolls” so special? It’s the ingenious approach to dough, creating a texture that’s wonderfully pliable and cooks up beautifully on a flat surface, mimicking the crisp yet tender quality of a perfect sandwich crust. These aren’t your typical fluffy dinner rolls; they possess a unique chewiness and a slightly rustic charm that makes them incredibly addictive. Whether you’re looking for a quick appetizer, a delicious side for your favorite soup or pasta, or just a satisfying snack, these garlic rolls are guaranteed to be a crowd-plepleaser. Their simplicity belies their incredible taste, making them a fantastic project for both novice and experienced bakers alike.
The beauty of this recipe lies in its approachable nature. We’re taking basic pantry staples – flour, water, yeast, and of course, plenty of garlic – and transforming them into something magical. The process is straightforward, focusing on creating a dough that’s easy to handle and quick to cook. The result is a batch of warm, fragrant garlic rolls that will fill your kitchen with an irresistible aroma and your taste buds with pure joy. Get ready to impress your family and friends with these homemade delights that taste like they came straight from a gourmet bakery, but were made with love right in your own kitchen.
Nutritional Information
Per serving (approximate values):
- Calories: 180
- Protein: 5g
- Carbohydrates: 30g
- Fat: 4g
- Fiber: 2g
- Sodium: 250mg
Ingredients
- 2 ½ cups all-purpose flour, plus more for dusting
- 1 teaspoon instant dry yeast
- 1 teaspoon granulated sugar
- 1 teaspoon fine sea salt
- 1 cup warm water (105-115°F / 40-46°C)
- 3 tablespoons olive oil, divided, plus extra for brushing
- 4-6 cloves garlic, minced very fine (about 2 tablespoons)
- 2 tablespoons fresh parsley, finely chopped (optional, for garnish)
- Pinch of red pepper flakes (optional, for a subtle kick)
Instructions
- In a large mixing bowl, combine the all-purpose flour, instant dry yeast, granulated sugar, and fine sea salt. Whisk these dry ingredients together until well combined.
- Gradually pour in the warm water while stirring with a wooden spoon or spatula. Continue to mix until a shaggy, cohesive dough forms. Ensure there are no dry pockets of flour remaining.
- Add 1 tablespoon of olive oil to the dough. Turn the dough out onto a lightly floured surface. Knead the dough for 5-7 minutes, until it becomes smooth, elastic, and no longer sticky. If the dough is too sticky, add a very small amount of flour, a teaspoon at a time. If it’s too dry, add a tiny bit of water.
- Lightly grease the mixing bowl with a little olive oil. Place the kneaded dough back into the bowl, turning it once to coat all sides with oil. Cover the bowl tightly with plastic wrap or a clean kitchen towel.
- Let the dough rise in a warm place for 1 to 1 ½ hours, or until it has doubled in size. The rising time can vary depending on the warmth of your kitchen.
- While the dough is rising, prepare the garlic oil. In a small bowl, combine the remaining 2 tablespoons of olive oil with the minced garlic and optional red pepper flakes. Stir well and set aside. This allows the flavors to meld.
- Once the dough has doubled, gently punch it down to release the air. Turn the dough out onto a lightly floured surface. Divide the dough into 12-16 equal pieces, depending on your desired roll size.
- Working with one piece at a time, gently roll each piece into a small ball, then flatten it slightly with the palm of your hand or a rolling pin into a disc about ¼ inch thick and 3-4 inches in diameter. These don’t need to be perfectly round.
- Heat a large non-stick skillet or cast-iron griddle over medium heat. Do not add oil to the skillet yet.
- Once the skillet is hot, place 3-4 dough discs in the skillet, ensuring they are not overcrowded. Cook for 2-3 minutes per side, or until golden brown spots appear and the rolls are cooked through. The rolls should puff up slightly. You may need to adjust the heat to prevent burning.
- As each batch of rolls finishes cooking, immediately transfer them to a plate. While still hot, brush the tops generously with the prepared garlic oil mixture. If using, sprinkle with fresh chopped parsley.
- Repeat the cooking and brushing process with the remaining dough discs and garlic oil. Serve the Sandwich Crust Garlic Rolls warm and enjoy!
Cooking Tips and Variations
For the best results with your Sandwich Crust Garlic Rolls, consider a few key tips. First, ensure your warm water for the yeast is at the correct temperature (105-115°F or 40-46°C). Water that is too hot will kill the yeast, and water that is too cold won’t activate it, leading to a dough that doesn’t rise properly. A kitchen thermometer is very helpful here. When kneading the dough, don’t rush the process; the 5-7 minutes are crucial for developing the gluten, which gives the rolls their signature chewiness and elasticity. If your kitchen is cool, you can create a warm spot for rising by preheating your oven to its lowest setting for a few minutes, then turning it off and placing the covered dough inside.
When cooking the rolls, preheat your skillet thoroughly over medium heat before adding the first batch. This ensures even cooking and a beautiful golden-brown crust. Avoid overcrowding the skillet, as this can lower the pan’s temperature and lead to steaming rather than browning. Cook in batches, and be patient – the rolls should puff up and develop nice color on both sides. Don’t forget to brush them with the garlic oil immediately after they come off the skillet while they are still hot; this allows the oil and garlic flavors to seep into the warm bread, maximizing the aroma and taste.
There are many exciting variations you can explore to customize your Sandwich Crust Garlic Rolls. For a cheesy twist, you can incorporate ½ cup of grated Parmesan cheese or shredded mozzarella into the dough during the kneading stage, or sprinkle it on top with the garlic oil after cooking. If you love fresh herbs, finely chopped rosemary, thyme, or oregano can be added to the dough along with the flour, or mixed into the garlic oil for an extra layer of flavor. For a spicier kick, increase the amount of red pepper flakes in the garlic oil or add a pinch of cayenne pepper to the dough. You can also experiment with different oils; a high-quality extra virgin olive oil will lend a more robust flavor to the garlic oil mixture.
To make these rolls gluten-free, substitute the all-purpose flour with a good quality gluten-free all-purpose flour blend that contains xanthan gum. You might need to adjust the water slightly, as gluten-free flours can absorb liquids differently. For a vegan version, this recipe is already naturally vegan, as it doesn’t call for any animal products. Just ensure your sugar is bone-char free if that is a concern. Finally, consider making larger or smaller rolls depending on their intended use. Smaller rolls are great for appetizers, while larger ones can serve as a more substantial side. The cooking time will need to be adjusted accordingly for different sizes.
Storage and Reheating
To store any leftover Sandwich Crust Garlic Rolls, allow them to cool completely to room temperature first. Once cooled, place them in an airtight container or a resealable plastic bag. They will keep well at room temperature for up to 2-3 days, though they are best enjoyed fresh. If you plan to keep them longer, you can store them in the refrigerator for up to 5 days, but be aware that refrigeration can sometimes alter the texture of bread, making it a bit tougher.
For longer-term storage, these garlic rolls freeze beautifully. Once completely cooled, arrange them in a single layer on a baking sheet and freeze until solid (this prevents them from sticking together). Then, transfer the frozen rolls to a freezer-safe bag or airtight container. They can be stored in the freezer for up up to 2-3 months. When ready to enjoy, there’s no need to thaw them beforehand if reheating from frozen.
Reheating the Sandwich Crust Garlic Rolls is straightforward and helps to restore their delicious texture and aroma. The best method for reheating is in an oven or toaster oven. Preheat your oven to 350°F (175°C). Place the rolls directly on a baking sheet or wrap them loosely in foil. If reheating from room temperature, warm for 5-7 minutes, or until heated through and slightly crispy on the outside. If reheating from frozen, it will take a bit longer, about 10-15 minutes, or until warm in the center. You can also quickly reheat them in a dry skillet over medium heat for a few minutes per side, which will help to crisp them up nicely. Avoid reheating in a microwave, as this can make the rolls soft and chewy rather than retaining their desirable slightly crisp exterior.
Frequently Asked Questions
Can I prepare the dough ahead of time?
Yes, you can definitely prepare the dough ahead of time. After the first rise, gently punch down the dough, then place it in an oiled bowl, cover it tightly with plastic wrap, and refrigerate it for up to 24 hours. When you’re ready to make the rolls, take the dough out of the refrigerator and let it sit at room temperature for about 30-60 minutes to warm up slightly before dividing and shaping. This helps the dough relax and makes it easier to work with.
What if I don’t have instant yeast? Can I use active dry yeast?
Yes, you can use active dry yeast instead of instant yeast. The main difference is that active dry yeast needs to be activated first. To do this, combine the active dry yeast with the warm water and sugar in a small bowl. Let it sit for 5-10 minutes until it becomes foamy. If it doesn’t foam, your yeast might be old or the water wasn’t the right temperature, and you’ll need to start with new yeast. Once activated, add this mixture to the flour and salt as directed in the recipe.
My rolls are coming out tough or dry. What went wrong?
Several factors can lead to tough or dry rolls. Over-kneading the dough can develop too much gluten, making it dense. Conversely, not enough kneading can result in a crumbly texture. Ensure you’re measuring your flour correctly, preferably by weight if possible, as too much flour will make the dough dry. Overcooking the rolls in the skillet can also dry them out; cook only until golden brown spots appear and they are cooked through, not excessively. Make sure your skillet isn’t too hot, causing the outside to burn before the inside cooks.
Can I bake these in an oven instead of a skillet?
While the skillet cooking method gives these “Sandwich Crust” rolls their unique texture and quick cooking time, you can bake them in an oven. Preheat your oven to 400°F (200°C). Place the shaped dough discs on a baking sheet lined with parchment paper. Bake for 10-15 minutes, or until golden brown and cooked through. You might not get the same slightly charred, bubbly exterior as with skillet cooking, but they will still be delicious. Brush with garlic oil immediately after removing from the oven.