
Follow Me On Social Media!
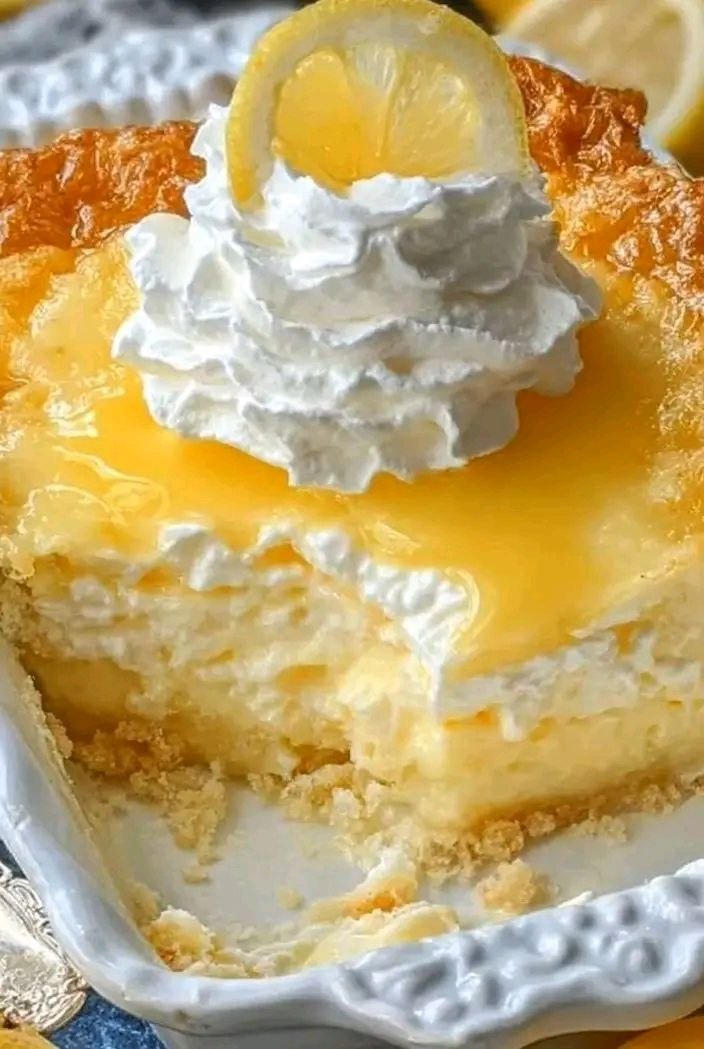
The Authentic Woolworth Cheesecake

Introduction
Step back in time with us to an era of bustling lunch counters, red vinyl stools, and the unmistakable aroma of a classic American dessert. Before the mega-malls and drive-thrus, there was Woolworth’s – a beloved five-and-dime store that was as famous for its accessible shopping as it was for its iconic soda fountains and lunch counters. And at the heart of their dessert menu, a true star shone brightly: the Woolworth Cheesecake. This wasn’t just any cheesecake; it was a slice of pure, unadulterated nostalgia, a creamy, tangy, and utterly satisfying treat that families flocked to enjoy. Recreating this authentic classic isn’t just about baking; it’s about preserving a piece of culinary history and bringing that cherished memory back to life in your own kitchen.
The magic of the Woolworth Cheesecake lies in its perfect balance of simplicity and sophistication. Unlike many modern cheesecakes that can be overly rich or dense, the Woolworth version boasts a delightful lightness and a pronounced, bright lemon tang that cuts through the creaminess beautifully. It’s a cheesecake that feels both comforting and elegant, making it suitable for a casual family dessert or a special occasion. We’ve meticulously researched and tested to bring you a recipe that truly captures the essence of that beloved original – from its perfectly crumbly graham cracker crust to its silky-smooth, lemon-infused filling, and that signature glossy lemon topping.
Prepare to embark on a delightful baking journey that will fill your home with irresistible aromas and your taste buds with pure joy. This recipe isn’t just about following steps; it’s about experiencing the joy of creating something truly special, a dessert that tells a story with every forkful. Get ready to discover why the Authentic Woolworth Cheesecake has remained a culinary legend for generations, and why it’s about to become a new favorite in your own recipe repertoire.
Nutritional Information
Per serving (approximate values):
- Calories: 420
- Protein: 8g
- Carbohydrates: 45g
- Fat: 25g
- Fiber: 1g
- Sodium: 280mg
Ingredients
For the Graham Cracker Crust:
- 1 ½ cups (about 10-12 full sheets) finely crushed graham cracker crumbs
- ¼ cup granulated sugar
- ½ cup (1 stick) unsalted butter, melted
For the Cheesecake Filling:
- 3 (8-ounce) packages full-fat cream cheese, softened at room temperature
- 1 ½ cups granulated sugar
- ¼ cup all-purpose flour
- 1 teaspoon vanilla extract
- ½ teaspoon lemon extract
- ¼ cup fresh lemon juice
- 1 teaspoon lemon zest (from 1 medium lemon)
- 4 large eggs, at room temperature
- ½ cup full-fat sour cream, at room temperature
For the Lemon Glaze Topping:
- ½ cup granulated sugar
- 2 tablespoons cornstarch
- ½ cup fresh lemon juice
- ¼ cup cold water
- 1 tablespoon unsalted butter
- 1 teaspoon lemon zest (optional, for extra flavor)
For Garnish (Optional):
- Fresh lemon slices or twists
- Fresh whipped cream
Instructions
- Preheat your oven to 350°F (175°C). Lightly grease a 9-inch springform pan.
- Prepare the Crust: In a medium bowl, combine the graham cracker crumbs and ¼ cup granulated sugar. Pour in the melted butter and mix until the crumbs are evenly moistened and hold together when pressed.
- Press the crumb mixture firmly and evenly into the bottom of the prepared springform pan. You can use the bottom of a glass to help create a compact and smooth crust.
- Bake the crust for 8-10 minutes, or until lightly golden brown and fragrant. Remove from the oven and let cool completely on a wire rack while you prepare the filling. Reduce oven temperature to 325°F (160°C).
- Prepare the Cheesecake Filling: In a large mixing bowl, using an electric mixer on medium speed, beat the softened cream cheese until smooth and creamy, about 2-3 minutes. Make sure there are no lumps.
- Gradually add the 1 ½ cups granulated sugar to the cream cheese, beating until well combined and smooth, scraping down the sides of the bowl as needed.
- Add the all-purpose flour and beat until just incorporated.
- Stir in the vanilla extract, lemon extract, fresh lemon juice, and lemon zest. Mix until evenly distributed.
- Add the eggs one at a time, beating on low speed after each addition just until combined. Be careful not to overmix once the eggs are added, as this can incorporate too much air and lead to cracks.
- Finally, gently fold in the sour cream until just incorporated. The filling should be smooth and creamy.
- Bake the Cheesecake: Pour the cheesecake filling over the cooled graham cracker crust in the springform pan. Gently tap the pan on the counter a few times to release any air bubbles.
- For best results and to prevent cracking, bake the cheesecake in a water bath. Wrap the outside of the springform pan tightly with heavy-duty aluminum foil to prevent water from seeping in. Place the springform pan inside a larger roasting pan. Carefully pour hot water into the roasting pan until it reaches about halfway up the sides of the springform pan.
- Carefully transfer the roasting pan with the cheesecake to the preheated 325°F (160°C) oven.
- Bake for 60-75 minutes, or until the edges are set and slightly puffed, but the center 2-3 inches still jiggles slightly when the pan is gently shaken. Do not overbake.
- Turn off the oven and prop the oven door open slightly with a wooden spoon. Let the cheesecake cool in the oven for 1 hour. This slow cooling process helps prevent cracking.
- Remove the cheesecake from the water bath and remove the foil. Let it cool completely on a wire rack at room temperature for another 1-2 hours.
- Once cooled, cover the cheesecake loosely with plastic wrap and refrigerate for at least 6-8 hours, or preferably overnight, to allow it to fully set and chill.
- Prepare the Lemon Glaze Topping: In a small saucepan, whisk together the ½ cup granulated sugar and cornstarch until no lumps remain.
- Gradually whisk in the ½ cup fresh lemon juice and ¼ cup cold water until smooth.
- Place the saucepan over medium heat and cook, stirring constantly, until the mixture thickens and comes to a boil. Boil for 1 minute, stirring constantly.
- Remove from heat and stir in the 1 tablespoon unsalted butter and optional 1 teaspoon lemon zest until the butter is melted and fully incorporated.
- Pour the lemon glaze into a heatproof bowl and let it cool completely to room temperature, stirring occasionally to prevent a skin from forming. The glaze will thicken further as it cools.
- Assemble and Serve: Once the cheesecake is thoroughly chilled and the glaze is cool, carefully run a thin knife around the edge of the springform pan before releasing the sides.
- Pour the cooled lemon glaze evenly over the top of the chilled cheesecake, spreading it gently to the edges.
- Garnish with fresh lemon slices or twists and dollops of fresh whipped cream, if desired. Slice and serve cold.
Cooking Tips and Variations
Preventing Cracks: The water bath is your best friend for a crack-free cheesecake. It creates a moist environment that helps the cheesecake bake evenly and prevents the top from drying out and cracking. Also, avoid overmixing the batter, especially after adding the eggs, as excess air can cause cracks. Cooling slowly in the oven with the door ajar is another crucial step.
Smooth Filling: Ensure your cream cheese, eggs, and sour cream are all at room temperature. This allows them to blend smoothly without lumps and prevents overmixing. Beat the cream cheese alone first until it’s super creamy before adding other ingredients.
Perfect Crust: For an extra sturdy and crisp crust, pre-bake it for 8-10 minutes as directed. If you prefer a thicker crust, increase the graham cracker crumbs and butter slightly, maintaining the ratio.
Intense Lemon Flavor: Use freshly squeezed lemon juice and fresh lemon zest for the most vibrant lemon flavor. Bottled lemon juice often lacks the brightness of fresh. Don’t skip the lemon extract in the filling; it boosts the lemon profile beautifully.
Don’t Rush the Chill: Cheesecake needs ample time to chill and set properly. Rushing this step will result in a soft, unset cheesecake that is difficult to slice. Plan to make it the day before you intend to serve it.
Variations:
- Berry Swirl: Before adding the lemon glaze, gently swirl a few spoonfuls of berry compote (raspberry, blueberry, or strawberry) into the top of the cheesecake filling for a beautiful marble effect.
- Chocolate Crust: Substitute chocolate cookie crumbs (like Oreos, with the cream filling removed) for graham cracker crumbs for a decadent twist.
- Orange Zest Twist: Replace half of the lemon zest in the filling and glaze with orange zest for a subtle citrus variation.
- Coconut Crust: Add 2 tablespoons of shredded unsweetened coconut to the graham cracker crust mixture for a tropical hint.
Storage and Reheating
Storage: The Authentic Woolworth Cheesecake stores beautifully. Once baked and cooled, cover it loosely with plastic wrap or transfer it to an airtight container. Store in the refrigerator for up to 5-7 days. For longer storage, you can freeze individual slices or the whole cheesecake. Wrap slices tightly in plastic wrap, then in aluminum foil, and place them in a freezer-safe bag or container. A whole cheesecake can be wrapped similarly. Frozen cheesecake can last for up to 1-2 months.
Reheating: Cheesecake is traditionally served cold, so reheating is generally not recommended as it can alter the texture. If you have frozen slices, transfer them to the refrigerator overnight to thaw slowly, or let them sit at room temperature for 30-60 minutes before serving. Avoid using a microwave or oven for thawing or warming, as this can make the cheesecake rubbery or oily.
Frequently Asked Questions
What kind of cream cheese should I use for the best results?
Always use full-fat block cream cheese, not the whipped or spreadable kind in tubs. The full-fat variety provides the necessary richness and structure for a classic, creamy cheesecake. Ensure it’s at room temperature for easy blending and a smooth batter.
Can I make this cheesecake without a water bath?
While a water bath is highly recommended for preventing cracks and ensuring a creamy texture, you can bake it without one. If omitting the water bath, be sure to place a pan of hot water on the bottom rack of your oven to create some humidity. Also, be prepared for a slightly higher chance of surface cracks and a potentially less creamy result. The baking time might also be slightly shorter, so keep a close eye on it.
My cheesecake cracked! What went wrong?
Cracking is a common cheesecake woe, often due to sudden temperature changes or overbaking. Common culprits include: overmixing the batter (incorporating too much air), baking at too high a temperature, not using a water bath, or removing the cheesecake from the oven or springform pan too quickly. Cooling the cheesecake slowly in the oven with the door ajar, as instructed, is crucial for preventing cracks.
Can I prepare the lemon glaze ahead of time?
Yes, the lemon glaze can be made a day or two in advance. Prepare it as directed, let it cool completely, then store it in an airtight container in the refrigerator. Before using, you may need to whisk it vigorously or gently warm it over low heat for a minute or two to loosen it up and make it pourable again. Ensure it’s completely cool before applying it to the cheesecake.



