
Follow Me On Social Media!
Search Results for 3-ingredient lemon bars

Introduction
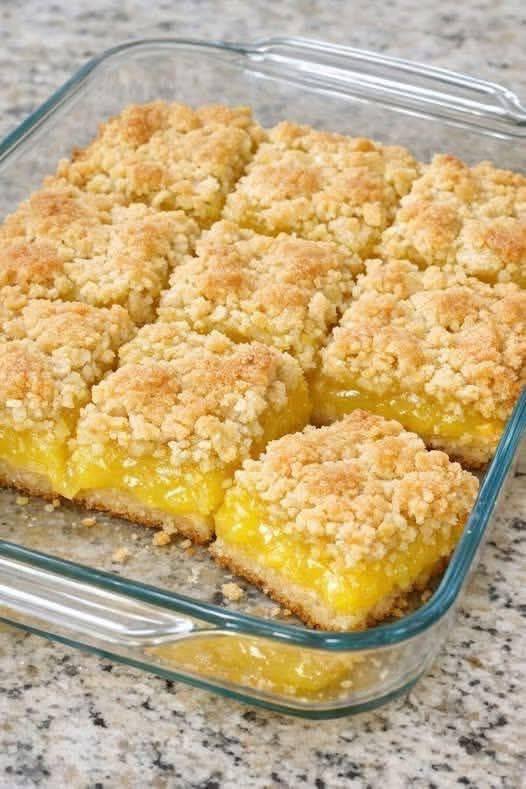
Get ready to have your mind blown and your taste buds sing with joy because today, we’re diving into the ridiculously easy, yet unbelievably delicious, world of 3-ingredient lemon bars! Forget complicated recipes, endless ingredient lists, and hours spent in the kitchen. These lemon bars are the ultimate shortcut to a tangy, sweet, and utterly satisfying dessert that will have everyone asking for your secret – and you can proudly tell them it’s just three simple components. Lemon bars have long been a beloved classic, known for their bright, citrusy punch and buttery crust, making them a perfect treat for picnics, potlucks, or simply a cozy afternoon indulgence. But often, the traditional recipe involves multiple steps, from making the crust from scratch to whisking up a creamy lemon filling, which can be daunting for even seasoned bakers.
That’s where our magical 3-ingredient version comes in. This recipe isn’t just easy; it’s a revelation. It takes the essence of what makes classic lemon bars so good and streamlines the process to an absolute minimum, without sacrificing any of the flavor or texture you crave. The secret lies in cleverly utilizing common pantry staples that do double duty, creating a dessert that tastes far more complex than its humble origins suggest. Imagine a golden, crumbly base and topping, embracing a vibrant, zesty lemon filling, all coming together in less time than it takes to decide what to watch on TV. This recipe is a game-changer for busy weeknights, last-minute gatherings, or anyone who simply loves dessert but hates the fuss.
What makes these 3-ingredient lemon bars truly special is their ability to deliver a full-bodied lemon bar experience with such minimal effort. The tartness of the lemon is perfectly balanced by the sweetness, and the texture is a delightful contrast between the tender, gooey filling and the slightly crisp, buttery crumble. It’s a dessert that appeals to all ages, from kids who love a sweet treat to adults who appreciate a sophisticated flavor profile. Whether you’re a baking novice looking for a foolproof recipe or an experienced chef in search of a quick and impressive dessert, these lemon bars are about to become your new go-to. Prepare to be amazed at how much deliciousness can be packed into just three simple ingredients!
Nutritional Information
Per serving (approximate values):
- Calories: 320 kcal
- Protein: 3g
- Carbohydrates: 45g
- Fat: 15g
- Fiber: 1g
- Sodium: 250mg
Ingredients
- 1 (15.25 ounce) box yellow cake mix (or lemon cake mix for extra lemon flavor)
- 1 cup (2 sticks) unsalted butter, melted
- 1 (12 ounce) jar good quality lemon curd
Instructions
- Preheat your oven to 350°F (175°C). Line a 9×13-inch baking pan with parchment paper, leaving an overhang on the sides to easily lift the bars out later. Lightly grease the parchment paper or spray with non-stick cooking spray. This step is crucial for easy removal and clean cuts.
- In a large mixing bowl, combine the dry cake mix and the melted butter. Stir with a fork or spatula until the mixture is well combined and forms a crumbly, sandy texture. It should resemble wet sand, with no dry cake mix visible.
- Press about two-thirds of the cake mix mixture evenly into the bottom of the prepared 9×13-inch baking pan. Use the back of a spoon or your fingers to firmly press the mixture down, forming a compact and even crust. Make sure the crust extends to all edges of the pan.
- Carefully spoon the entire jar of lemon curd over the pressed crust. Using an offset spatula or the back of a spoon, gently spread the lemon curd evenly across the crust, ensuring it reaches all the way to the edges. Be careful not to disturb the crust underneath.
- Sprinkle the remaining one-third of the cake mix crumble mixture evenly over the top of the lemon curd layer. Try to get an even distribution so you have a nice crumbly topping in every bite.
- Place the baking pan into the preheated oven and bake for 25-30 minutes, or until the top is lightly golden brown and the lemon curd filling appears set (it shouldn’t jiggle excessively when gently shaken). The edges of the crumble may be a deeper golden.
- Once baked, remove the pan from the oven and place it on a wire rack to cool completely. This is a critical step for proper setting and clean cuts. Do not attempt to cut the bars while they are warm, as they will be too soft and fall apart. Cooling can take 2-3 hours at room temperature, or you can speed it up by placing the pan in the refrigerator for about an hour once it has cooled down slightly.
- Once completely cool, use the parchment paper overhangs to carefully lift the entire slab of lemon bars out of the pan. Place it on a cutting board.
- Using a sharp knife, cut the lemon bars into 12-16 squares, depending on your desired size. For cleaner cuts, wipe the knife blade clean between each cut, especially if the lemon curd is slightly sticky.
- Serve immediately or store for later enjoyment. These bars are delicious at room temperature or chilled.
Cooking Tips and Variations
For the absolute best results with these simple 3-ingredient lemon bars, a few key tips can make all the difference. Firstly, the quality of your lemon curd truly matters. While any store-bought lemon curd will work, investing in a good quality, thick, and tangy lemon curd will elevate the flavor profile significantly. Some brands offer a more intense lemon flavor, which is exactly what you want for a dessert with so few ingredients. If you’re feeling adventurous and have a little extra time, you can even make your own lemon curd from scratch – it’s more involved than three ingredients, but the results are incredibly fresh and vibrant. Secondly, ensure your butter is fully melted but not boiling hot when you mix it with the cake mix. This helps create the perfect crumbly texture for both the crust and the topping. If the butter is too hot, it might “fry” the cake mix slightly, altering the texture. Room temperature melted butter is ideal.
When pressing the bottom layer, make sure it’s firm and even. This creates a sturdy base that won’t crumble apart when you cut the bars. Use the bottom of a glass or a flat measuring cup to really compact the mixture into the pan. Don’t be shy about pressing down. Conversely, when sprinkling the top layer, aim for an even distribution but don’t press it down too hard. You want a light, crumbly texture on top, not another solid crust. Baking time can vary slightly depending on your oven, so keep an eye on the bars. They are done when the top is golden brown and the lemon curd no longer looks excessively wet or jiggly in the center. A slight jiggle is fine, as it will firm up upon cooling, but it shouldn’t be liquid. Overbaking can make the crumble dry, while underbaking will result in a messy, unset filling.
Cooling is arguably the most crucial step for beautiful, clean cuts. Resist the urge to cut into warm bars. The lemon curd needs time to set completely, and the butter in the crumble needs to solidify. If you cut them while warm, the bars will be gooey and fall apart, making it difficult to get neat squares. If you’re in a hurry, pop the pan into the refrigerator after it has cooled for about 30 minutes at room temperature. This will significantly speed up the setting process. For the cleanest cuts, use a sharp, thin-bladed knife and wipe the blade clean with a damp cloth after every cut to prevent dragging the lemon curd. You can also lightly spray the knife with non-stick spray.
As for variations, while the beauty of this recipe is its simplicity, there are a few ways to customize it to your liking. For an extra punch of lemon flavor, use a lemon-flavored cake mix instead of yellow cake mix. You can also add the zest of one fresh lemon to the cake mix mixture before adding the butter; this will intensify the citrus aroma and flavor. Another delightful addition is a dusting of powdered sugar over the cooled bars just before serving. This adds an elegant touch and a little extra sweetness that complements the tart lemon perfectly. For a touch of texture, you could sprinkle a handful of toasted shredded coconut or finely chopped nuts (like pecans or almonds) over the lemon curd before adding the top crumble layer. These additions would add a subtle crunch and a different flavor dimension without making the recipe overly complicated.
If you prefer a different fruit flavor, you could experiment with other fruit curds, such as lime curd or even raspberry curd, though the classic lemon is truly king here. Just ensure the curd is thick enough to set properly when baked. For those who love a bit of spice, a tiny pinch of ground ginger or cardamom mixed into the cake crumble could add a warm, subtle complexity. Remember, the core of this recipe is its ease and minimal ingredients, so try not to go overboard with variations if you want to maintain its quick-and-easy appeal. These tips and variations will help you create perfect 3-ingredient lemon bars every time, tailored exactly to your taste!
Storage and Reheating
Storing your delicious 3-ingredient lemon bars properly is key to maintaining their freshness and texture. Once the bars have completely cooled and been cut, they should be stored in an airtight container. If you stack them, it’s a good idea to place a piece of parchment paper or wax paper between layers to prevent them from sticking together. These lemon bars can be stored at room temperature for up to 2-3 days, especially if your kitchen isn’t too warm. However, for extended freshness and to keep the lemon curd firm, refrigeration is recommended. When stored in an airtight container in the refrigerator, they will last for up to 5-7 days. The cold temperature also enhances the refreshing tang of the lemon. If you live in a particularly humid climate or your house is warm, refrigeration is definitely the best option for storage from the start.
Freezing is also an excellent option if you want to make a larger batch or save some for later. To freeze, first ensure the bars are completely cool. Cut them into individual squares. You can then flash freeze them on a baking sheet lined with parchment paper for about 30 minutes to an hour, or until firm. This prevents them from sticking together. Once firm, transfer the frozen bars to a freezer-safe airtight container or a heavy-duty freezer bag, again, with parchment paper between layers if stacking. They can be frozen for up to 2-3 months. When you’re ready to enjoy them, simply remove the desired number of bars from the freezer and let them thaw at room temperature for about 30 minutes to an hour, or overnight in the refrigerator. They taste just as good as fresh!
Reheating these lemon bars is generally not necessary, as they are typically enjoyed chilled or at room temperature. The crumbly texture of the cake mix crust and topping, combined with the firm lemon curd, is best when cool. Reheating in a microwave can make the lemon curd too soft and gooey, and the crust might become soggy. If you prefer a slightly warm bar, you could try warming an individual bar in a toaster oven for a very short period (just a minute or two) on a low setting, but be very careful not to overdo it, as the lemon curd can quickly become too liquid. It’s usually best to enjoy them as they are, straight from the fridge or at room temperature, to fully appreciate their delightful texture and bright flavor.
Frequently Asked Questions
Can I use a different flavor cake mix for these bars?
Yes, absolutely! While yellow or lemon cake mix is traditional and complements the lemon curd perfectly, you can certainly experiment with other flavors. A vanilla cake mix would work well as a neutral base, allowing the lemon to shine. You could also try a white cake mix. However, avoid highly flavored cake mixes like chocolate or strawberry, as they might clash with the tangy lemon curd. Stick to lighter, more neutral flavors for the best results.
My lemon bars are too gooey, what went wrong?
If your lemon bars are too gooey, it’s most likely due to insufficient baking time or not cooling them completely. Ensure you bake them until the top is golden brown and the lemon curd looks set, with only a slight jiggle in the center. Ovens vary, so your baking time might be a little longer than stated. More importantly, always allow the bars to cool completely, preferably in the refrigerator, before cutting. The lemon curd needs time to firm up and set properly, and cutting them while warm will always result in a gooey, messy bar.
Can I use homemade lemon curd instead of store-bought?
Yes, you can definitely use homemade lemon curd! In fact, using a high-quality homemade lemon curd will likely enhance the flavor of these bars even further, giving them a fresher, more vibrant taste. Just make sure your homemade lemon curd is thick enough to hold its shape when baked. If it’s too runny, the bars might not set properly. Ensure it’s completely cooled before spreading it over the crust layer.
What if I don’t have parchment paper?
While parchment paper is highly recommended for easy removal and clean cuts, you can still make these bars without it. If you don’t have parchment paper, thoroughly grease and flour your 9×13-inch baking pan. Alternatively, you can generously spray it with a non-stick baking spray that contains flour. This will help prevent sticking, but you will need to carefully run a knife along the edges before attempting to remove the bars, and lifting them out in one piece might be more challenging. Always ensure the bars are completely cooled before attempting to remove or cut them if not using parchment paper.



