
Follow Me On Social Media!
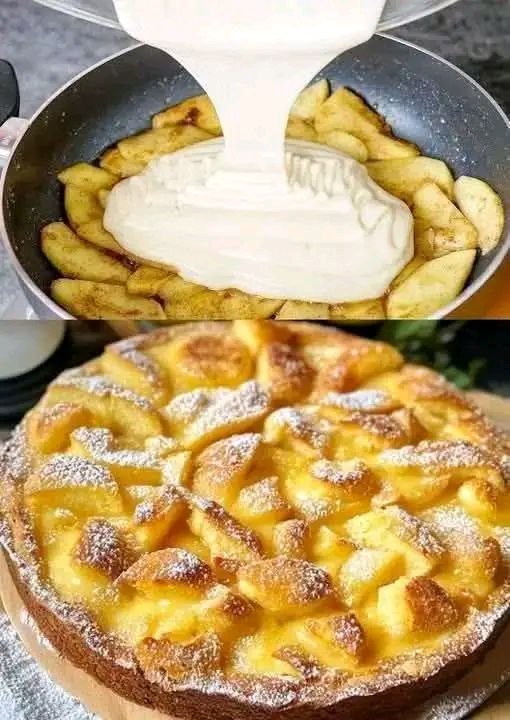
Table of Contents

Introduction
Welcome to the ultimate guide for creating a truly unforgettable Apple Pancake, a dish that effortlessly bridges the gap between a comforting breakfast and a delightful dessert. Imagine a golden-brown, fluffy pancake, generously studded with tender, caramelized apples, all cooked to perfection in a single skillet. This isn’t just any pancake; it’s a culinary experience, a warm hug on a plate that promises to become a staple in your kitchen. The beauty of this apple pancake lies in its elegant simplicity, making it accessible to even novice cooks, while its impressive presentation and exquisite flavor profile will wow even the most discerning palates. It’s the kind of dish that fills your home with an intoxicating aroma of cinnamon and baked apples, signaling that something truly special is being prepared.
Often likened to a German apple pancake or a Dutch baby, this skillet-baked marvel distinguishes itself by incorporating the apples directly into the cooking process from the very beginning. Instead of merely being a topping, the apples are sautéed in butter and spices, creating a rich, sweet, and slightly tangy foundation upon which the light and airy pancake batter is poured. This method ensures that every bite is infused with the warm, comforting essence of baked apples, creating a harmonious blend of textures and flavors. The edges crisp up beautifully in the hot skillet, while the center remains wonderfully custardy, offering a delightful contrast that keeps you coming back for more.
Beyond its incredible taste and texture, this apple pancake is a fantastic way to utilize a bounty of fresh apples, especially during the autumn season when they are at their peak. It transforms simple ingredients into a dish that feels both wholesome and indulgent. Whether you’re looking for a special weekend breakfast, a comforting brunch centerpiece, or a surprisingly easy yet impressive dessert, this apple pancake fits the bill perfectly. Dusted with a delicate veil of powdered sugar, it’s not just food; it’s an invitation to savor the moment, to share warmth and deliciousness with loved ones, and to create lasting culinary memories.
Nutritional Information
Per serving (approximate values):
- Calories: 380
- Protein: 10g
- Carbohydrates: 55g
- Fat: 15g
- Fiber: 4g
- Sodium: 280mg
Ingredients
- 2 medium-sized firm apples (such as Honeycrisp, Granny Smith, or Fuji), peeled, cored, and thinly sliced
- 2 tablespoons unsalted butter, divided
- 1 tablespoon granulated sugar (for apples)
- 1/2 teaspoon ground cinnamon (for apples)
- 1/4 teaspoon ground nutmeg (optional, for apples)
- 1 cup all-purpose flour
- 1 tablespoon granulated sugar (for batter)
- 1 teaspoon baking powder
- 1/2 teaspoon salt
- 1 large egg
- 1 cup milk (whole or 2%)
- 1 teaspoon vanilla extract
- Powdered sugar, for dusting
Instructions
- Preheat your oven to 375°F (190°C).
- Prepare the apples: In a 10-inch oven-safe skillet (cast iron works best), melt 1 tablespoon of unsalted butter over medium heat.
- Add the thinly sliced apples, 1 tablespoon granulated sugar, 1/2 teaspoon ground cinnamon, and 1/4 teaspoon ground nutmeg (if using) to the skillet.
- Sauté the apples for 5-7 minutes, stirring occasionally, until they are slightly softened and lightly caramelized. Remove the skillet from the heat and arrange the apples in an even layer at the bottom of the skillet.
- While the apples are cooking, prepare the pancake batter: In a large bowl, whisk together the all-purpose flour, 1 tablespoon granulated sugar, baking powder, and salt.
- In a separate medium bowl, whisk together the large egg, milk, and vanilla extract until well combined.
- Pour the wet ingredients into the dry ingredients. Whisk gently until just combined. A few lumps are okay; do not overmix, as this can lead to a tough pancake.
- Melt the remaining 1 tablespoon of unsalted butter and carefully pour it over the sautéed apples in the skillet. Swirl the skillet to ensure the butter coats the bottom and sides.
- Carefully pour the pancake batter evenly over the apples in the skillet.
- Transfer the skillet to the preheated oven.
- Bake for 20-25 minutes, or until the pancake is puffed up, golden brown around the edges, and set in the center. A toothpick inserted into the center should come out clean.
- Carefully remove the skillet from the oven. The pancake will deflate slightly as it cools, which is normal.
- Allow the apple pancake to cool in the skillet for 5 minutes before slicing and serving.
- Dust generously with powdered sugar just before serving.
Cooking Tips and Variations
For the best results with your apple pancake, selecting the right apples is crucial. Opt for firm, crisp varieties that hold their shape well during cooking, such as Honeycrisp, Granny Smith, Fuji, or Braeburn. Softer apples tend to turn to mush, detracting from the textural contrast of the dish. When slicing, aim for uniform, thin slices, about 1/8 to 1/4 inch thick, to ensure even cooking and tender results. Don’t be afraid to experiment with spices; while cinnamon and nutmeg are classics, a pinch of cardamom, allspice, or even a tiny grating of fresh ginger can add intriguing depth to the apple layer. A good quality, heavy-bottomed oven-safe skillet, preferably cast iron, is essential. Cast iron distributes heat evenly and helps create that wonderful crispy edge and beautifully caramelized bottom that makes this dish so special. Preheat your skillet properly before adding the apples to ensure they start caramelizing immediately, building a flavorful foundation for your pancake.
To avoid overmixing the batter, combine the wet and dry ingredients only until just incorporated. A few small lumps are perfectly fine and often result in a tenderer pancake. Overmixing develops the gluten in the flour, leading to a chewy, rather than fluffy, texture. Ensure your milk and egg are at room temperature, as this helps them combine more smoothly with the other ingredients and creates a more uniform batter. When pouring the batter over the sautéed apples, distribute it evenly to ensure consistent thickness and cooking throughout the pancake. Resist the urge to open the oven door frequently while baking, as this can cause the pancake to collapse. Watch for the visual cues: puffed, golden brown, and set in the center. The slight deflation after removal from the oven is normal and expected.
This recipe is highly adaptable. For a gluten-free version, substitute the all-purpose flour with a 1:1 gluten-free baking blend that contains xanthan gum. Ensure your baking powder is also gluten-free. For a dairy-free option, use a plant-based milk (almond, soy, or oat milk work well) and a dairy-free butter alternative or coconut oil for sautéing the apples and greasing the skillet. You can also incorporate other ingredients into the apple layer or the batter. A handful of chopped pecans or walnuts can add a delightful crunch and nutty flavor. Raisins or dried cranberries can be added to the apples for extra sweetness and chewiness. A tablespoon of brown sugar can replace the granulated sugar for the apples, adding a deeper, molasses-like flavor. For an extra decadent touch, a splash of brandy or applejack can be added to the apples as they sauté, cooking off the alcohol and leaving behind a sophisticated flavor.
Consider serving this apple pancake with various toppings beyond simple powdered sugar. A dollop of freshly whipped cream, a scoop of vanilla bean ice cream, or a drizzle of warm maple syrup or caramel sauce can elevate it to a truly extraordinary dessert. For a brighter, fresher note, a squeeze of fresh lemon juice or a sprinkle of lemon zest over the cooked apples before adding the batter can cut through the sweetness and add a lovely tang. If you prefer a less sweet pancake, you can reduce the sugar in both the apple mixture and the batter, relying more on the natural sweetness of the apples and any added toppings. This apple pancake is versatile enough to be enjoyed for breakfast, brunch, or dessert, making it a perfect dish for any time of day and any occasion.
Storage and Reheating
To store leftover apple pancake, allow it to cool completely to room temperature. Once cool, you can either cover the entire skillet tightly with aluminum foil or plastic wrap, or carefully transfer individual slices to an airtight container. Store in the refrigerator for up to 3-4 days. It is best enjoyed fresh, but leftovers are still delicious.
For reheating, there are a few options depending on your preference. To reheat a whole pancake or larger slices and maintain some crispness, place it on a baking sheet and warm in a preheated oven at 300°F (150°C) for 10-15 minutes, or until heated through. If you’re reheating individual slices and don’t mind a softer texture, you can use a microwave. Place a slice on a microwave-safe plate and heat on medium power for 30-60 seconds, or until warm. Be careful not to overheat in the microwave, as it can make the pancake rubbery. Alternatively, a toaster oven can also work well for reheating individual slices, providing a nice balance of warmth and a slightly crisped exterior.
Frequently Asked Questions
Can I use different fruits instead of apples?
Absolutely! This recipe is very adaptable. Pears, peaches, plums, or berries (fresh or frozen) can all work wonderfully. If using berries, you might want to reduce the sugar slightly, as they tend to be sweeter. For softer fruits like peaches or berries, reduce the sautéing time to just a couple of minutes, or add them directly to the skillet without pre-sautéing if you prefer them to be very tender.
What kind of skillet is best for this recipe?
A 10-inch cast iron skillet is ideal for this recipe. Its excellent heat retention and even heat distribution create a beautifully golden and crispy crust on the pancake. If you don’t have cast iron, any oven-safe, heavy-bottomed skillet of similar size (such as stainless steel or enameled cast iron) will work, but you might need to adjust baking times slightly and ensure it’s well-greased to prevent sticking.
Can I make the batter ahead of time?
While pancake batter is generally best when made fresh, you can prepare the dry ingredients and wet ingredients separately and store them in the refrigerator overnight. Just before cooking, combine them. If you mix the full batter ahead of time, the baking powder will start to react, and the pancake might not rise as much. For best results, mix the batter right before pouring it over the apples and baking.
Why did my pancake deflate after taking it out of the oven?
It is perfectly normal for the apple pancake to deflate slightly after being removed from the oven. The puffiness is due to the steam trapped within the batter during baking. As the pancake cools, the steam dissipates, causing it to settle. This doesn’t affect the taste or texture; it’s simply a natural part of the cooling process for this type of skillet pancake.



