
Follow Me On Social Media!
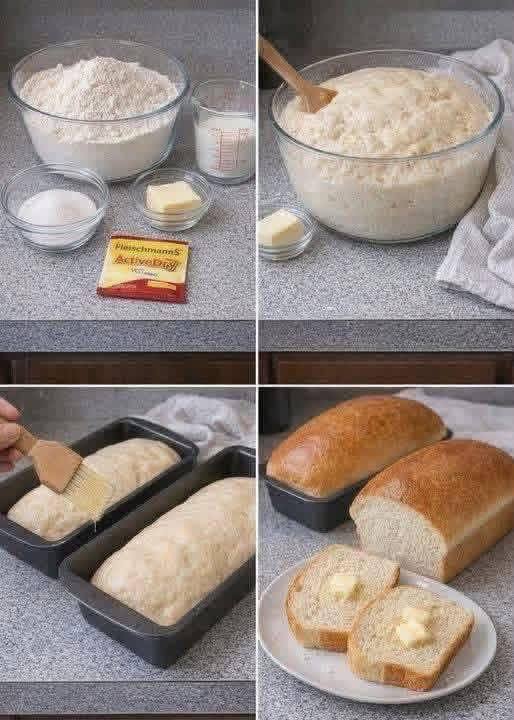
Amish White Bread

Introduction
There’s a special kind of magic that happens when warm, freshly baked bread emerges from your oven. The aroma alone is enough to transport you to a place of comfort and nostalgia. And when that bread is Amish White Bread, you’re in for an extra-special treat. This isn’t just any white bread; it’s renowned for its incredibly soft, fluffy crumb, its subtly sweet flavor, and that perfect golden crust that whispers promises of deliciousness. It’s the kind of bread that elevates a simple sandwich to a gourmet experience and makes morning toast feel like a luxurious indulgence. Baking it at home fills your kitchen with an inviting warmth and a scent that simply can’t be replicated by store-bought loaves.
Amish White Bread holds a special place in the hearts of many for its simplicity and wholesome goodness. Rooted in traditional baking methods, this recipe celebrates the pure joy of creating something truly wonderful from basic ingredients. It’s a testament to the fact that sometimes, the simplest things are the most profound. Whether you’re a seasoned baker or just dipping your toes into the world of yeast breads, this recipe is designed to be straightforward and rewarding. We’ll guide you through every step, ensuring that you achieve two beautiful, delectable loaves that will impress everyone fortunate enough to get a slice.
Get ready to embrace the therapeutic rhythm of mixing, kneading, and watching dough rise. The satisfaction of pulling your own golden loaves from the oven is unparalleled, and with this comprehensive guide, you’ll discover just how achievable that joy is. Prepare to fill your home with the irresistible scent of homemade bread and delight in the unparalleled taste of this classic Amish White Bread.
Nutritional Information
Per serving (approximate values, based on 24 slices per recipe):
- Calories: 150
- Protein: 5g
- Carbohydrates: 28g
- Fat: 2g
- Fiber: 1g
- Sodium: 220mg
Ingredients
- 4 ½ teaspoons (2 packets) active dry yeast
- 2 cups warm water (105-115°F / 40-46°C) or warm milk
- ½ cup granulated sugar, plus 1 teaspoon for yeast activation
- 1 ½ teaspoons salt
- ¼ cup unsalted butter, melted and slightly cooled, plus extra for greasing pans and brushing
- 6-7 cups all-purpose flour, plus more for dusting
- Optional: 1 tablespoon milk or 1 egg whisked with 1 tablespoon water for egg wash
Instructions
- Activate the Yeast: In a large mixing bowl, combine the warm water (or milk) and 1 teaspoon of granulated sugar. Sprinkle the active dry yeast over the top. Let it sit for 5-10 minutes until the mixture becomes foamy and bubbly. This indicates your yeast is active and ready to go. If it doesn’t foam, your yeast might be old or the water temperature was off, and you should start again with fresh yeast.
- Combine Wet and Dry Ingredients (Part 1): To the activated yeast mixture, add the remaining ½ cup of granulated sugar, the salt, and the melted butter. Stir well to combine these ingredients.
- Begin Adding Flour: Gradually add 3 cups of the all-purpose flour, one cup at a time, mixing with a sturdy spoon or a dough hook on a stand mixer until just combined after each addition. The mixture will be quite wet at this stage.
- Form the Dough: Continue adding the remaining flour, ½ cup at a time, mixing until a shaggy dough forms. You may not need all 7 cups of flour; stop adding flour when the dough starts to pull away from the sides of the bowl and is no longer excessively sticky. The dough should be soft but manageable.
- Knead the Dough:
- By Hand: Turn the shaggy dough out onto a lightly floured surface. Knead for 8-10 minutes. Use the heel of your hand to push the dough away from you, then fold it back over itself, turn, and repeat. Continue until the dough is smooth, elastic, and springs back when gently poked.
- By Stand Mixer: Attach the dough hook. Knead on medium-low speed for 6-8 minutes until the dough is smooth, elastic, and pulls cleanly away from the sides of the bowl.
- First Rise (Bulk Fermentation): Lightly grease a large clean bowl with a little butter or oil. Place the kneaded dough in the bowl, turning it once to coat the top. Cover the bowl tightly with plastic wrap or a clean kitchen towel. Place the bowl in a warm, draft-free place (like a slightly warmed, turned-off oven, or near a sunny window) for 1 to 1.5 hours, or until the dough has doubled in size.
- Prepare Loaf Pans: While the dough is rising, grease and lightly flour two standard 9×5-inch loaf pans.
- Punch Down and Divide Dough: Once the dough has doubled, gently punch it down to release the air. Turn the dough out onto a lightly flfloured surface. Divide the dough in half.
- Shape the Loaves: Take one half of the dough and gently flatten it into a rectangle, approximately 9×12 inches. Starting from one of the longer sides, tightly roll the dough into a log. Pinch the seam closed along the bottom and tuck in the ends to create a neat loaf shape. Place the shaped dough, seam-side down, into one of the prepared loaf pans. Repeat with the second half of the dough.
- Second Rise (Proofing): Cover the loaf pans loosely with plastic wrap or a clean kitchen towel. Return them to your warm, draft-free place for another 30-45 minutes, or until the loaves have nearly doubled in size and look puffy. They should extend about 1 inch above the rim of the pan.
- Preheat Oven: About 15 minutes before the second rise is complete, preheat your oven to 375°F (190°C).
- Bake the Bread: If desired, brush the tops of the risen loaves with a little melted butter, milk, or the egg wash for a golden, slightly softer crust. Place the loaf pans in the preheated oven. Bake for 30-35 minutes, or until the tops are golden brown and the internal temperature reaches 200-210°F (93-99°C) when measured with an instant-read thermometer. If you don’t have a thermometer, you can tap the bottom of a loaf; it should sound hollow.
- Cool the Bread: Once baked, immediately remove the loaves from their pans and place them on a wire rack to cool completely. This is crucial to prevent the bottom of the bread from becoming soggy. Allow at least 1 hour, or ideally 2 hours, before slicing.
- Serve and Enjoy: Slice and serve warm with butter, jam, or use for your favorite sandwiches.
Cooking Tips and Variations
Yeast Activation is Key: The temperature of your liquid is critical. Too cold, and the yeast won’t activate; too hot, and it will kill the yeast. Aim for bathwater warm – around 105-115°F (40-46°C). If your yeast doesn’t foam, discard and start over with fresh yeast.
Don’t Fear the Knead: Kneading develops the gluten, which gives bread its structure and chew. Under-kneaded dough will be dense and crumbly, while properly kneaded dough will be smooth, elastic, and pass the “windowpane test” (you can stretch a small piece thin enough to see light through it without tearing). If kneading by hand, a little extra flour on your hands and the surface can help prevent sticking, but avoid adding too much to the dough itself.
Patience with Rising: Bread baking is all about patience. Don’t rush the rising times. The dough will rise faster in a warmer environment and slower in a cooler one. Look for visual cues (doubled in size, puffy) rather than strictly adhering to the clock. A slightly warm, turned-off oven with the door ajar can be a perfect proofing box.
For a Softer Crust: Brush the top of the baked loaves with melted butter immediately after removing them from the oven. For a slightly crisper crust, you can skip this step or use an egg wash before baking.
Pan Preparation Matters: Always grease and lightly flour your loaf pans thoroughly. This ensures the bread releases easily after baking, preserving its beautiful crust.
High Altitude Adjustments: If you live at a high altitude, yeast doughs tend to rise faster. You might need to reduce the yeast slightly (by ¼ to ½ teaspoon), reduce the sugar by a tablespoon, or reduce the rising times. Keep an eye on the dough rather than the clock.
Variations:
- Honey Wheat Bread: Substitute ½ cup of the all-purpose flour with whole wheat flour and swap half of the granulated sugar for honey. You might need a tiny bit more liquid as whole wheat flour absorbs more.
- Herb Bread: Add 1-2 tablespoons of dried herbs like rosemary, thyme, or oregano to the dough during the last few minutes of kneading.
- Cheese Bread: Fold in 1 cup of shredded cheddar or Gruyere cheese during the last minute of kneading.
- Cinnamon Swirl: After flattening the dough into a rectangle before rolling, spread a mixture of 2 tablespoons melted butter, ¼ cup brown sugar, and 1 teaspoon cinnamon over the surface before rolling it up.
Storage and Reheating
Storage: Once completely cooled, homemade Amish White Bread is best stored in an airtight container or a large zip-top bag at room temperature. It will stay fresh and soft for 3-4 days. Avoid refrigerating bread, as it tends to dry out and become stale more quickly in the fridge. For longer storage, you can freeze individual slices or whole loaves. Wrap tightly in plastic wrap, then in aluminum foil, and place in a freezer-safe bag. It will keep well in the freezer for up to 3 months.
Reheating:
- From Room Temperature: To refresh a whole loaf, you can wrap it in aluminum foil and warm it in a 300°F (150°C) oven for 10-15 minutes until heated through. Individual slices can be toasted or warmed in a microwave for 10-15 seconds.
- From Frozen: If reheating a whole frozen loaf, unwrap it and let it thaw at room temperature for a few hours, then warm as above. For frozen slices, you can toast them directly from frozen in a toaster or toaster oven.
Frequently Asked Questions
Why did my dough not rise?
The most common reasons for dough not rising are inactive yeast or incorrect liquid temperature. Ensure your water or milk is between 105-115°F (40-46°C) – warm to the touch but not hot. Old or expired yeast will also fail to activate. Always check the expiration date and ensure your yeast foams up nicely when proofed; if it doesn’t, start over with fresh yeast.
My bread is dense and heavy, what went wrong?
Dense bread is usually a sign of under-kneading or insufficient rising. Kneading is crucial for developing gluten, which creates the airy structure. Ensure you knead for the full recommended time until the dough is smooth and elastic. Also, make sure your dough has had enough time for both the first and second rises, doubling in size and looking puffy. Over-mixing can also sometimes lead to dense bread, but under-kneading is more common for beginners.
Can I use milk instead of water?
Yes, absolutely! Using milk instead of water will result in an even softer crumb and a slightly richer flavor due to the fats and sugars in the milk. Just ensure the milk is warmed to the correct temperature for activating the yeast.
How do I get a perfectly golden crust?
For a beautiful golden crust, you have a few options. Brushing the loaves with melted butter before baking will give a soft, golden finish. A milk wash (simply brush with a little milk) will also create a lovely golden color. For a slightly shinier and richer brown crust, an egg wash (one egg whisked with a tablespoon of water or milk) works wonderfully. Ensure your oven temperature is accurate for even browning.



