
Follow Me On Social Media!
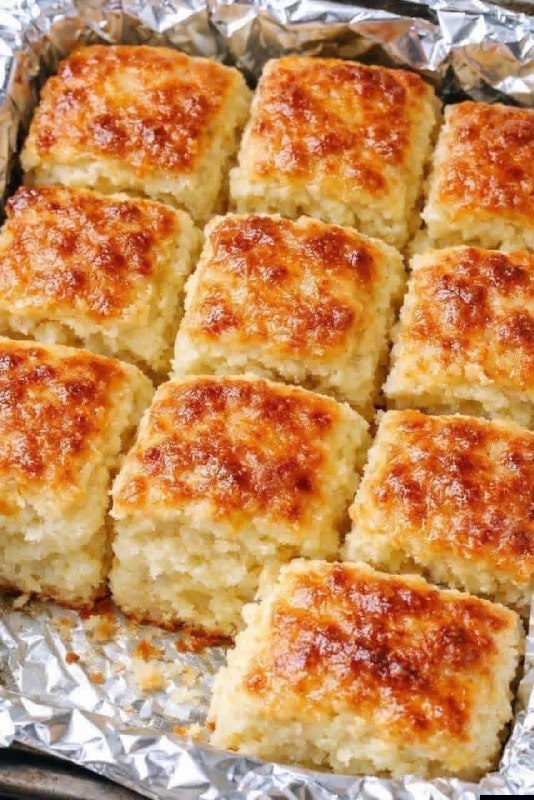
Classic Butter Swim Biscuits

Introduction
Get ready to meet your new favorite biscuit! Classic Butter Swim Biscuits are an absolute game-changer in the world of comfort food. Forget the tedious process of cutting in cold butter or rolling out dough; these biscuits redefine ease and indulgence. What makes them so magical? The secret is right in the name: they literally “swim” in a pool of melted butter as they bake. This unique method ensures every single bite is infused with rich, buttery goodness, resulting in a biscuit that’s crispy on the outside, golden-brown on top and bottom, and unbelievably soft and tender on the inside. They’re a testament to how simple ingredients, prepared with a clever technique, can yield extraordinary results.
These biscuits aren’t just easy; they’re a revelation for anyone who loves the idea of homemade biscuits but dreads the effort. They require minimal handling, no special equipment beyond a baking dish, and deliver a consistently perfect texture every time. Whether you’re a seasoned baker or a complete novice, you’ll be amazed at how effortlessly you can create these flaky, tender, and incredibly buttery treats. Perfect for a leisurely breakfast, a decadent brunch, or as a comforting side to a savory dinner, Classic Butter Swim Biscuits are versatile, satisfying, and guaranteed to become a staple in your kitchen.
The appeal of these biscuits lies in their delightful texture and unparalleled flavor. The “swim” concept creates a self-basting effect, ensuring the biscuits never dry out. Instead, they emerge from the oven with a shatteringly crisp exterior that gives way to a cloud-like interior, soaked in butter without being greasy. The simplicity of the recipe makes it incredibly approachable, while the delicious outcome makes it utterly addictive. Prepare to fall in love with the sheer joy of these buttery masterpieces!
Nutritional Information
Per serving (approximate values, based on 12 biscuits):
- Calories: 280
- Protein: 5g
- Carbohydrates: 30g
- Fat: 16g
- Fiber: 1g
- Sodium: 380mg
Ingredients
- 1 cup (2 sticks) unsalted butter, melted, plus extra for greasing if not using foil
- 2 cups all-purpose flour
- 2 tablespoons granulated sugar
- 1 tablespoon baking powder
- 1 teaspoon salt
- 1 cup whole milk (or buttermilk for a tangier flavor)
Instructions
- Preheat your oven to 425°F (220°C). If using a 9×13 inch baking dish, line it with parchment paper or aluminum foil for easy cleanup, leaving an overhang on the sides. If not lining, lightly grease the dish.
- Pour the melted butter into the bottom of the prepared 9×13 inch baking dish, ensuring it evenly coats the entire bottom.
- In a large mixing bowl, whisk together the all-purpose flour, granulated sugar, baking powder, and salt until well combined.
- Create a well in the center of the dry ingredients and pour in the cold milk (or buttermilk).
- Using a fork or a rubber spatula, gently mix the ingredients until just combined. Be careful not to overmix; the dough will be shaggy and sticky, which is exactly what you want for tender biscuits. A few lumps are perfectly fine.
- Carefully spoon the dough into the butter-filled baking dish. Use your hands or the back of a spoon to gently spread the dough evenly across the melted butter. Do not press down too firmly.
- Using a sharp knife or a bench scraper, score the dough into 12 equal squares (3 rows by 4 rows). Do not cut all the way through to the bottom of the pan; just score the top surface. This helps the biscuits bake evenly and makes them easier to separate after baking.
- Place the baking dish into the preheated oven and bake for 20-25 minutes, or until the biscuits are golden brown on top and the butter is bubbling around the edges. The internal temperature should be around 200-210°F (93-99°C).
- Once baked, carefully remove the dish from the oven. The biscuits will be swimming in butter.
- Allow the biscuits to cool in the pan for about 5-10 minutes. This allows them to soak up more of the delicious butter and firm up slightly.
- Using the parchment paper/foil overhang, lift the entire slab of biscuits out of the pan and place it on a cutting board.
- Cut along the scored lines to separate the individual biscuits. Serve warm and enjoy!
Cooking Tips and Variations
For the most tender biscuits, remember the golden rule: do not overmix the dough! Overworking the flour develops gluten, which leads to tough, chewy biscuits. Mix just until the dry ingredients are moistened and the dough comes together. A shaggy, slightly lumpy dough is ideal.
Using cold milk or buttermilk is crucial. Cold liquids help keep the dough from warming up too quickly, which can affect the texture. If you don’t have buttermilk, you can make your own by adding 1 tablespoon of white vinegar or lemon juice to a measuring cup, then filling the rest with whole milk until it reaches 1 cup. Let it sit for 5 minutes before using.
Adjusting sweetness: If you prefer a sweeter biscuit, you can increase the granulated sugar to 3-4 tablespoons. For savory applications, you might even consider reducing it to 1 tablespoon or omitting it entirely, though a little sugar does help with browning.
For a savory twist, consider adding fresh or dried herbs to the dry ingredients. Rosemary, chives, thyme, or garlic powder would be delicious additions. A sprinkle of black pepper or a pinch of cayenne can also add a nice kick. If going savory, you might also want to reduce the sugar slightly.
A great tip for easy cleanup is to line your baking dish with parchment paper or aluminum foil, leaving an overhang. This allows you to easily lift the entire slab of biscuits out of the pan after baking, making separation and serving a breeze, and your pan will be practically clean.
While a 9×13 inch pan is recommended, you can use an 8×8 inch pan for thicker biscuits, but you may need to adjust the baking time slightly longer (by 5-10 minutes) and keep a close eye on them to ensure they are cooked through.
Good quality butter makes a noticeable difference in the final flavor. Since butter is such a prominent ingredient in this recipe, using a good unsalted butter will elevate the taste. Always use unsalted so you can control the salt content yourself.
Don’t be afraid of the amount of butter! The biscuits absorb a lot of it, creating that incredibly moist and flavorful interior. The butter also helps create that beautifully crisp crust. It might look like a lot when you pour it in, but trust the process!
For extra golden tops, you can brush the scored dough lightly with a little extra melted butter or milk before baking, though the butter swim usually takes care of this naturally.
These biscuits are incredibly versatile. Serve them simply with a drizzle of honey or your favorite fruit jam for a sweet treat. For a classic Southern experience, pair them with sausage gravy, fried chicken, or a hearty stew. They’re also fantastic alongside eggs and bacon for a complete breakfast.
Storage and Reheating
Classic Butter Swim Biscuits are undeniably at their best when served warm, straight from the oven. The crispy exterior and tender, buttery interior are unmatched at this point.
If you have any leftovers (a rare occurrence!), store them in an airtight container at room temperature for up to 2 days. While they won’t be as crispy as fresh, they will still be wonderfully soft and buttery.
To reheat, the best method is to use an oven or toaster oven. Preheat your oven to 300-325°F (150-160°C). Place the biscuits on a baking sheet and heat for 5-10 minutes, or until warmed through. This method helps to crisp up the exterior slightly and restore some of their fresh-baked glory.
You can also reheat them in a microwave, but be aware that this will make them softer and potentially a bit chewier, and they will lose their crisp crust. Microwave on high for 15-30 seconds, depending on your microwave and the number of biscuits.
These biscuits also freeze beautifully. Once completely cooled, wrap individual biscuits tightly in plastic wrap, then place them in a freezer-safe bag or container. They can be frozen for up to 2-3 months. To reheat from frozen, you can either thaw them overnight in the refrigerator and then reheat in the oven, or reheat directly from frozen in a preheated oven at 300-325°F (150-160°C) for 15-20 minutes, or until warmed through.
Frequently Asked Questions
What makes these biscuits different from traditional biscuits?
The primary difference is the “butter swim” method. Traditional biscuits typically involve cutting cold butter into the flour, then rolling and folding the dough to create layers. Butter Swim Biscuits, however, are made by pouring melted butter into the bottom of the baking pan, then placing the dough directly on top. As they bake, the biscuits absorb the butter, resulting in an incredibly moist, tender interior and a wonderfully crispy, buttery crust without any complex dough handling.
Can I use self-rising flour for this recipe?
Yes, you can use self-rising flour, but you will need to adjust the other leavening agents and salt. If using self-rising flour, omit the baking powder and reduce the salt to about 1/2 teaspoon, as self-rising flour already contains these ingredients. The texture may be slightly different but will still be delicious.
My biscuits didn’t rise much. What went wrong?
There are a few common culprits for biscuits that don’t rise. The most likely reason is old or expired baking powder. Always ensure your leavening agents are fresh. Another reason could be overmixing the dough; too much handling develops gluten, which can make biscuits dense. Lastly, ensure your oven is preheated to the correct temperature, as a hot oven helps activate the baking powder quickly, leading to a good rise.
Can I make these biscuits ahead of time?
While these biscuits are best enjoyed fresh, you can prepare the dry ingredients ahead of time and store them in an airtight container. When ready to bake, simply add the wet ingredients and proceed with the recipe. You can also freeze baked biscuits (as described in the storage section) and reheat them when needed for a quick and easy treat.



