
Follow Me On Social Media!
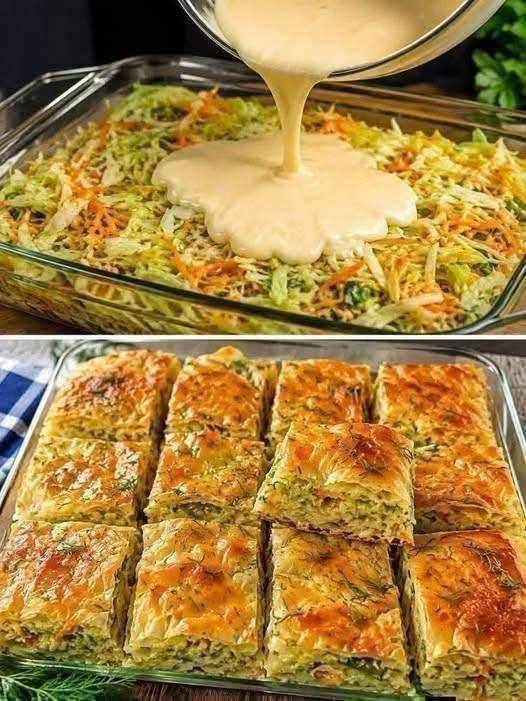
Crispy Vegetable Baklava Rolls

Introduction
Prepare to have your taste buds tantalized and your culinary expectations delightfully upended! Forget everything you thought you knew about baklava, because today we’re diving into a savory sensation that’s as innovative as it is irresistible: Crispy Vegetable Baklava Rolls. This isn’t your grandma’s syrupy sweet treat; it’s a flaky, golden-brown masterpiece, brimming with vibrant vegetables and baked to absolute perfection. Imagine delicate layers of phyllo dough, brushed with rich butter, encasing a hearty, seasoned medley of shredded cabbage and carrots, all bound together with a creamy, savory custard that infuses every bite with incredible flavor and a satisfying tenderness. It’s a dish that beautifully marries the intricate artistry of Mediterranean baking with the wholesome goodness of fresh produce, creating a truly unique and memorable experience.
What makes these Crispy Vegetable Baklava Rolls so utterly captivating? It’s the harmonious interplay of textures and flavors. The phyllo, known for its ethereal crispness, shatters with each bite, revealing a tender, flavorful vegetable filling. The subtle sweetness of the carrots, the earthy notes of the cabbage, and the fresh burst of dill are elevated by a rich, savory pour-over that creates a custardy interior as it bakes. Whether you’re searching for an elegant appetizer to impress guests, a delectable side dish to complement your main course, or a light yet satisfying vegetarian meal, these rolls fit the bill perfectly. Their versatility is matched only by their visual appeal, emerging from the oven with a magnificent golden hue, often adorned with a sprinkle of sesame seeds, promising a delightful culinary adventure.
While working with phyllo dough might seem a little intimidating at first glance, fear not! Our detailed guide will walk you through each step, ensuring your Crispy Vegetable Baklava Rolls turn out spectacular every time. The effort is minimal compared to the incredible reward of serving a dish that is both comforting and sophisticated, familiar yet wonderfully surprising. Get ready to transform humble vegetables and delicate pastry into a savory sensation that will undoubtedly become a new favorite in your kitchen.
Nutritional Information
Per serving (approximate values, based on 12 servings):
- Calories: 280-320
- Protein: 8-10g
- Carbohydrates: 25-30g
- Fat: 18-22g
- Fiber: 3-4g
- Sodium: 300-350mg
Ingredients
- 1 pound (about 20-25 sheets) frozen phyllo dough, thawed
- 1/2 cup unsalted butter, melted, plus 2 tablespoons for sautéing
- 2 tablespoons olive oil
- 1 medium head green cabbage, about 2 pounds, finely shredded
- 2 large carrots, about 8 ounces, finely shredded
- 1 medium onion, finely chopped
- 3 cloves garlic, minced
- 1/2 cup fresh dill, chopped, plus more for garnish
- 1/4 cup fresh parsley, chopped
- 1 teaspoon salt, or to taste
- 1/2 teaspoon black pepper, or to taste
- 1/4 teaspoon red pepper flakes (optional, for a hint of heat)
- 4 large eggs
- 1 1/2 cups whole milk or half-and-half
- 1/2 cup plain Greek yogurt or sour cream
- 1/2 cup grated Parmesan cheese (optional, but recommended)
- 1 teaspoon baking powder
- 2 tablespoons sesame seeds (white or black, or a mix), for sprinkling
Instructions
- Thaw Phyllo Dough: If frozen, transfer phyllo dough from the freezer to the refrigerator the night before, or thaw at room temperature for 2-3 hours before use. Keep the phyllo dough package sealed until ready to use.
- Prepare the Vegetable Filling: Heat 2 tablespoons of melted butter and 2 tablespoons of olive oil in a large skillet or pot over medium heat. Add the chopped onion and sauté for 5-7 minutes until softened and translucent. Add the minced garlic and cook for another minute until fragrant.
- Add the shredded cabbage and carrots to the skillet. Cook, stirring frequently, for 10-15 minutes, or until the vegetables have softened significantly and most of their moisture has evaporated. Season with 1 teaspoon salt, 1/2 teaspoon black pepper, and 1/4 teaspoon red pepper flakes (if using). Stir in the chopped fresh dill and parsley. Remove from heat and let the filling cool completely. It is crucial that the filling is cool before assembling to prevent the phyllo from tearing.
- Prepare the Creamy Topping: In a medium bowl, whisk together the eggs, whole milk or half-and-half, Greek yogurt or sour cream, grated Parmesan cheese (if using), and baking powder until well combined and smooth. Set aside.
- Preheat Oven and Prepare Pan: Preheat your oven to 375°F (190°C). Lightly grease a 9×13 inch baking dish with some of the melted butter.
- Assemble the Baklava Rolls: Carefully unroll the phyllo dough. Lay a clean, slightly damp kitchen towel over the phyllo sheets to prevent them from drying out while you work.
- Take one sheet of phyllo dough and lay it flat on a clean work surface. Brush it lightly but thoroughly with melted butter.
- Place a second sheet of phyllo dough directly on top of the first, aligning it perfectly. Brush this second sheet with melted butter as well.
- Spoon about 1/2 to 3/4 cup of the cooled vegetable filling in a line along one of the longer edges of the double-layered phyllo, leaving about a 1-inch border on the sides.
- Carefully roll the phyllo dough tightly from the long edge, creating a log or cigar shape. Place the rolled phyllo seam-side down in the prepared baking dish.
- Repeat this process with the remaining phyllo sheets and vegetable filling, arranging the rolls snugly side-by-side in the baking dish. You should end up with approximately 8-10 rolls, depending on their thickness.
- Cut and Pour Topping: Once all the rolls are in the baking dish, use a sharp knife to gently cut the rolls into individual serving pieces. You can cut them into squares or rectangles, typically 2-3 inches wide. Do not cut all the way through to the bottom of the dish, just through the top layers of phyllo.
- Evenly pour the prepared creamy topping mixture over the cut phyllo rolls, ensuring it seeps into the cuts and covers the entire surface.
- Sprinkle the sesame seeds evenly over the top of the baklava rolls.
- Bake: Bake in the preheated oven for 35-45 minutes, or until the top is deeply golden brown, crispy, and the creamy topping is set and puffed. If the top browns too quickly, you can loosely tent it with aluminum foil for the last 10-15 minutes of baking.
- Rest and Serve: Once baked, remove the dish from the oven and let it rest for 10-15 minutes before serving. This allows the layers to set and makes for easier, cleaner cutting. Garnish with additional fresh dill if desired. Serve warm.
Cooking Tips and Variations
Tips for Success:
- Phyllo Handling is Key: Phyllo dough dries out incredibly fast. Always keep unused sheets covered with a slightly damp (not wet!) kitchen towel. Work quickly when layering and buttering. If a sheet tears, don’t panic! Just patch it with another piece and continue, as the layers will hide imperfections.
- Don’t Skimp on Butter: The melted butter (or oil) between each phyllo layer is crucial for achieving that signature crispiness and golden-brown color. Brush generously but not so much that it’s pooling.
- Cool the Filling Completely: Hot or even warm filling will steam the phyllo, making it soggy and difficult to work with. Ensure your vegetable mixture is completely cooled before assembly.
- Squeeze Excess Moisture: After cooking the vegetables, if they seem particularly watery, you can press them in a sieve or squeeze them in a cheesecloth to remove excess liquid. This prevents a soggy interior.
- Pre-cutting is Essential: Cutting the baklava before baking allows the creamy topping to penetrate deeply into the layers, ensuring a moist and flavorful interior, and helps create those distinct, crispy pieces.
- Deep Golden Brown: Don’t be afraid to let your baklava get truly golden brown in the oven. This is where the maximum crispiness and flavor develop.
Variations:
- Cheese Power-Up: For an even richer, tangier flavor, mix 1/2 cup of crumbled feta cheese or shredded mozzarella into the cooled vegetable filling. A blend of cheeses like Gruyere or white cheddar would also be delicious.
- Vegetable Medley: Feel free to experiment with other finely shredded or diced vegetables. Spinach (sautéed and squeezed dry), mushrooms (sautéed until all moisture is gone), bell peppers, leeks, or zucchini would all work well. Adjust cooking times as needed.
- Herb Garden: Swap out or add other fresh herbs like mint, oregano, thyme, or chives to the vegetable filling for different aromatic profiles.
- Spice It Up: Enhance the seasoning with a pinch of nutmeg, a dash of smoked paprika, or a touch of curry powder for an exotic twist.
- Protein Boost: For a heartier dish, you could add cooked, finely crumbled ground chicken or turkey to the vegetable filling. Ensure it’s very lean and well-drained.
- Vegan Option: Replace butter with a plant-based butter alternative, and for the creamy topping, use a plant-based milk (such as unsweetened almond or soy milk), a plant-based yogurt or sour cream, and omit the eggs (or use a flax egg substitute, though the texture will vary). You might need to add a bit of cornstarch to the “custard” for thickening.
Storage and Reheating
Storage:
- Room Temperature: Crispy Vegetable Baklava Rolls are best enjoyed fresh from the oven, but they can be left at room temperature for up to 2 hours. After that, they should be refrigerated.
- Refrigerator: Store any leftover baklava rolls in an airtight container in the refrigerator for up to 3-4 days. The phyllo will lose some of its crispiness, but the flavor will still be excellent.
- Freezing: While technically possible, freezing is not recommended for this dish as the phyllo layers can become very soggy and lose their delicate texture upon thawing. If you must freeze, wrap individual portions tightly in plastic wrap, then in foil, and store for up to 1 month.
Reheating:
- Oven (Recommended): For best results and to regain some of the crispiness, reheat the baklava rolls in a preheated oven at 300-325°F (150-160°C) for 10-15 minutes, or until warmed through and the phyllo is crisp again. Placing them on a baking sheet lined with parchment paper can help.
- Toaster Oven: Small portions can be reheated in a toaster oven for about 5-8 minutes at 300°F (150°C) until crispy and hot.
- Microwave (Not Recommended): While you can technically reheat in a microwave, it will make the phyllo very soft and potentially chewy, and you will lose all the crispiness. Only use this method if you prioritize speed over texture.
Frequently Asked Questions
What kind of phyllo dough should I use, and can I make it from scratch?
For this recipe, store-bought frozen phyllo dough is highly recommended. It’s readily available in most grocery stores (usually near the frozen desserts or specialty items) and saves a significant amount of time and effort. Making phyllo dough from scratch is a very labor-intensive process that requires specialized skills and equipment, so it’s generally not practical for home cooks. Ensure you thaw it properly according to package instructions before use.
Can I prepare the vegetable filling in advance?
Absolutely! Preparing the vegetable filling in advance is a great time-saver. You can cook the cabbage and carrot mixture up to 2-3 days ahead of time. Store it in an airtight container in the refrigerator. Just make sure it is completely cooled before you start assembling the baklava rolls to prevent the phyllo from becoming soggy.
My phyllo dough keeps tearing. What am I doing wrong?
Tearing phyllo is a common issue, especially for beginners, but it’s usually easily remedied. The most common cause is dry phyllo. Ensure you keep the unused sheets covered with a slightly damp kitchen towel at all times. Also, handle the sheets gently and avoid excessive force. If a sheet does tear, don’t worry! You can often patch it with a small piece of another sheet, and the multiple layers will hide any imperfections once baked. Working quickly also helps, as the dough has less time to dry out.



