Follow Me On Social Media!
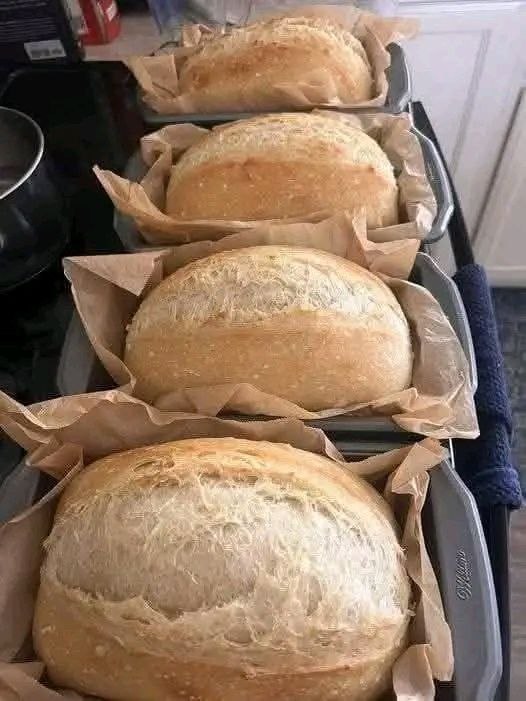
Crusty Italian Bread

Introduction
There’s something truly magical about the aroma of freshly baked bread wafting through your home. It’s a scent that promises comfort, warmth, and deliciousness. Today, we’re diving into the wonderful world of Crusty Italian Bread, a staple that embodies simplicity, incredible flavor, and that satisfyingly crisp exterior we all crave. This isn’t just any bread; it’s a testament to the power of basic ingredients – flour, water, yeast, and salt – transformed into something extraordinary with a little time and love. Imagine tearing into a loaf, hearing the subtle crackle of the crust, and revealing a soft, airy interior perfect for soaking up olive oil, cradling your favorite sandwich fillings, or simply enjoying on its own.
Our recipe for Crusty Italian Bread is designed to bring that authentic bakery experience right into your kitchen. We’re talking about a bread with a beautiful golden-brown crust that shatters just so, yielding to a tender, chewy crumb. Unlike some more enriched breads, Italian bread prides itself on a lean dough, allowing the subtle nutty flavors of the flour and the yeast to truly shine. This recipe is special because it demystifies the process, making it approachable for home bakers of all skill levels. With clear instructions and helpful tips, you’ll be producing loaves that look and taste like they came straight from a traditional Italian “forno” in no time.
So, whether you’re looking to elevate your dinner table, impress guests, or simply indulge in the therapeutic process of bread making, this Crusty Italian Bread recipe is your perfect companion. Get ready to experience the joy of creating a truly remarkable loaf that will undoubtedly become a regular feature in your culinary repertoire. The satisfaction of pulling a perfectly baked, gloriously crusty loaf from your oven is unparalleled, and we can’t wait for you to experience it.
Nutritional Information
Per serving (approximate values, based on 1 loaf yielding 12 slices):
- Calories: 180 kcal
- Protein: 6g
- Carbohydrates: 35g
- Fat: 1g
- Fiber: 2g
- Sodium: 300mg
Ingredients
- 4 cups (480g) all-purpose flour, plus more for dusting
- 1.5 teaspoons (5g) active dry yeast
- 1.5 teaspoons (9g) fine sea salt
- 1.5 cups (360ml) warm water (105-115°F / 40-46°C)
- 1 tablespoon olive oil, for greasing
Instructions
- Activate the Yeast: In a large mixing bowl, combine the warm water and yeast. Stir gently and let it sit for 5-10 minutes, until the mixture becomes foamy. This indicates the yeast is active and ready to work its magic.
- Combine Dry Ingredients: In a separate bowl, whisk together the flour and salt.
- Form the Dough: Gradually add the dry ingredients to the wet yeast mixture, stirring with a wooden spoon or your hands until a shaggy dough forms. It will be sticky.
- Knead the Dough: Turn the dough out onto a lightly floured surface. Knead for 8-10 minutes, or until the dough is smooth, elastic, and no longer sticky. If using a stand mixer with a dough hook, knead on medium-low speed for 6-8 minutes. The dough should spring back when gently poked.
- First Rise (Bulk Fermentation): Lightly grease a clean large bowl with olive oil. Place the dough in the bowl, turning it once to coat the entire surface with oil. Cover the bowl tightly with plastic wrap or a clean kitchen towel. Let the dough rise in a warm, draft-free place for 1.5-2 hours, or until it has doubled in size.
- Punch Down and Shape: Gently punch down the risen dough to release the air. Turn the dough out onto a lightly floured surface. Divide the dough into two equal portions. For each portion, flatten it into a rectangle, then tightly roll it into a log shape, pinching the seams to seal.
- Second Rise (Proofing): Lightly grease two standard loaf pans (8.5 x 4.5 inches or similar) with olive oil and line them with parchment paper, leaving an overhang on the sides for easy removal. Place one shaped loaf into each prepared pan. Cover the loaf pans loosely with plastic wrap or a kitchen towel and let them rise in a warm place for another 45-60 minutes, or until the loaves have nearly doubled in size and look puffy.
- Preheat Oven and Prepare for Baking: While the dough is proofing for the second time, preheat your oven to 425°F (220°C). If you have a baking stone or steel, place it in the oven during preheating. For a truly crusty crust, you’ll want to create steam. Place an empty metal baking pan on the bottom rack of your oven while it preheats.
- Score the Loaves: Just before baking, gently remove the plastic wrap from the risen loaves. Using a very sharp knife or a bread lame, make 2-3 diagonal slashes about 1/2 inch deep across the top of each loaf. This allows for even expansion during baking.
- Bake with Steam: Carefully pour about 1 cup of hot water into the empty metal pan on the bottom rack (be cautious of the steam!). Immediately place the loaf pans into the preheated oven.
- Bake the Bread: Bake for 25-30 minutes, or until the crust is deeply golden brown and the internal temperature reaches 200-210°F (93-99°C) when measured with an instant-read thermometer. If the tops are browning too quickly, you can loosely tent them with aluminum foil.
- Cool: Once baked, carefully remove the loaves from the pans using the parchment paper overhangs. Transfer them to a wire rack to cool completely before slicing. This is crucial for developing the final texture and preventing a gummy interior. Cooling can take 1-2 hours.
Cooking Tips and Variations
Achieving that perfect crusty exterior and a tender, airy interior is the hallmark of great Italian bread. Here are some tips to ensure your loaves are nothing short of spectacular, along with a few variations to explore:
- The Importance of Steam: The secret to a truly crusty crust lies in steam during the initial phase of baking. The steam keeps the surface of the dough moist, allowing it to expand fully before the crust sets. This leads to a thinner, crisper crust. Our method of pouring hot water into a pan on the oven floor is effective. Alternatively, if you have a Dutch oven, preheating it with the lid on, then carefully transferring the dough into it for the first 20 minutes of baking before removing the lid, works wonderfully.
- Don’t Rush the Rise: Bread making is all about patience. Allowing the dough to rise fully, both for the bulk fermentation and the proofing, is crucial for flavor development and a light, airy texture. If your kitchen is cool, you can create a warm environment by placing the bowl in a slightly warm (turned off) oven with a bowl of hot water, or near a sunny window.
- Flour Power: While all-purpose flour works well, using bread flour (which has a higher protein content) can result in a chewier crumb and a more robust structure. Experiment to see which you prefer! For an even more authentic touch, seek out unbleached bread flour.
- Scoring for Success: Scoring the top of your loaves before baking isn’t just for aesthetics; it serves a vital purpose. It controls where the bread expands, preventing uncontrolled tearing and allowing the loaf to achieve its maximum volume and a beautiful shape. Use a very sharp knife or a bread lame and make quick, confident cuts.
- Cool Completely: It’s tempting to slice into a warm loaf, but resist! Slicing hot bread can release steam prematurely, resulting in a gummy interior. Letting it cool completely on a wire rack allows the starches to set, giving you that perfect texture.
- Adding Flavor: While traditional Italian bread is lean, you can certainly add subtle flavors. Try incorporating a tablespoon of dried Italian herbs (like oregano, basil, and rosemary) into the dry ingredients. For a savory twist, mix in a handful of grated Parmesan cheese or sun-dried tomatoes (chopped) during the kneading process.
- Shaping Variations: Instead of loaf pans, you can shape this dough into round boules or longer bâtards and bake them directly on a baking sheet or baking stone. Just be sure to dust your surface liberally with flour to prevent sticking.
- Over-Proofing vs. Under-Proofing: An under-proofed loaf will be dense and can have large, irregular holes. An over-proofed loaf might collapse in the oven or have a very weak crust. Aim for dough that looks noticeably puffy and has increased significantly in size, but still has some spring when gently poked.
Storage and Reheating
Proper storage is key to maintaining the deliciousness of your homemade Crusty Italian Bread, and reheating it correctly can bring back that fresh-from-the-oven experience.
Storage:
- Room Temperature (Short Term): For optimal freshness and crustiness, store your cooled bread in a paper bag at room temperature for up to 1-2 days. The paper bag allows the crust to breathe, preventing it from becoming soggy. Avoid plastic bags at room temperature, as they trap moisture and soften the crust.
- Freezing (Long Term): If you won’t be eating the entire loaf within a day or two, freezing is an excellent option. Once the bread is completely cool, you can freeze it whole or sliced.
- Whole Loaf: Wrap the entire cooled loaf tightly in plastic wrap, then an additional layer of aluminum foil.
- Sliced Loaf: Slice the bread first, then arrange the slices in a single layer on a baking sheet and freeze until firm. Once frozen, transfer the slices to a freezer-safe bag or container. This allows you to grab just a few slices as needed.
- Frozen bread can be stored for up to 2-3 months.
Reheating:
- From Room Temperature: To revive a slightly stale loaf, preheat your oven to 350°F (175°C). Lightly spritz the bread with water (this helps restore the crust) and bake for 5-10 minutes, or until warmed through and the crust is crisp again.
- From Frozen (Whole Loaf): If reheating a whole frozen loaf, you can either let it thaw at room temperature for a few hours first, or bake it directly from frozen. If baking from frozen, remove all wrapping, spritz with water, and place in a cold oven. Set the oven to 350°F (175°C) and bake for 20-30 minutes, or until thawed and crusty.
- From Frozen (Sliced): Frozen slices can be toasted directly from the freezer in a toaster, toaster oven, or on a griddle. For larger quantities, arrange slices on a baking sheet and bake at 350°F (175°C) for 5-8 minutes until warm and slightly crisp.
Always allow reheated bread to cool for a few minutes before serving to let the crust re-crisp.
Frequently Asked Questions
What makes Italian bread crusty?
The crustiness of Italian bread primarily comes from two factors: a lean dough and steam during baking. A lean dough, made simply with flour, water, yeast, and salt, has less fat and sugar, which allows for a crispier crust. The steam introduced into the oven during the first part of baking keeps the surface of the dough moist, allowing it to expand fully before the crust sets. Once the steam dissipates, the high heat then bakes the expanded, thin outer layer into that characteristic brittle crust.
Can I make this bread without a stand mixer?
Absolutely! This recipe is perfectly suited for hand-kneading. In fact, many traditional bread bakers prefer the feel and control of kneading by hand. It might take a few extra minutes of effort, but the process is quite therapeutic, and the results are just as good, if not better, as you can truly feel the dough’s development. Just be prepared for a bit of a workout for your arms!
Why did my bread turn out dense?
Several factors can lead to dense bread. The most common reasons include insufficient kneading (which doesn’t develop enough gluten for a light structure), not allowing enough time for the dough to rise (under-proofing), using old or inactive yeast, or using too much flour during kneading and shaping. Make sure your yeast is fresh and active, knead until the dough is elastic, and let it rise in a warm, draft-free place until it has visibly doubled in size for both rises.
How can I tell if my yeast is still good?
You can easily test if your active dry yeast is still good. In a small bowl, combine 1/2 cup of warm water (105-115°F / 40-46°C) with 1 teaspoon of sugar and 2 teaspoons of your yeast. Stir gently and let it sit for 5-10 minutes. If the mixture becomes foamy and bubbly, your yeast is active and ready to use. If there’s no activity, your yeast is likely expired, and you should get a new batch.