
Follow Me On Social Media!
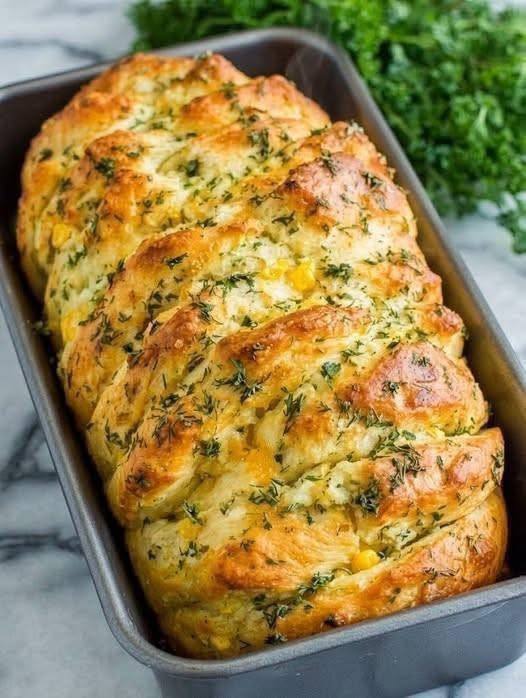
Garlic Herb Pull-Apart Bread

Introduction
Imagine a warm, golden-brown loaf, its crust glistening with melted butter, bursting with the irresistible aroma of fresh garlic and fragrant herbs. Now imagine pulling apart a soft, tender piece, revealing pockets of melted cheese and savory goodness. That, my friends, is the magic of Garlic Herb Pull-Apart Bread, and it’s about to become your new favorite side dish! This isn’t just bread; it’s an experience, a communal delight that begs to be shared, making every meal feel like a special occasion.
This recipe transforms simple ingredients into an impressive, show-stopping centerpiece that’s surprisingly easy to achieve. Whether you’re hosting a dinner party, looking for the perfect accompaniment to a comforting soup, or simply craving something utterly delicious, this pull-apart bread delivers on all fronts. Its inviting appearance and interactive nature make it a hit with both adults and kids, turning mealtime into a fun, hands-on affair. The blend of pungent garlic, aromatic fresh herbs, rich butter, and gooey cheese creates a flavor profile that is both classic and deeply satisfying, promising a delightful bite every single time.
What makes this particular Garlic Herb Pull-Apart Bread stand out is its delightful texture and incredible flavor. Each individual piece of dough is lovingly coated in a savory mixture before being baked together, ensuring that every “pull” is infused with buttery garlic and herb goodness. The occasional burst of sweet corn kernels, a unique and delightful addition, adds an unexpected layer of flavor and texture that elevates this bread beyond the ordinary. It’s a versatile dish that can complement almost any main course, from hearty pasta dishes to succulent roasts, or even shine as a standalone appetizer. Get ready to impress your taste buds and your guests with this utterly irresistible creation!
Nutritional Information
Per serving (approximate values):
- Calories: 350
- Protein: 12g
- Carbohydrates: 40g
- Fat: 16g
- Fiber: 3g
- Sodium: 580mg
Ingredients
- 1 (16.3-ounce) can refrigerated biscuit dough (such as Pillsbury Grands!), 8 biscuits
- 1/2 cup unsalted butter, melted
- 4 cloves garlic, minced
- 1/4 cup fresh parsley, finely chopped
- 2 tablespoons fresh dill, finely chopped
- 1 cup shredded cheddar cheese (or a cheddar-Monterey Jack blend)
- 1/2 cup frozen corn kernels, thawed and drained (optional, but highly recommended!)
- 1/2 teaspoon salt
- 1/4 teaspoon black pepper
- Pinch of red pepper flakes (optional, for a little kick)
Instructions
- Preheat your oven to 375°F (190°C). Lightly grease a 9×5-inch loaf pan with cooking spray or butter.
- Open the can of refrigerated biscuit dough. On a clean cutting board, cut each biscuit into 6-8 smaller pieces. You can quarter them and then cut each quarter in half, or simply cut them into bite-sized chunks. Set aside.
- In a medium-sized microwave-safe bowl, melt the unsalted butter. This should take about 30-60 seconds in the microwave, or you can melt it gently on the stovetop.
- Add the minced garlic, finely chopped fresh parsley, finely chopped fresh dill, salt, black pepper, and optional red pepper flakes to the melted butter. Stir well to combine.
- Add the shredded cheese and the thawed and drained corn kernels (if using) to the butter mixture. Stir again to ensure all ingredients are well distributed.
- Add the cut biscuit dough pieces to the bowl with the butter, herb, cheese, and corn mixture. Using a spoon or your hands, gently toss the dough pieces until each one is thoroughly coated in the mixture. Make sure to scrape the bottom of the bowl to get all the cheesy, herby goodness onto the dough.
- Carefully transfer the coated dough pieces into the prepared loaf pan. Arrange them somewhat evenly, but don’t press them down too firmly; you want them to have room to puff up and create those wonderful “pull-apart” layers.
- Bake for 30-35 minutes, or until the top is golden brown and a toothpick inserted into the center comes out clean (or with just melted cheese, not raw dough). If the top starts to brown too quickly, you can loosely tent the loaf pan with aluminum foil for the last 10-15 minutes of baking.
- Once baked, remove the loaf pan from the oven and let it rest on a wire rack for 5-10 minutes. This allows the bread to set slightly and makes it easier to remove from the pan.
- After resting, carefully invert the loaf onto a serving platter. If any cheese or herbs stick to the pan, simply scrape them out and place them back on the bread.
- Serve warm, inviting everyone to pull off their own delicious, cheesy, garlicky, herby pieces!
Cooking Tips and Variations
For the best results, always use fresh herbs for this recipe. Dried herbs simply won’t deliver the same vibrant flavor or aromatic punch. When mincing garlic, aim for very fine pieces to ensure the flavor is evenly distributed without overwhelming any single bite. Don’t be shy with the butter mixture; ensuring each dough piece is fully coated is key to maximizing flavor and achieving that perfectly glossy, golden crust. If your dough pieces are sticking together excessively during coating, a light dusting of flour on your hands can help. For an extra cheesy crust, sprinkle a little extra shredded cheese over the top of the bread during the last 5-10 minutes of baking.
This recipe is incredibly versatile! For a different flavor profile, swap out the cheddar for mozzarella, provolone, or even a spicy pepper jack cheese. You can experiment with different fresh herbs too; chives, oregano, or thyme would all be delicious additions. For a touch of heat, increase the red pepper flakes or add a pinch of cayenne pepper. To make it a more substantial appetizer, consider adding finely diced cooked bacon bits, sun-dried tomatoes (patted dry and chopped), or even tiny pepperoni pieces to the butter mixture. If you’re feeling adventurous, a tablespoon of grated Parmesan cheese can be added to the butter mixture for an extra layer of savory depth. Remember not to overcrowd your loaf pan, as the dough needs space to expand and cook evenly.
Storage and Reheating
Leftover Garlic Herb Pull-Apart Bread is best stored in an airtight container or wrapped tightly in aluminum foil at room temperature for up to 2 days. While it’s certainly most delicious fresh out of the oven, it can be enjoyed later with proper reheating. To reheat, preheat your oven to 300°F (150°C). Place the bread (either whole or individual pieces) on a baking sheet and heat for 10-15 minutes, or until warmed through and the cheese is melty again. Avoid microwaving, as it can make the bread tough and chewy. If reheating individual pieces, you can also quickly toast them in a toaster oven for a crispier exterior.
Frequently Asked Questions
Can I use homemade dough instead of canned biscuits?
Absolutely! While canned biscuits offer a convenient shortcut, you can certainly use homemade pizza dough or a simple yeast dough. Just ensure the dough is cut into similar bite-sized pieces before coating and baking. Adjust baking time as needed, as homemade dough may vary.
What if I don’t have fresh herbs?
While fresh herbs are highly recommended for the best flavor and aroma, you can substitute with dried herbs in a pinch. Use about 1/3 the amount of dried herbs compared to fresh (e.g., 1 tablespoon dried parsley and 1 teaspoon dried dill). However, be aware the flavor won’t be as vibrant.
My bread is browning too quickly on top but seems raw in the middle. What should I do?
This often happens if your oven runs a bit hot or if the bread is too close to the top heating element. Loosely tent the loaf pan with aluminum foil for the remainder of the baking time. This will help prevent further browning while allowing the inside to cook through.
Can I prepare this bread ahead of time?
You can prepare the butter and herb mixture a few hours in advance and store it in the refrigerator. However, it’s best to coat the dough and bake it immediately. The dough can become soggy if left to sit in the wet mixture for too long before baking, affecting the texture of the finished bread.



