
Follow Me On Social Media!
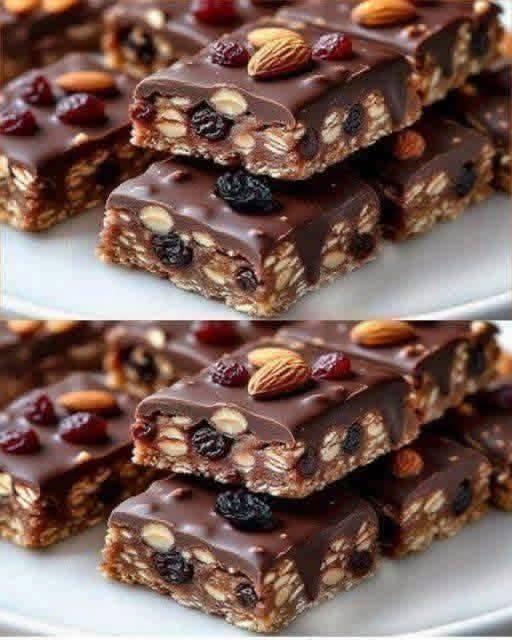
No-Bake Chocolate Nut Bars with Almonds & Cranberries

Introduction
Get ready to meet your new favorite snack! These No-Bake Chocolate Nut Bars with Almonds & Cranberries are the perfect blend of chewy, chocolatey, and utterly satisfying. Imagine a rich, dense base packed with wholesome oats, sweet dates, and crunchy almonds, all bound together with creamy nut butter, then topped with a luscious layer of dark chocolate and a vibrant sprinkle of more nuts and dried cranberries. It’s a treat that feels indulgent but secretly packs a nutritional punch, making it ideal for a quick energy boost, a delightful dessert, or a healthy-ish snack any time of day.
What makes these bars truly special is their incredible simplicity. As the name suggests, there’s no oven required, making them perfect for hot days or when you just want a quick, fuss-free recipe. In under 20 minutes of active prep time, you can have a batch of these beauties chilling in your fridge, ready to be enjoyed. They’re wonderfully customizable, catering to various tastes and dietary needs, and their delightful combination of sweet, nutty, and fruity flavors will have everyone reaching for more. Plus, they hold up beautifully, making them excellent for meal prep and grab-and-go convenience.
These bars are a testament to how delicious and wholesome no-bake treats can be. The natural sweetness from dates and a touch of maple syrup or honey perfectly balances the richness of the chocolate and the earthiness of the nuts. The chewiness of the oats and dried fruits combined with the satisfying crunch of almonds creates a textural symphony that keeps every bite interesting. Whether you’re a seasoned baker or a kitchen novice, you’ll find this recipe incredibly easy to follow and incredibly rewarding to eat.
Nutritional Information
Per serving (approximate values):
- Calories: 280-320
- Protein: 6-8g
- Carbohydrates: 30-35g
- Fat: 16-20g
- Fiber: 4-6g
- Sodium: 50-70mg
Ingredients
- 1 ½ cups rolled oats (quick or old-fashioned)
- 1 cup pitted Medjool dates (about 10-12 large dates), packed
- ½ cup natural nut butter (peanut butter, almond butter, or cashew butter)
- ¼ cup honey or maple syrup
- ¼ teaspoon salt
- ½ cup whole or chopped almonds, divided
- ¼ cup dried cranberries, divided
- ¼ cup raisins (dark or golden), divided
- ¾ cup semi-sweet or dark chocolate chips
- 1 tablespoon coconut oil (or butter/shortening)
Instructions
- Line an 8×8 or 9×9 inch baking pan with parchment paper, leaving an overhang on all sides to easily lift the bars out later.
- If your dates are firm, soak them in warm water for 5-10 minutes, then drain thoroughly. In a food processor, process the pitted dates until they form a sticky ball or a thick paste. This may take a few minutes and you might need to scrape down the sides.
- In a large mixing bowl, combine the processed date paste, nut butter, honey or maple syrup, and salt. Mix well with a sturdy spatula or your hands until thoroughly combined and sticky.
- Add the rolled oats to the date mixture. Continue mixing until the oats are evenly coated and incorporated into the sticky base.
- Fold in about ⅓ cup of the whole or chopped almonds, 2 tablespoons of dried cranberries, and 2 tablespoons of raisins into the oat mixture. Reserve the remaining nuts and dried fruits for topping.
- Transfer the entire mixture to the prepared baking pan. Using the back of a spoon, a spatula, or your hands, press the mixture down very firmly and evenly into the pan. The firmer you press, the better your bars will hold together. You can even use the bottom of a glass to help compact it.
- In a microwave-safe bowl, combine the chocolate chips and coconut oil. Microwave in 30-second intervals, stirring well after each interval, until the chocolate is fully melted and smooth. Alternatively, melt the chocolate and coconut oil in a double boiler over simmering water, stirring until smooth.
- Pour the melted chocolate evenly over the pressed oat base in the pan, spreading it to cover the entire surface.
- Immediately sprinkle the remaining ⅓ cup of almonds, 2 tablespoons of dried cranberries, and 2 tablespoons of raisins over the melted chocolate, pressing them gently so they adhere.
- Place the pan in the refrigerator for at least 1-2 hours, or until the chocolate topping is completely firm and set.
- Once firm, use the parchment paper overhang to lift the entire slab out of the pan. Place it on a cutting board and use a sharp knife to slice it into 12-16 bars, depending on your desired size. For cleaner cuts, you can warm your knife slightly under hot water and wipe it dry between cuts.
- Serve immediately or store for later enjoyment.
Cooking Tips and Variations
For bars that hold together perfectly, the key is firm pressing. After you’ve spread the base mixture into the pan, really put some muscle into it! Use the bottom of a flat glass or a clean, sturdy spatula to compact it as much as possible. This ensures a dense, cohesive bar that won’t crumble when cut. Another crucial step is thorough chilling. Don’t rush this part; allowing the bars to chill for the full 1-2 hours (or even longer) ensures both the base and the chocolate topping are firm, making for cleaner cuts and a better eating experience. If your dates feel a bit dry or hard, soak them in warm water for about 10-15 minutes before processing. This will soften them, making them easier to blend into a smooth paste and helping the base bind better.
The beauty of these no-bake bars lies in their versatility. Feel free to experiment with different nuts: walnuts, pecans, pistachios, or even a mix of several types would be delicious. For dried fruits, swap out or add dried apricots, cherries, goji berries, or even chopped dried figs for different flavor profiles. To boost the nutritional content, consider adding seeds like chia seeds, flax seeds, hemp seeds, or sunflower seeds to the base mixture – they’ll add healthy fats and fiber without significantly altering the taste. A pinch of cinnamon or nutmeg in the base can also add a warm, comforting spice note.
When it comes to the chocolate topping, you have options! While semi-sweet or dark chocolate chips are classic, you could use milk chocolate for a sweeter bar or even white chocolate for a different aesthetic. If you prefer a lighter touch of chocolate, you can skip the full topping and simply drizzle melted chocolate over the bars instead. For a truly decadent treat, you could add a layer of caramel or a sprinkle of sea salt over the chocolate topping before it sets. If you’re looking for a vegan option, ensure your nut butter, chocolate chips, and sweetener (maple syrup) are all plant-based. Many brands of dark chocolate chips are naturally vegan, but always check the label.
To achieve a super smooth and glossy chocolate topping that’s less prone to cracking when cut, the addition of coconut oil is essential. It thins out the melted chocolate slightly, making it easier to spread and giving it a nicer texture when set. If you don’t have coconut oil, a small amount of butter or shortening can work as a substitute. Be careful not to overheat the chocolate, as this can cause it to seize or become grainy. Melt it slowly and stir frequently until just smooth. For an extra boost of flavor, you can add a tiny splash of vanilla extract to the melted chocolate before pouring.
Storage and Reheating
These No-Bake Chocolate Nut Bars are best stored in an airtight container in the refrigerator. They will maintain their freshness, texture, and flavor for up to 1-2 weeks. Storing them in the fridge keeps the chocolate firm and prevents the bars from becoming too soft or sticky, especially in warmer climates. If your kitchen is cool, they can be stored at room temperature for a couple of days, but refrigeration is highly recommended for optimal quality and longevity. To prevent the bars from sticking together, you can place small pieces of parchment paper between layers in the container.
These bars do not require reheating and are best enjoyed straight from the refrigerator. The cold temperature enhances their chewiness and the firmness of the chocolate, providing a satisfying contrast in textures. If you find them too firm directly from the fridge, you can let them sit at room temperature for 5-10 minutes before eating to soften them slightly, though this is purely a matter of personal preference. They also freeze exceptionally well. To freeze, wrap individual bars tightly in plastic wrap, then place them in a freezer-safe airtight container or bag. They can be stored in the freezer for up to 2-3 months. Thaw frozen bars in the refrigerator overnight or at room temperature for about 15-30 minutes before serving.
Frequently Asked Questions
Can I make these bars gluten-free?
Yes, absolutely! Rolled oats are naturally gluten-free, but they are often processed in facilities that also handle wheat, leading to cross-contamination. To ensure your bars are truly gluten-free, make sure to use certified gluten-free rolled oats. All other ingredients in this recipe (dates, nut butter, honey/maple syrup, salt, almonds, cranberries, raisins, chocolate chips, coconut oil) are typically gluten-free, but it’s always a good practice to check labels, especially for chocolate chips, to confirm no gluten-containing additives are present.
My date mixture isn’t forming a paste. What should I do?
If your dates are too dry, they won’t process into a smooth, sticky paste easily. The best solution is to soak them in hot water for about 5-10 minutes before pitting and processing. Drain them very well after soaking to avoid adding excess moisture to your bar mixture. If you’ve already started processing and it’s still crumbly, try adding a tiny bit of the liquid sweetener (honey or maple syrup) or a teaspoon of water at a time to the food processor and pulse until it reaches the desired sticky consistency. Be careful not to add too much liquid, as this can make the base too soft.
How can I prevent the chocolate topping from cracking when I cut the bars?
A common issue with chocolate toppings is cracking, especially when cut directly from the fridge. The coconut oil added to the chocolate helps a lot by making the chocolate a bit more flexible when set. To further minimize cracking, try these tips: First, ensure the bars are well chilled but not frozen solid. Second, remove the slab from the fridge and let it sit at room temperature for about 5-10 minutes before cutting – this allows the chocolate to soften just slightly. Third, use a very sharp knife and press down firmly and steadily, rather than sawing. For the cleanest cuts, you can warm your knife under hot water, wipe it completely dry, and then make your cuts, wiping the blade clean between each cut.
Are these bars healthy?
These no-bake bars are definitely on the healthier side compared to many conventional desserts. They are packed with whole food ingredients like oats, dates, nuts, and dried fruits, which provide fiber, healthy fats, vitamins, and minerals. They offer sustained energy and can be a great alternative to processed snacks. However, they are also calorie-dense due to the nuts, dates, and chocolate, so moderation is key. They are a fantastic “healthy-ish” treat that satisfies a sweet craving while offering nutritional benefits, making them a much better choice than many store-bought options.



