
Follow Me On Social Media!
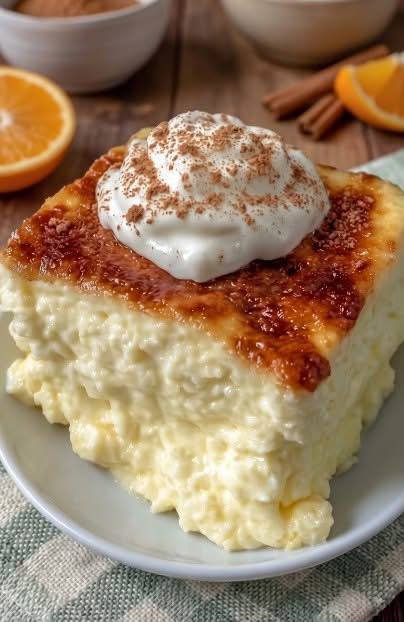
Old-Fashioned Vanilla Baked Custard

Introduction
There’s something profoundly comforting about a truly classic dessert, and old-fashioned vanilla baked custard sits proudly at the top of that list. Imagine a dessert that whispers tales of simpler times, of kitchens filled with warmth and the sweet aroma of home baking. This isn’t just any custard; it’s a creamy, dreamy confection that evokes nostalgia with every spoonful, a gentle hug for your taste buds that transcends generations. Its appeal lies in its unassuming elegance: a rich, tender texture that melts in your mouth, infused with the pure, comforting essence of vanilla, and crowned with a beautiful, golden top that hints at the delights within.
What makes this particular custard “old-fashioned” isn’t just its timeless popularity, but its commitment to wholesome, straightforward ingredients. This is a dessert born from the pantry staples of yesteryear – fresh eggs, rich milk, a touch of sugar, and the irreplaceable perfume of real vanilla. There are no complicated techniques or exotic components here, just honest goodness prepared with care. The result is a dessert that feels both luxurious and humble, satisfying without being overly heavy. It’s the kind of treat that makes any meal feel special, a perfect ending to a family dinner or a quiet moment of indulgence.
In a world bustling with complex culinary creations, this Old-Fashioned Vanilla Baked Custard stands out for its serene simplicity and profound satisfaction. It’s a testament to the fact that sometimes, the most exquisite pleasures are found in the familiar and the lovingly prepared. Get ready to rediscover the magic of a truly classic dessert that promises comfort, flavor, and a touch of golden perfection in every delightful bite.
Nutritional Information
Per serving (approximate values):
- Calories: 350-400
- Protein: 12-15g
- Carbohydrates: 30-35g
- Fat: 20-25g
- Fiber: 0-1g
- Sodium: 100-150mg
Ingredients
- 6 large eggs (3 whole eggs + 3 egg yolks for richer color and texture)
- 4 cups (1 liter) whole milk (or a mix of whole milk and heavy cream for extra richness)
- 1/2 cup (100g) granulated sugar, plus 2 tablespoons for caramelizing the top
- 1 teaspoon pure vanilla extract (or 1 vanilla bean, split and scraped)
- 1/4 teaspoon salt
- Optional: Whipped cream for serving
- Optional: Ground cinnamon or cocoa powder for garnish
Instructions
- Preheat your oven to 325°F (160°C). Gather a large baking dish (such as a 9×13 inch casserole dish or individual ramekins) and a larger roasting pan for the water bath.
- In a large bowl, whisk together the whole eggs, egg yolks, 1/2 cup granulated sugar, and salt until well combined and slightly pale. Do not overwhisk, as incorporating too much air can lead to a frothy or bubbly custard.
- In a medium saucepan, gently heat the milk (and cream, if using) over medium-low heat until it’s steamy and small bubbles form around the edges. Do not let it boil. If using a vanilla bean, add it to the milk while heating to infuse the flavor, then remove the pod before tempering.
- Slowly temper the hot milk into the egg mixture. This is a crucial step to prevent the eggs from scrambling. While continuously whisking the egg mixture, gradually pour in a thin stream of the hot milk. Once about half of the milk has been incorporated, you can pour the remaining milk in a steady stream, still whisking.
- Stir in the vanilla extract (if not using a vanilla bean).
- Strain the custard mixture through a fine-mesh sieve into a clean bowl or directly into your baking dish(es). This step removes any bits of cooked egg or chalazae, ensuring a perfectly smooth custard. Skim off any foam that forms on the surface.
- If using a large baking dish, pour the custard mixture into it. If using ramekins, divide the mixture evenly among them.
- Carefully place the baking dish(es) into the larger roasting pan. Pour hot water into the roasting pan until it comes halfway up the sides of the custard dish(es). This water bath (bain-marie) helps the custard cook gently and evenly, preventing it from curdling or becoming rubbery.
- Carefully transfer the roasting pan with the custard to the preheated oven.
- Bake for 45-60 minutes for a large dish, or 30-40 minutes for individual ramekins, or until the custard is just set. The edges should be firm, but the center should still have a slight jiggle when gently shaken. A knife inserted near the center should come out clean.
- Carefully remove the roasting pan from the oven. Using oven mitts, carefully lift the custard dish(es) out of the water bath.
- Allow the custard to cool completely on a wire rack at room temperature for at least 1 hour, then cover and refrigerate for at least 4 hours, or preferably overnight, to allow it to fully set and chill.
- Before serving, you can create the beautiful caramelized top. Sprinkle the remaining 2 tablespoons of granulated sugar evenly over the chilled custard.
- To caramelize, you have two options:
- Broiler Method: Place the custard dish(es) under a preheated broiler for 1-3 minutes, watching carefully, until the sugar melts and turns a deep golden-brown. Be extremely vigilant, as sugar can burn quickly.
- Torch Method: Use a kitchen torch to melt and caramelize the sugar until it forms a crisp, golden crust.
- Serve chilled, optionally topped with a dollop of whipped cream and a sprinkle of ground cinnamon or cocoa powder.
Cooking Tips and Variations
For the smoothest, silkiest custard, always ensure your eggs are at room temperature before mixing. This helps them incorporate more evenly into the other ingredients. When tempering the eggs with hot milk, pour very slowly at first, whisking continuously, to gradually bring the egg temperature up without scrambling them. Don’t rush this step! Straining the custard mixture through a fine-mesh sieve before baking is a small but essential step to eliminate any lumps and ensure a perfectly smooth texture. The water bath is non-negotiable for baked custards; it provides gentle, even heat, preventing the edges from overcooking while the center sets. To check for doneness, look for edges that are set and a center that still has a slight wobble. Overbaking will lead to a rubbery texture, so err on the side of underbaking, as residual heat will continue to cook the custard as it cools. Always allow the custard to cool completely and chill thoroughly in the refrigerator for several hours or overnight for the best texture and flavor.
To add variety, consider infusing the milk with other flavors before tempering. A cinnamon stick, a few cardamom pods, orange zest, or even a star anise can add a wonderful aromatic dimension. For a richer flavor profile, substitute up to half of the whole milk with heavy cream. If you prefer a less sweet custard, you can slightly reduce the sugar, but be mindful that sugar also contributes to the custard’s texture and caramelization. For a different topping, instead of a caramelized sugar crust, you could serve it with fresh berries, a fruit compote, a drizzle of maple syrup, or even a sprinkle of toasted nuts. Individual ramekins are perfect for portion control and elegant presentation, while a large baking dish makes for easy serving at a family gathering.
Storage and Reheating
Old-fashioned vanilla baked custard stores beautifully in the refrigerator. Once completely cooled, cover the dish or individual ramekins tightly with plastic wrap or an airtight lid. It will keep well for up to 3-4 days. If you’ve already caramelized the top, it’s best to enjoy it within a day or two, as the caramelized sugar can soften over time in the refrigerator. For the best texture, it’s generally recommended to serve baked custard chilled. Reheating is not typically advised for baked custards, as it can alter the delicate texture, making it more prone to curdling or becoming rubbery. If you prefer a slightly warmer custard, you can let it sit at room temperature for 15-20 minutes before serving, but avoid any direct heat. The beauty of this dessert is its refreshing chilled quality, especially when contrasted with the crisp caramelized topping.
Frequently Asked Questions
What makes my custard watery or curdled?
A watery custard often results from underbaking, not allowing it to set properly, or sometimes from overbaking which can cause the proteins to separate. Curdling is usually caused by overcooking, especially if the heat is too high, or by not tempering the eggs properly. The water bath is crucial for preventing both of these issues by providing gentle, even heat.
Can I use milk alternatives for this recipe?
While traditional baked custard relies on dairy milk for its rich flavor and protein structure, you can experiment with full-fat canned coconut milk or a rich oat milk for a dairy-free version. However, the texture and setting may vary slightly, and you might need to adjust baking times. Almond milk or other thinner plant milks might result in a much thinner, less custardy texture.
How do I know when the custard is perfectly set?
The custard is perfectly set when the edges appear firm and slightly puffed, but the center still has a slight, gentle wobble when the dish is lightly shaken. If you insert a thin knife or skewer about an inch from the edge, it should come out clean. Avoid baking until the center is completely firm, as it will continue to cook and set as it cools, and overbaking leads to a rubbery texture.
Can I make this custard ahead of time?
Absolutely! This old-fashioned vanilla baked custard is an excellent make-ahead dessert. In fact, it’s best when made at least several hours in advance or even the day before, to allow it to chill thoroughly and for the flavors to meld. If you plan to caramelize the top, it’s best to do that just before serving to ensure the sugar crust is crisp.



