
Follow Me On Social Media!
Search Results for Classic Baked Chicken with Golden Breadcrumb Topping

Introduction
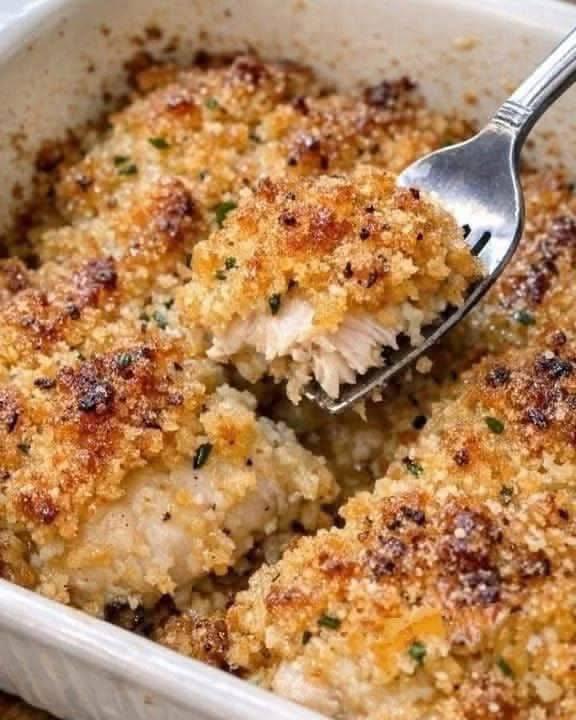
Imagine the comforting aroma wafting from your kitchen, a symphony of savory chicken and toasted herbs. Then, picture a platter laden with golden-brown chicken, each piece crowned with a gloriously crispy breadcrumb topping that shimmers under the light. This, my friends, is the irresistible allure of classic baked chicken with a golden breadcrumb topping – a dish that transcends mere sustenance to become a warm, nostalgic embrace. It’s the kind of meal that brings smiles to faces, hushes to hungry rooms, and contented sighs all around. There’s something undeniably magical about that perfect crunch giving way to tender, juicy chicken, a culinary experience that satisfies both the palate and the soul.
Why has this humble recipe stood the test of time, gracing countless dinner tables for generations? Simply put, it’s a winner on every front. This dish masterfully balances ease of preparation with an explosion of flavor, making it an ideal candidate for busy weeknights when you crave something wholesome and delicious without spending hours slaving over a hot stove. It’s inherently family-friendly, appealing to even the pickiest eaters with its familiar textures and comforting taste. What you can expect from this recipe is nothing short of culinary perfection: succulent, perfectly cooked chicken nestled beneath a vibrant, golden crust that delivers an unparalleled crunch in every bite. We’ll guide you through simple steps to achieve this delightful harmony, ensuring your kitchen becomes the heart of comfort and flavor.
Nutritional Information
Per serving (approximate values):
- Calories: 420
- Protein: 45g
- Carbohydrates: 25g
- Fat: 15g
- Fiber: 2g
- Sodium: 650mg
Ingredients
- 4 boneless, skinless chicken breasts (about 1.5-2 lbs total)
- 1 cup Panko breadcrumbs
- 1/2 cup grated Parmesan cheese
- 1/4 cup finely chopped fresh parsley
- 2 tablespoons melted unsalted butter or olive oil
- 1 large egg
- 2 tablespoons milk (any kind)
- 1/4 cup all-purpose flour
- 1 teaspoon garlic powder
- 1/2 teaspoon onion powder
- 1/2 teaspoon dried Italian seasoning
- 1/4 teaspoon black pepper
- 1/2 teaspoon salt, plus more for seasoning chicken
- Cooking spray or additional oil for baking dish
Instructions
- Preheat your oven to 400°F (200°C). Lightly grease a 9×13 inch baking dish with cooking spray or a thin layer of oil.
- Prepare the chicken: If your chicken breasts are very thick, you can pound them to an even 1/2 to 3/4-inch thickness using a meat mallet or rolling pin. This ensures even cooking. Pat the chicken breasts thoroughly dry with paper towels. Season both sides of the chicken with salt and pepper.
- Set up your breading station: Prepare three shallow dishes or plates. In the first dish, place the all-purpose flour. In the second dish, whisk together the egg and milk until well combined. In the third dish, combine the Panko breadcrumbs, grated Parmesan cheese, chopped fresh parsley, garlic powder, onion powder, dried Italian seasoning, 1/2 teaspoon salt, and 1/4 teaspoon black pepper. Stir until all ingredients are evenly distributed.
- Bread the chicken: Take one chicken breast at a time. First, dredge it in the flour, shaking off any excess. Next, dip it into the egg mixture, ensuring it’s fully coated, then let any excess drip off. Finally, transfer the chicken to the breadcrumb mixture, pressing firmly on both sides to ensure the breadcrumbs adhere well. Make sure the entire surface is covered. Repeat this process for all chicken breasts.
- Arrange in baking dish: Place the breaded chicken breasts in the prepared baking dish, ensuring they are in a single layer and not overcrowded. If using melted butter, drizzle it evenly over the top of the breaded chicken. If using olive oil, you can lightly spray or drizzle it over the topping. This fat is crucial for achieving that beautiful golden crisp.
- Bake the chicken: Bake for 20-25 minutes, or until the chicken is cooked through and the internal temperature reaches 165°F (74°C) when measured with a meat thermometer inserted into the thickest part. The breadcrumb topping should be gloriously golden brown and crispy.
- Achieve maximum crispness (optional): If your topping isn’t as golden or crispy as desired after the initial baking time, you can carefully place the baking dish under the broiler for 1-3 minutes. Watch it very closely, as breadcrumbs can burn quickly. Remove from the oven once the desired crispness is achieved.
- Rest and serve: Remove the chicken from the oven and let it rest for 5 minutes before serving. This allows the juices to redistribute, ensuring moist and tender chicken.
Cooking Tips and Variations
- For the Crispiest Topping: Panko breadcrumbs are your best friend here; their irregular shape creates more surface area for crunch. For an extra layer of crispness and deeper flavor, you can lightly toast the Panko breadcrumbs in a dry pan over medium heat for a few minutes until golden before mixing them with other seasonings. Drizzling melted butter or olive oil generously over the breadcrumbs before baking is also key. Don’t be shy with it!
- Ensuring Moist Chicken: The biggest mistake with baked chicken is overcooking. Invest in a good instant-read meat thermometer and pull the chicken from the oven as soon as it reaches 165°F (74°C). Pounding chicken breasts to an even thickness also helps them cook uniformly, preventing thinner parts from drying out while thicker parts finish cooking. Brining the chicken for 30 minutes in a saltwater solution (1 tablespoon salt per cup of water) before breading can also significantly enhance moisture.
- Don’t Overcrowd the Pan: Give your chicken pieces space in the baking dish. If they’re too close together, steam will build up, preventing the breadcrumbs from getting crispy. Use two baking dishes if necessary.
- Flavor Boosters:
- Cheesy Goodness: Add an extra 1/4 cup of finely grated Parmesan, Pecorino Romano, or even a sharp cheddar to the breadcrumb mixture for a richer, more savory crust.
- Herb Garden: Experiment with different fresh herbs. Thyme, rosemary, or a mix of “herbes de Provence” would be fantastic additions to the breadcrumbs.
- Spicy Kick: A pinch of cayenne pepper or red pepper flakes in the breadcrumbs will add a subtle warmth. Smoked paprika can also add depth and a beautiful color.
- Citrus Zest: Grate the zest of half a lemon into the breadcrumb mixture for a bright, fresh flavor that complements the chicken beautifully.
- Serving Suggestions: This versatile chicken pairs wonderfully with a myriad of side dishes. Consider creamy mashed potatoes, fluffy rice pilaf, roasted asparagus or broccoli, a vibrant green salad with a light vinaigrette, or even a tangy coleslaw. A squeeze of fresh lemon juice over the finished chicken just before serving can brighten all the flavors.
- Make-Ahead Prep: You can bread the chicken up to 4 hours in advance. Place the breaded chicken on a wire rack set over a baking sheet (to prevent the bottom from getting soggy) and refrigerate, uncovered. This allows the breading to dry out slightly, which can actually contribute to a crispier crust.
Storage and Reheating
Store any leftover baked chicken in an airtight container in the refrigerator for up to 3-4 days. To reheat, the best method for retaining crispness is to use an oven or air fryer. Preheat your oven to 350°F (175°C) or air fryer to 325°F (160°C). Place the chicken on a baking sheet or in the air fryer basket and reheat for 10-15 minutes, or until thoroughly heated through and the topping has re-crisped. Microwaving is not recommended as it will make the breading soggy.
Frequently Asked Questions
Can I use boneless, skinless chicken thighs instead of breasts?
Absolutely! Boneless, skinless chicken thighs work wonderfully in this recipe. They tend to be more forgiving and stay moister due to their higher fat content. The cooking time might need to be adjusted slightly, typically 25-30 minutes, or until they reach an internal temperature of 175°F (80°C).
My breading isn’t sticking to the chicken. What am I doing wrong?
The most common reasons for breading not sticking are not patting the chicken dry enough before dredging in flour, or not pressing the breadcrumbs firmly onto the chicken. Ensure each step is done thoroughly: dry chicken, complete flour coating, full egg wash coverage, and firm pressing of the breadcrumbs. You can also try chilling the breaded chicken for 15-20 minutes before baking to help the breading adhere.
How can I make this recipe gluten-free?
To make this recipe gluten-free, simply substitute the all-purpose flour with a gluten-free all-purpose flour blend and use gluten-free Panko breadcrumbs. Ensure any other packaged ingredients, like spices, are also certified gluten-free.
Can I prepare this chicken without the egg wash?
While the egg wash helps create a strong bond for the breading, you can try an alternative. Some recipes use mayonnaise or plain yogurt as a coating before the breadcrumbs. However, the classic egg and milk wash generally provides the best adhesion and browning for a crispy crust.



