Follow Me On Social Media!
Oven Baked Ingredient Cheesy Potato Stacks The Easter Side Dish That Steals the Show

Introduction
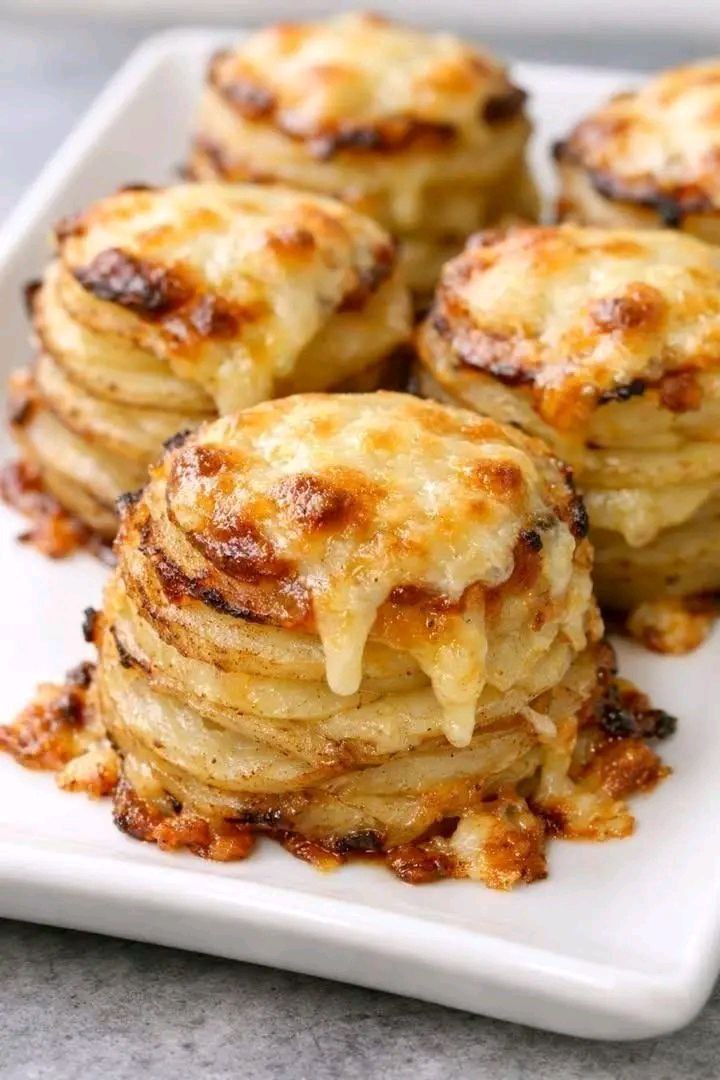
As Easter approaches, the quest for the perfect holiday side dish begins. While mashed potatoes are a classic, and roasted potatoes are always a hit, sometimes you crave something that truly elevates the meal, something that not only tastes incredible but also looks stunning on the table. Enter the Cheesy Potato Stacks – individual portions of thinly sliced potatoes, layered with rich cheese and baked to golden perfection. This isn’t just a side dish; it’s a showstopper, designed to impress your guests and bring a touch of elegance to your Easter feast without adding undue stress to your holiday cooking.
Imagine perfectly tender potato slices, infused with savory seasonings, and bound together by gooey, melted cheese, all crisped up around the edges. Each stack is a delightful little package of comfort and flavor, offering a sophisticated alternative to traditional potato preparations. What makes these potato stacks truly special for Easter is their individual presentation, making serving a breeze and ensuring everyone gets a beautiful, cheesy portion. They manage to be both hearty and refined, satisfying that craving for comforting potatoes while still feeling light and celebratory.
Beyond their undeniable deliciousness, these Cheesy Potato Stacks are incredibly versatile and surprisingly easy to make. They offer a fantastic textural contrast to the often-creamy or soft main dishes of an Easter meal, providing a lovely crispness and a satisfying chew. Plus, the ability to assemble them ahead of time means you can focus on other aspects of your holiday meal, only popping them into the oven when you’re ready to bake. Get ready to ditch the ordinary and embrace the extraordinary with this simple yet spectacular side dish that’s guaranteed to be the talk of your Easter table.
Nutritional Information
Per serving (approximate values):
- Calories: 320
- Protein: 12g
- Carbohydrates: 30g
- Fat: 17g
- Fiber: 3g
- Sodium: 450mg
Ingredients
- 2 lbs Yukon Gold potatoes, peeled
- 1/2 cup unsalted butter, melted
- 1 cup shredded Gruyere cheese
- 1/2 cup shredded sharp cheddar cheese
- 1/4 cup finely grated Parmesan cheese
- 1 teaspoon garlic powder
- 1/2 teaspoon onion powder
- 1/2 teaspoon dried thyme
- 1/4 teaspoon black pepper
- 1 teaspoon salt, or to taste
- 1/4 cup heavy cream (optional, for extra richness)
- Fresh parsley, chopped, for garnish (optional)
Instructions
- Preheat your oven to 375°F (190°C). Generously grease a 12-cup standard muffin tin with butter or non-stick cooking spray. Ensuring the muffin cups are well-greased is crucial for easy removal of the potato stacks.
- Peel the potatoes and slice them as thinly as possible. A mandoline slicer is highly recommended for achieving uniform, paper-thin slices, which are essential for even cooking and a beautiful presentation. Aim for slices no thicker than 1/16th of an inch.
- In a large bowl, combine the melted butter, garlic powder, onion powder, dried thyme, salt, and black pepper. Whisk well to combine the seasonings.
- Add the thinly sliced potatoes to the butter mixture. Toss gently with your hands or a spatula, ensuring every potato slice is lightly coated in the seasoned butter. This step is key for flavor distribution.
- In a separate bowl, combine the shredded Gruyere, sharp cheddar, and grated Parmesan cheeses. Mix them together thoroughly.
- Begin layering the potato slices into each muffin cup. Start by placing a few potato slices flat at the bottom of each cup. Then, continue layering the slices vertically, overlapping them slightly, to build up the height of the stack. After every 4-5 potato slices, sprinkle a small amount of the mixed cheese blend over the potatoes. If using heavy cream, drizzle a tiny amount over the cheese as you layer. Continue layering potatoes and cheese until each muffin cup is filled with neatly stacked potato slices, pressing down gently as you go to compact them. You want the stacks to be slightly mounded above the rim of the muffin tin, as they will shrink down during baking.
- Once all the muffin cups are filled, sprinkle any remaining cheese over the tops of the potato stacks.
- Cover the muffin tin loosely with aluminum foil. This helps to steam the potatoes and ensure they cook through before the tops get too browned.
- B Bake for 30 minutes with the foil on.
- Remove the foil and continue baking for another 25-35 minutes, or until the potatoes are tender when pierced with a fork and the tops are golden brown and bubbling. If the cheese starts to brown too quickly, you can loosely tent the foil over the muffin tin again.
- Once baked, remove the muffin tin from the oven and let the potato stacks rest for 5-10 minutes. This resting period allows them to firm up slightly, making them much easier to remove from the muffin tin without falling apart.
- Carefully run a thin knife around the edges of each stack to loosen them, then gently lift them out of the muffin tin. Serve immediately, garnished with fresh chopped parsley if desired.
Cooking Tips and Variations
Achieving Uniform Slices: The consistency of your potato slices is paramount for even cooking. A mandoline slicer is truly your best friend here. If you don’t have one, a sharp chef’s knife and a steady hand can work, but take your time to ensure all slices are as thin and uniform as possible. Inconsistent slices will result in some potatoes being undercooked while others are perfectly tender.
Preventing Sticking: No one wants a beautiful potato stack to fall apart when serving. Beyond just greasing, consider using a good quality non-stick muffin tin. You can also lightly dust the greased cups with a tablespoon of flour or fine breadcrumbs, which creates a barrier and helps the stacks release cleanly.
Cheese, Glorious Cheese: The cheese blend suggested is fantastic, but don’t be afraid to experiment! For a richer, nuttier flavor, swap out some of the Gruyere for Comté or Fontina. If you prefer a sharper profile, an aged white cheddar or even a touch of smoked Gouda would be wonderful. For a spicier kick, a little Monterey Jack with jalapeño could be layered in. Just ensure your cheeses melt well.
Herb and Spice Infusions: The garlic powder, onion powder, and thyme provide a great base, but the possibilities are endless. Fresh herbs like finely chopped rosemary, sage, or chives can be added to the butter mixture or sprinkled between layers. A pinch of smoked paprika or a tiny dash of cayenne pepper can add depth or a subtle warmth. For an extra aromatic touch, rub a cut garlic clove around the inside of each muffin cup before greasing.
Crispier Edges: If you love a super crispy edge, consider baking the last 10-15 minutes at a slightly higher temperature (like 400°F/200°C) or even switching to a broiler for the final 2-3 minutes. Keep a very close eye on them to prevent burning, especially the cheese.
Make-Ahead Magic: These potato stacks are fantastic for meal prep. You can assemble them completely in the muffin tin, cover tightly with plastic wrap, and refrigerate for up to 24 hours before baking. When ready to bake, remove them from the fridge 30 minutes prior to bring them closer to room temperature, then bake as directed, potentially adding an extra 5-10 minutes to the covered baking time.
Adding a Creamy Element: While the recipe includes an optional drizzle of heavy cream, you could also thin out some cream cheese or Boursin cheese with a touch of milk and spread a thin layer between potato layers for an even creamier result. Alternatively, a small amount of crème fraîche mixed with the herbs could be delightful.
Serving Suggestions: These Cheesy Potato Stacks are the ideal accompaniment to any roasted meat, especially Easter ham, leg of lamb, or roasted chicken. They also pair wonderfully with seared steaks or even as a sophisticated brunch item alongside eggs and sausage. Garnish with a sprinkle of fresh chives or finely chopped green onions for a pop of color and fresh flavor.
Storage and Reheating
Storage: Leftover Cheesy Potato Stacks should be stored in an airtight container in the refrigerator. They will keep well for up to 3-4 days. It’s best to store them as individual stacks rather than breaking them apart, as this helps maintain their structure and flavor.
Reheating: For best results, reheat the potato stacks in an oven or toaster oven. Preheat your oven to 350°F (175°C). Place the leftover stacks on a baking sheet and heat for 10-15 minutes, or until thoroughly warmed through and the cheese is bubbly again. Covering them loosely with foil for the first part of reheating can help prevent them from drying out, then uncover for the last few minutes to crisp up the edges. You can also reheat them in a microwave, but they may lose some of their crispness and become softer. If using a microwave, heat in short intervals until warmed through.
Frequently Asked Questions
Can I use different types of potatoes for this recipe?
While Yukon Gold potatoes are highly recommended for their creamy texture and ability to hold their shape, you can experiment with other varieties. Russet potatoes will result in a fluffier texture, but may not hold together as firmly. Red potatoes can also work, offering a slightly waxier texture and a beautiful color contrast if you choose not to peel them. The key is to slice them very thinly regardless of the type.
What if I don’t have a mandoline slicer?
If you don’t have a mandoline, you can use a very sharp chef’s knife or even the slicing attachment of a food processor. The most important thing is to achieve consistently thin slices. Take your time and be careful when using a knife to ensure evenness, as this directly impacts how uniformly the potatoes cook.
Can these be made dairy-free or gluten-free?
Making them dairy-free would require substituting the butter with a dairy-free butter alternative and using a good quality dairy-free shredded cheese blend that melts well. For gluten-free, this recipe is naturally gluten-free, assuming all ingredients (like spices) are pure and not cross-contaminated. Always double-check ingredient labels if you have severe allergies or sensitivities.
Why did my potato stacks fall apart when I tried to remove them from the muffin tin?
There are a few common reasons for this. First, ensure you generously greased the muffin tin; even non-stick tins can benefit from extra grease. Second, not allowing the stacks to rest for 5-10 minutes after baking can make them fragile; the resting time helps them firm up. Third, ensure your potato slices were thin and even; thicker slices might not meld together as well. Finally, ensure enough cheese was used between layers to act as a binding agent.