Follow Me On Social Media!
BEST HOMEMADE PANCAKES RECIPE EASY AND DELICIOUS

Introduction
There’s something undeniably magical about a stack of warm, fluffy pancakes. They evoke memories of lazy Sunday mornings, celebratory brunches, and comforting treats. While often relegated to breakfast, the versatility of a perfectly made pancake knows no bounds. From a simple syrup-drenched stack to a decadent dessert, pancakes are a universal language of deliciousness. But let’s be honest, sometimes the idea of making them from scratch can feel daunting. That’s where this recipe comes in. Forget complicated steps and endless ingredient lists. We’re about to unlock the secret to the BEST homemade pancakes – a recipe so easy, so consistently delicious, it’ll become your new go-to.
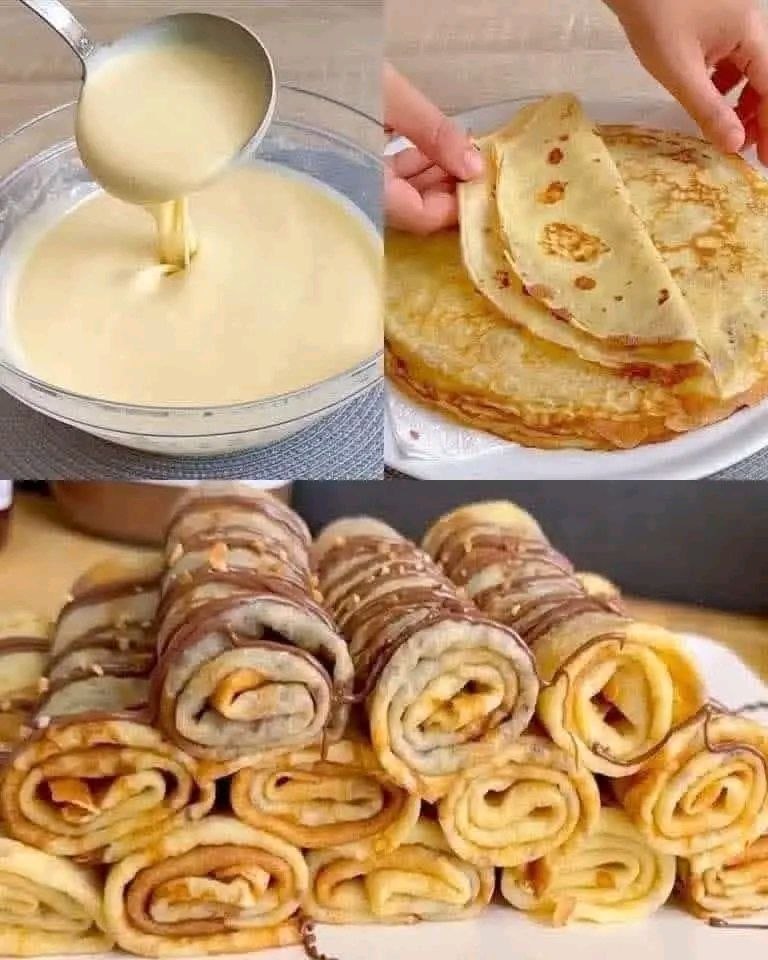
What makes this particular pancake recipe a game-changer? It’s all about simplicity meeting sublime flavor. We’re talking about thin, delicate pancakes, almost like crepes, that are incredibly versatile. They cook up quickly, requiring minimal effort but delivering maximum taste. The texture is key here – a slight crispness on the edges, a tender chewiness within, creating the perfect canvas for whatever fillings or toppings your heart desires. While the image shows a delightful chocolate filling, this basic pancake recipe is a foundation for endless culinary creativity, making it perfect for breakfast, dessert, or even a delightful snack any time of day.
Prepare to impress yourself and anyone you share these with. Whether you’re a seasoned chef or a kitchen novice, this recipe is designed for success. We’ll guide you through every step, ensuring your pancakes are consistently golden, perfectly cooked, and utterly irresistible. Say goodbye to dense, rubbery pancakes and hello to light, airy perfection. Get ready to transform simple ingredients into a truly extraordinary culinary experience, proving that the best homemade pancakes don’t have to be complicated to be incredibly delicious.
Nutritional Information
Per serving (approximate values, based on 2 pancakes with a moderate chocolate filling):
- Calories: 320 kcal
- Protein: 8g
- Carbohydrates: 45g
- Fat: 13g
- Fiber: 2g
- Sodium: 280mg
Ingredients
- 1 ½ cups (190g) all-purpose flour
- 2 tablespoons granulated sugar
- 2 teaspoons baking powder
- ½ teaspoon salt
- 1 large egg
- 1 ¼ cups (300ml) milk (whole or 2%)
- 2 tablespoons unsalted butter, melted, plus extra for greasing the pan
- 1 teaspoon vanilla extract
- For filling (optional, as pictured): ½ cup (120g) chocolate hazelnut spread (like Nutella)
- Optional toppings: powdered sugar, fresh fruit, whipped cream
Instructions
- In a large mixing bowl, whisk together the dry ingredients: flour, granulated sugar, baking powder, and salt. Ensure there are no lumps and the ingredients are well combined. This step is crucial for even distribution of the leavening agents.
- In a separate medium bowl, whisk together the wet ingredients: the large egg, milk, melted butter, and vanilla extract. Whisk until everything is fully incorporated and smooth.
- Pour the wet ingredients into the dry ingredients. Using a whisk or a rubber spatula, gently mix until just combined. It’s very important not to overmix the batter. A few small lumps are perfectly fine and even desirable; overmixing develops the gluten in the flour, leading to tough pancakes. The batter should be slightly thick but pourable.
- Let the batter rest for 5-10 minutes at room temperature. This resting period allows the gluten to relax and the baking powder to activate, resulting in lighter, fluffier pancakes. You’ll notice small bubbles forming on the surface of the batter during this time.
- Heat a large non-stick frying pan or griddle over medium heat. Lightly grease the pan with a small amount of butter or cooking spray. You can test the pan’s readiness by sprinkling a few drops of water on the surface; if they sizzle and evaporate quickly, the pan is ready.
- Pour about ¼ cup of batter for each pancake onto the hot pan. For the thin, crepe-like pancakes shown in the image, you might want to use slightly less batter, about 3 tablespoons, and gently swirl the pan to spread it thinner. Don’t overcrowd the pan; cook 2-3 pancakes at a time, depending on the size of your pan.
- Cook for 2-3 minutes on the first side, or until you see bubbles forming on the surface of the pancake and the edges look set and slightly dry. The underside should be golden brown.
- Carefully flip the pancakes using a thin spatula. Cook for another 1-2 minutes on the second side, or until golden brown and cooked through.
- Transfer the cooked pancakes to a plate. If you’re making a large batch, you can keep them warm in a preheated oven set to its lowest temperature (around 200°F / 90°C) while you cook the remaining batter.
- Once all pancakes are cooked, if you’re serving them with a chocolate spread as pictured, gently warm the chocolate hazelnut spread slightly (you can microwave it for 15-20 seconds or place the jar in warm water) to make it easier to spread.
- Lay a pancake flat, spread a thin layer of the warm chocolate hazelnut spread over one half or the entire surface, then carefully roll it up. Repeat with the remaining pancakes.
- Serve immediately, optionally dusted with powdered sugar, a dollop of whipped cream, or alongside fresh berries. Enjoy your delicious homemade pancakes!
Cooking Tips and Variations
To achieve truly perfect pancakes every time, a few key techniques can make all the difference. Firstly, the temperature of your pan is crucial. Too low, and your pancakes will be pale and greasy; too high, and they’ll burn on the outside before cooking through. Medium heat is usually the sweet spot. If you find your first pancake isn’t quite right, don’t despair! The first one is often a “test pancake” to adjust your heat and batter consistency. Secondly, resist the urge to overmix the batter. Lumps are your friends here; they indicate you haven’t overdeveloped the gluten, which keeps your pancakes tender and light. A resting period for the batter, even just 5-10 minutes, allows the flour to fully hydrate and the baking powder to activate, leading to a much better texture.
For those thin, crepe-like pancakes shown in the image, use a slightly thinner batter. If your batter feels too thick, you can add an extra tablespoon or two of milk until it reaches a pourable but not watery consistency. When pouring, use a smaller amount of batter (about 3 tablespoons) and immediately swirl the pan gently to spread the batter into a thin, even circle. This technique helps achieve that delicate, almost lacy texture perfect for rolling with fillings.
The beauty of this recipe lies in its versatility. While the chocolate hazelnut spread is a decadent choice, don’t hesitate to experiment with other fillings and toppings. For a fruitier option, spread with your favorite jam or fruit preserves, or fill with fresh berries and a dollop of whipped cream. Lemon curd and a sprinkle of powdered sugar make for a bright and tangy treat. For something richer, cream cheese frosting or a simple sweetened cream can be delightful. Savory variations are also possible with this base recipe; simply omit the sugar from the batter and fill with cheese, ham, or sautéed vegetables for a unique meal.
To enhance the flavor of your pancakes, consider adding a pinch of cinnamon or nutmeg to the dry ingredients for a warm, spiced note. A little orange or lemon zest can also brighten the flavor profile, especially if you’re pairing them with fruit fillings. For an extra touch of richness, substitute half of the milk with buttermilk. If you don’t have buttermilk, you can make your own by adding 1 tablespoon of white vinegar or lemon juice to a measuring cup, then filling the rest with regular milk to 1 ¼ cups. Let it sit for 5 minutes before adding to the batter.
Don’t be afraid to play with the size of your pancakes too. Smaller, silver dollar pancakes are fantastic for children or for serving as an appetizer. Larger pancakes are perfect for a hearty breakfast or for creating impressive rolled desserts. Always ensure your pan is adequately greased before each batch to prevent sticking and ensure beautiful, golden-brown results.
The type of fat you use for cooking can also influence the outcome. Butter adds a rich flavor and helps with browning, but it can burn easily if the heat is too high. Vegetable oil or coconut oil are good alternatives for a more neutral flavor and higher smoke point. A combination of butter and oil often works best to get the flavor of butter without the risk of burning. Finally, always cook pancakes on medium heat. Patience is a virtue here; allow them to cook fully on one side until bubbles appear and the edges set before flipping. This ensures even cooking and a beautiful golden crust.
Storage and Reheating
Homemade pancakes are at their absolute best when served fresh off the griddle, but sometimes you might have leftovers or want to prepare them ahead of time. Properly storing and reheating them means you can enjoy their deliciousness later without sacrificing too much quality.
To store cooked pancakes, first allow them to cool completely to room temperature. Stacking warm pancakes can create condensation, leading to soggy results. Once cool, you can store them in an airtight container or a resealable plastic bag. If stacking multiple pancakes, it’s a good idea to place a small piece of parchment paper between each one to prevent them from sticking together. Stored this way, pancakes will keep in the refrigerator for up to 2-3 days.
For longer storage, pancakes freeze exceptionally well. Again, ensure they are completely cool. Stack them with parchment paper in between, then wrap the stack tightly in plastic wrap or aluminum foil, and place them in a freezer-safe bag or container. Frozen pancakes can last for up to 1-2 months. This is a fantastic way to meal prep for quick breakfasts on busy mornings.
When it comes to reheating, there are several methods, depending on how many pancakes you’re reheating and how much time you have:
- Microwave: This is the quickest method for a few pancakes. Place 1-2 pancakes on a microwave-safe plate. Microwave on high for 20-30 seconds, or until heated through. Be careful not to overcook, as they can become tough.
- Toaster or Toaster Oven: For a slightly crispy exterior, a toaster or toaster oven works wonderfully, especially for frozen pancakes. Pop them in on a medium setting until warm and lightly toasted. Keep an eye on them to prevent burning.
- Oven: If you’re reheating a larger batch, the oven is your best bet. Preheat your oven to 350°F (175°C). Place the pancakes in a single layer on a baking sheet. Cover loosely with foil to prevent them from drying out. Heat for 5-10 minutes, or until warmed through.
- Frying Pan/Griddle: For that fresh-off-the-griddle taste and texture, you can quickly reheat pancakes in a lightly greased frying pan or on a griddle over medium-low heat. Cook for 1-2 minutes per side, until warm and slightly crispy. This method is great for bringing back some of their original appeal.
Avoid reheating pancakes that have already been filled and rolled, especially with spreads or fruit. The filling can become messy or the texture might change unpleasantly. It’s best to reheat the plain pancakes and then add your chosen filling or toppings fresh.
Frequently Asked Questions
Why are my pancakes flat and dense?
Flat and dense pancakes are usually a sign of one of two things: overmixing the batter or using old/inactive baking powder. Overmixing develops the gluten in the flour, making the pancakes tough and preventing them from rising. A few lumps in the batter are perfectly fine. If your baking powder is old, it loses its leavening power. To test its freshness, mix a teaspoon of baking powder with a few tablespoons of hot water; if it bubbles vigorously, it’s still good.
Can I make the pancake batter ahead of time?
While it’s best to cook pancakes with freshly mixed batter, you can prepare it ahead of time. Store the batter in an airtight container in the refrigerator for up to 24 hours. However, be aware that the leavening agents (baking powder) will lose some of their potency over time, which might result in slightly less fluffy pancakes. You might also notice the batter thickening; if so, add a tablespoon or two of milk to thin it out to the desired consistency before cooking. Stir gently, don’t whisk vigorously.
How do I prevent my pancakes from sticking to the pan?
Several factors contribute to pancakes sticking. First, ensure you’re using a good quality non-stick frying pan or a well-seasoned cast iron griddle. Second, make sure your pan is properly preheated to the correct temperature (medium heat) before adding the batter. If the pan isn’t hot enough, the batter will spread and stick. Third, always lightly grease the pan before each batch of pancakes. You can use a pat of butter (wipe off any excess with a paper towel to prevent burning) or a neutral cooking oil spray. Avoid using too much fat, as this can make the pancakes greasy.
What’s the difference between these thin pancakes and traditional American pancakes?
The main difference lies in the amount of leavening agents and the batter consistency. Traditional American pancakes typically use more baking powder, resulting in a thicker batter and a much fluffier, thicker pancake. These thin pancakes, closer to crepes, use less leavening or sometimes none at all, and have a thinner batter, leading to a delicate, flexible, and often larger pancake that’s ideal for rolling or folding around fillings rather than stacking.