Follow Me On Social Media!
How to Make Easy Homemade Bread

Introduction
There’s something undeniably magical about the aroma of freshly baked bread wafting through your home. It’s a scent that evokes comfort, warmth, and a sense of accomplishment. Many people shy away from baking bread, convinced it’s a complicated, time-consuming endeavor best left to professional bakers. But what if I told you that creating your own delicious, crusty, and tender loaves at home can be incredibly easy? This recipe is designed to demystify the bread-making process, proving that even a novice baker can achieve remarkable results with minimal effort.
Forget the endless kneading, the complicated starters, and the daunting multi-day processes. This “Easy Homemade Bread” recipe focuses on simple ingredients, straightforward steps, and a forgiving dough that practically does the work for you. We’re talking about a bread that’s perfect for slicing for sandwiches, dipping into your favorite soup, or simply enjoying with a pat of butter. The satisfaction of pulling a warm, golden-brown loaf from your oven, knowing you made it yourself, is unparalleled. Prepare to impress your family and friends (and most importantly, yourself!) with this surprisingly simple yet utterly delicious homemade bread.
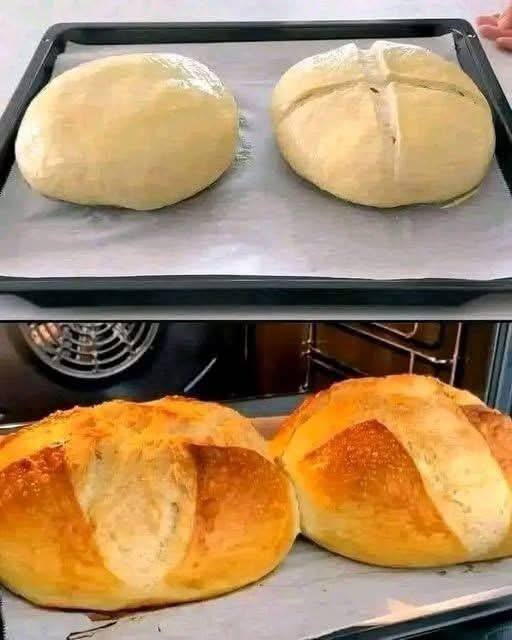
This particular recipe yields two beautiful, rustic loaves, much like the ones you see in the image – golden brown with a satisfying crust and a soft, airy interior. We’ll guide you through each step, from mixing the basic ingredients to the satisfying moment of scoring your dough before it goes into the oven. Get ready to embark on a delightful baking journey that will not only fill your home with an irresistible fragrance but also equip you with a fundamental skill that will bring joy for years to come. Let’s get baking!
Nutritional Information
Per serving (approximate values for 1/12th of a loaf):
- Calories: 180
- Protein: 6g
- Carbohydrates: 35g
- Fat: 2g
- Fiber: 2g
- Sodium: 290mg
Ingredients
- 4 cups (500g) all-purpose flour, plus more for dusting
- 2 teaspoons active dry yeast
- 2 teaspoons granulated sugar
- 2 teaspoons salt
- 1 ½ cups (360ml) warm water (105-115°F / 40-46°C)
- 2 tablespoons olive oil, plus more for greasing the bowl
Instructions
- In a large mixing bowl, combine the warm water, granulated sugar, and active dry yeast. Stir gently and let it sit for 5-10 minutes, or until the mixture becomes foamy. This indicates that your yeast is active and ready to work. If it doesn’t foam, your yeast might be old or the water temperature was too hot or too cold, and you should start over with fresh yeast.
- Add the olive oil, salt, and 2 cups of the all-purpose flour to the yeast mixture. Stir with a wooden spoon or a sturdy spatula until well combined.
- Gradually add the remaining 2 cups of flour, about ½ cup at a time, mixing after each addition until a shaggy, sticky dough forms. You might not need all of the flour, or you might need a tiny bit more, depending on the humidity and your flour. The goal is a dough that pulls away from the sides of the bowl but is still quite soft and slightly sticky.
- Turn the dough out onto a lightly floured surface. Knead the dough for 5-7 minutes. This is where the “easy” part comes in – we’re not aiming for a super-developed gluten structure like some complex breads. Just a moderate amount of kneading to bring the dough together, make it smooth, and elastic. If the dough is too sticky, lightly dust your hands and the surface with a little more flour, but avoid adding too much, as this can make the bread dry. The dough should feel smooth and spring back slightly when poked.
- Lightly grease a clean large bowl with olive oil. Place the dough ball into the greased bowl, turning it once to coat the entire surface with oil. This prevents the dough from drying out and sticking.
- Cover the bowl tightly with plastic wrap or a clean kitchen towel. Place the bowl in a warm, draft-free place for the first rise (bulk fermentation). Let the dough rise for 1 to 1 ½ hours, or until it has doubled in size. The exact time will depend on the warmth of your room. A good test is to gently poke the dough with a floured finger; if the indentation remains, it’s ready.
- Once the dough has doubled, gently punch it down to release the air. Turn the dough out onto a lightly floured surface.
- Divide the dough into two equal portions. Gently shape each portion into a round or oval loaf. To do this, gently pull the edges of the dough towards the center and pinch them together at the bottom to create tension on the surface. Flip the dough seam-side down and gently cup it with your hands, rotating it on the counter to create a smooth, taut surface.
- Place the shaped loaves onto a baking sheet lined with parchment paper, leaving ample space between them.
- Cover the loaves loosely with a clean kitchen towel and let them rise for a second time (proof) for 30-45 minutes, or until they have noticeably increased in size and look puffy. While the loaves are proofing, preheat your oven to 400°F (200°C).
- Just before baking, use a sharp knife or a bread lame to make 2-3 shallow cuts (scores) on the top of each loaf. This allows the steam to escape during baking and helps the bread expand evenly, preventing uncontrolled cracks. You can make simple slashes or cross patterns.
- Bake the loaves in the preheated oven for 25-35 minutes, or until they are golden brown and sound hollow when tapped on the bottom. If you have a meat thermometer, the internal temperature should reach 200-210°F (93-99°C).
- Carefully remove the loaves from the oven and transfer them to a wire rack to cool completely before slicing. This is crucial for the internal structure to set and for the crust to remain crisp. Slicing too early can result in a gummy texture.
Cooking Tips and Variations
For a truly exceptional crust, place an oven-safe pan or cast iron skillet on the bottom rack of your oven while it preheats. Just before placing the bread in the oven, carefully pour about ½ cup of boiling water into the hot pan. This creates steam, which helps the crust develop a beautiful golden color and a satisfying crunch. Be very careful to avoid steam burns. If you don’t have a pan for water, you can lightly mist the loaves with water a couple of times during the first 10 minutes of baking.
Don’t rush the rising process. The yeast needs time to work its magic, developing flavor and creating the airy texture. If your kitchen is cool, you can place the covered bowl (or loaves) in a slightly warm oven (turned off, with just the pilot light on if you have one, or briefly warmed and then turned off). Alternatively, you can place the bowl in a larger bowl of warm water. Patience is key to good bread.
To add more flavor, consider incorporating herbs like dried rosemary, thyme, or oregano into the dough during the initial mixing stage. About 1-2 tablespoons will suffice for this recipe. For a cheesy bread, add ½ cup of shredded cheddar or Parmesan cheese along with the last addition of flour. You can also mix in ½ cup of roasted garlic cloves or sun-dried tomatoes (well-drained and chopped) for a savory twist.
For a slightly chewier texture and a richer flavor, you can substitute up to 1 cup of the all-purpose flour with whole wheat flour. Keep in mind that whole wheat flour absorbs more liquid, so you might need to add a tablespoon or two more water to achieve the right dough consistency. Experiment with different flour combinations to find your favorite.
If you prefer a free-form rustic loaf, you can bake this dough in a Dutch oven. Preheat your Dutch oven with the lid on in the oven at 450°F (230°C) for 30 minutes. Carefully transfer one shaped loaf into the hot Dutch oven, score it, cover, and bake for 30 minutes. Then remove the lid and bake for another 10-15 minutes, or until golden brown. Adjust baking time for the second loaf as needed.
Storage and Reheating
Once cooled, homemade bread is best stored at room temperature. For optimal freshness, place the entire loaf in a breathable bread bag, a clean paper bag, or wrap it loosely in a clean kitchen towel. Avoid airtight plastic bags if you want to preserve the crispness of the crust, as they tend to make the crust soft and chewy. The bread will stay fresh for 2-3 days. If you’ve sliced the bread, store the cut side down on a cutting board or wrap the remaining loaf tightly in plastic wrap to prevent it from drying out.
For longer storage, this bread freezes beautifully. Once completely cool, slice the loaf and place the slices in a freezer-safe bag or wrap the entire loaf tightly in plastic wrap, then foil. It can be stored in the freezer for up to 3 months. When you’re ready to enjoy it, you can thaw individual slices in a toaster or microwave, or thaw the entire loaf at room temperature. For a whole loaf, you can also reheat it in a preheated oven at 350°F (175°C) for 10-15 minutes, or until warmed through and the crust is revitalized.
To refresh a day-old loaf that has gone a little stale, lightly dampen the crust with water (you can mist it with a spray bottle or quickly run it under the tap) and then place it in a preheated oven at 300°F (150°C) for 5-10 minutes. This will bring back some of its original crispness and warmth, making it almost as good as freshly baked.
Frequently Asked Questions
What if my dough doesn’t rise?
The most common reason for dough not rising is inactive yeast or incorrect water temperature. Ensure your yeast is fresh and active (it should foam when mixed with warm water and sugar). Water that is too hot will kill the yeast, while water that is too cold will inhibit its activity. Also, ensure your rising environment is warm and draft-free. A slightly warmer room can significantly help the dough rise effectively.
Can I make this bread ahead of time?
Yes, you can! After the first rise, you can punch down the dough, shape the loaves, and then place them on a parchment-lined baking sheet. Cover them tightly with plastic wrap and refrigerate overnight (up to 12-18 hours). In the morning, take them out of the fridge and let them come to room temperature and complete their second rise (this might take 1-2 hours) before scoring and baking as usual. This “cold proofing” can also enhance the flavor of the bread.
Why is my bread dense and heavy?
A dense loaf usually indicates that the dough didn’t rise enough, or it was over-kneaded (which can develop too much gluten for this type of easy bread), or it was under-baked. Make sure to allow sufficient time for both rises until the dough has doubled in size. Also, avoid adding too much extra flour during kneading, as this can lead to a dry, dense crumb. Always ensure the bread is baked until it sounds hollow when tapped and reaches the correct internal temperature.
Can I use bread flour instead of all-purpose flour?
Yes, you can substitute bread flour for all-purpose flour. Bread flour has a higher protein content, which will result in a chewier crust and a slightly more structured crumb. You might need to adjust the amount of water slightly, as bread flour tends to absorb more liquid. Start with the recipe’s recommended amount and add a tablespoon or two more if the dough feels too stiff or dry.