Follow Me On Social Media!
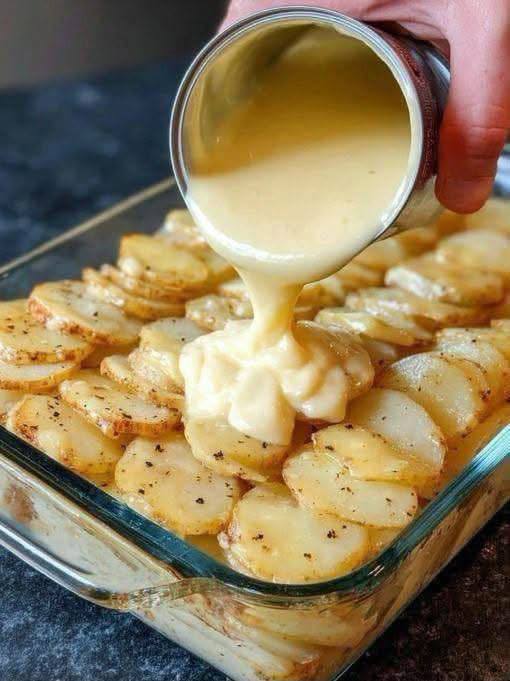
Cheesy Scalloped Potatoe

Introduction
There are few dishes that evoke the warmth and comfort of home quite like Cheesy Scalloped Potatoes. This classic side dish is a true crowd-pleaser, a staple at holiday gatherings, family dinners, and potlucks alike. Imagine tender, thinly sliced potatoes, lovingly layered and baked in a rich, velvety cheese sauce until golden brown and bubbly. Each forkful delivers a symphony of creamy texture and savory flavor that is simply irresistible, making it the perfect accompaniment to almost any main course.
What makes this particular recipe so special is its perfect balance of simplicity and indulgence. While some scalloped potato recipes can be overly complicated, ours focuses on straightforward steps and readily available ingredients to deliver maximum flavor with minimal fuss. We’ll guide you through creating a luscious, from-scratch cheese sauce that coats every potato slice, ensuring a consistently creamy and cheesy experience throughout. Say goodbye to dry or bland scalloped potatoes; this recipe guarantees a dish that is moist, tender, and bursting with cheesy goodness.
Whether you’re a seasoned home cook or just starting your culinary journey, these Cheesy Scalloped Potatoes are a fantastic recipe to master. It’s versatile enough to be dressed up or down, pairing beautifully with everything from a simple roasted chicken to a grand holiday ham. Get ready to impress your family and friends with a side dish that will undoubtedly become a cherished part of your recipe repertoire, bringing smiles and satisfied sighs to every table.
Nutritional Information
Per serving (approximate values):
- Calories: 350
- Protein: 15g
- Carbohydrates: 30g
- Fat: 18g
- Fiber: 3g
- Sodium: 650mg
Ingredients
- 2 lbs Russet or Yukon Gold potatoes, peeled
- 1 tablespoon unsalted butter
- 1 small yellow onion, finely minced (optional, but recommended)
- 2 cloves garlic, minced
- 1/4 cup all-purpose flour
- 2 cups whole milk, warmed
- 1 cup heavy cream
- 1 teaspoon salt, or to taste
- 1/2 teaspoon black pepper, freshly ground, or to taste
- 1/4 teaspoon ground nutmeg
- 1/4 teaspoon smoked paprika (optional, for extra flavor)
- 2 cups shredded sharp cheddar cheese, divided
- 1/2 cup shredded Gruyere cheese (optional, for extra depth)
- 1/4 cup grated Parmesan cheese
- Cooking spray or butter for greasing the baking dish
Instructions
- Preheat your oven to 375°F (190°C). Grease a 9×13 inch baking dish with cooking spray or butter.
- Prepare the potatoes: Peel the potatoes and slice them very thinly, about 1/8-inch thick. A mandoline slicer is highly recommended for uniform slices, ensuring even cooking. If you don’t have one, use a very sharp knife and aim for consistency. Place the sliced potatoes in a large bowl of cold water to prevent browning while you prepare the sauce.
- Make the cheese sauce: In a medium saucepan or Dutch oven, melt the butter over medium heat. If using, add the finely minced onion and cook until softened and translucent, about 3-5 minutes. Add the minced garlic and cook for another minute until fragrant.
- Sprinkle the flour over the butter, onion, and garlic mixture. Whisk constantly for 1-2 minutes to cook out the raw flour taste, creating a roux.
- Gradually whisk in the warmed whole milk and heavy cream, a little at a time, ensuring no lumps form. Continue whisking until the sauce thickens and comes to a gentle simmer.
- Remove the saucepan from the heat. Stir in 1.5 cups of the sharp cheddar cheese, the Gruyere cheese (if using), Parmesan cheese, salt, pepper, nutmeg, and smoked paprika (if using). Stir until the cheeses are completely melted and the sauce is smooth and creamy. Taste and adjust seasonings as needed.
- Assemble the scalloped potatoes: Drain the sliced potatoes thoroughly and pat them dry with paper towels.
- Arrange a single layer of potato slices in the bottom of the prepared baking dish, overlapping them slightly.
- Pour about one-third of the cheese sauce evenly over the potato layer.
- Repeat the layering process: add another layer of potato slices, followed by another third of the cheese sauce.
- Place the final layer of potato slices on top. Pour the remaining cheese sauce over the top layer, ensuring all potatoes are covered.
- Sprinkle the remaining 1/2 cup of shredded sharp cheddar cheese over the top of the casserole.
- Cover the baking dish tightly with aluminum foil.
- Bake for 45 minutes, covered.
- Remove the foil and continue baking for another 20-30 minutes, or until the potatoes are tender when pierced with a fork and the top is golden brown and bubbly. If the top is browning too quickly, you can loosely tent it with foil.
- Once baked, remove the dish from the oven and let it rest for 10-15 minutes before serving. This allows the sauce to set and prevents it from being too runny.
- Serve hot and enjoy your delicious cheesy scalloped potatoes!
Cooking Tips and Variations
Achieving perfectly tender and creamy scalloped potatoes is all about technique and a few clever tricks. For starters, the uniformity of your potato slices is paramount. A mandoline slicer is your best friend here, as it creates consistently thin, even slices that cook at the same rate, preventing some potatoes from being undercooked while others are mushy. If slicing by hand, take your time and aim for slices no thicker than 1/8 inch. Regarding potato choice, Russets offer a classic starchy texture that breaks down beautifully, contributing to the creaminess, while Yukon Golds provide a slightly firmer, buttery texture that holds its shape well. Either will work wonderfully, so choose based on your preference.
The cheese sauce is the heart of this dish, and its consistency is key. Warming your milk and cream before adding them to the roux helps prevent lumps and ensures a smoother, more cohesive sauce. When whisking in the liquids, do so gradually, allowing each addition to be fully incorporated before adding more. This vigilance will result in a velvety smooth sauce that coats every potato slice. Don’t be afraid to taste and adjust the seasonings; a pinch more salt or pepper, or a dash of hot sauce, can elevate the flavor profile significantly. For a richer, more complex cheese flavor, consider experimenting with different cheese blends. Smoked gouda, fontina, or even a touch of blue cheese can add intriguing notes. You can also infuse the milk with aromatics like a bay leaf or a few sprigs of thyme while it warms, straining them out before adding to the roux, for an extra layer of flavor.
To prevent dry or undercooked potatoes, covering the dish with foil for the initial baking period is crucial. This traps steam, helping the potatoes cook through and become tender without drying out the top layer of sauce. Removing the foil for the last portion of baking allows the top to become gloriously golden brown and bubbly. If you notice the top browning too quickly, simply tent the foil loosely over the dish. A common pitfall is over-baking, which can lead to a grainy sauce or mushy potatoes. Always test for doneness by inserting a knife into the center; it should slide in easily with little resistance. Finally, the resting period is non-negotiable. It allows the sauce to thicken and set, preventing a watery mess when you go to serve. Patience is a virtue when it comes to perfect scalloped potatoes.
For flavor variations, the possibilities are endless. Crispy cooked bacon bits can be layered in with the potatoes or sprinkled on top for a smoky, salty crunch. Sautéed mushrooms, finely diced bell peppers, or even a handful of fresh spinach can be added for extra vegetables and texture. A pinch of cayenne pepper or a dash of Worcestershire sauce can add a subtle kick to the cheese sauce. For a touch of fresh herbaceousness, stir in finely chopped chives or parsley just before serving. You can also experiment with different types of onions; caramelized onions would add a wonderful sweetness and depth. Consider topping the dish with a mixture of breadcrumbs and Parmesan cheese during the last 15 minutes of baking for an extra crispy, golden crust.
Storage and Reheating
Storing and reheating your Cheesy Scalloped Potatoes properly ensures that you can enjoy leftovers that taste almost as good as the freshly baked dish. Once the scalloped potatoes have cooled completely to room temperature, transfer any leftovers to an airtight container. They can be stored in the refrigerator for up to 3-4 days. It’s important to cool them thoroughly before refrigerating to prevent bacterial growth and maintain food safety.
For reheating, the oven is generally the best method to preserve the texture and prevent the potatoes from becoming rubbery or dried out. Preheat your oven to 300-325°F (150-160°C). Transfer the desired portion of scalloped potatoes to an oven-safe dish. If the potatoes appear a bit dry, you can add a splash of milk or cream over the top to help rehydrate the sauce. Cover the dish loosely with aluminum foil to prevent further browning and drying. Reheat for 20-30 minutes, or until heated through and bubbly. Remove the foil for the last 5-10 minutes if you want to crisp up the top again.
While the microwave can be used for reheating individual servings in a pinch, be aware that it may alter the texture slightly, sometimes making the potatoes a bit softer and the sauce less creamy. If using the microwave, heat in short intervals (1-2 minutes) and stir gently in between, until heated through. Avoid over-microwaving, as this can make the potatoes tough. Freezing scalloped potatoes is also an option, though the texture of the potatoes can become a bit mealy after thawing due to the high water content. If you choose to freeze, ensure the dish is completely cooled, then wrap it tightly in plastic wrap and then foil. It can be frozen for up to 2-3 months. Thaw overnight in the refrigerator before reheating in the oven as described above.
Frequently Asked Questions
Can I prepare cheesy scalloped potatoes ahead of time?
Yes, you can absolutely prepare cheesy scalloped potatoes ahead of time! You have a couple of options. You can assemble the entire dish, layers and sauce included, cover it tightly with plastic wrap, and refrigerate it for up to 24 hours before baking. When ready to bake, let it sit at room temperature for 30 minutes while your oven preheats, then bake as directed, adding an extra 10-15 minutes to the covered baking time to ensure it heats through. Alternatively, you can make the cheese sauce a day in advance and store it in an airtight container in the refrigerator. When you’re ready to bake, gently reheat the sauce on the stovetop to loosen it, slice your potatoes, and assemble the dish. This makes it a fantastic option for holiday meals or busy weeknights.
Why did my scalloped potatoes turn out watery?
There are several reasons why your scalloped potatoes might turn out watery. One common culprit is not allowing the cheese sauce to thicken enough. Ensure your roux is cooked properly and that you’ve simmered the sauce until it’s thick enough to coat the back of a spoon. Another reason could be using potatoes with very high water content, or not patting your sliced potatoes dry before layering, which releases excess moisture during baking. Overcrowding the baking dish can also lead to excess moisture and prevent proper evaporation. Lastly, not allowing the dish to rest after baking is crucial; the resting period allows the sauce to set and thicken, preventing a runny consistency when served. If you cut into it too soon, the liquid hasn’t had a chance to reabsorb and solidify.
What kind of potatoes are best for scalloped potatoes?
For cheesy scalloped potatoes, starchy or all-purpose potatoes generally yield the best results. Russet potatoes are an excellent choice because their high starch content breaks down during cooking, contributing to a wonderfully creamy texture. Yukon Gold potatoes are another popular option; they are less starchy than Russets but have a natural buttery flavor and hold their shape well, resulting in a slightly firmer, yet still creamy, dish. Avoid waxy potatoes like red or new potatoes, as they tend to remain too firm and won’t absorb the sauce as effectively, leading to a less cohesive and often watery final product.
Can I make this recipe without a mandoline?
Absolutely! While a mandoline slicer is highly recommended for achieving uniformly thin slices quickly, you can certainly make this recipe without one. The key is to use a very sharp chef’s knife and take your time to slice the potatoes as thinly and evenly as possible, aiming for about 1/8-inch thickness. Uniformity is important for even cooking, so try to be consistent with each slice. It might take a bit longer, but the delicious end result will be worth the effort. Just be extra careful when handling a sharp knife!