
Follow Me On Social Media!
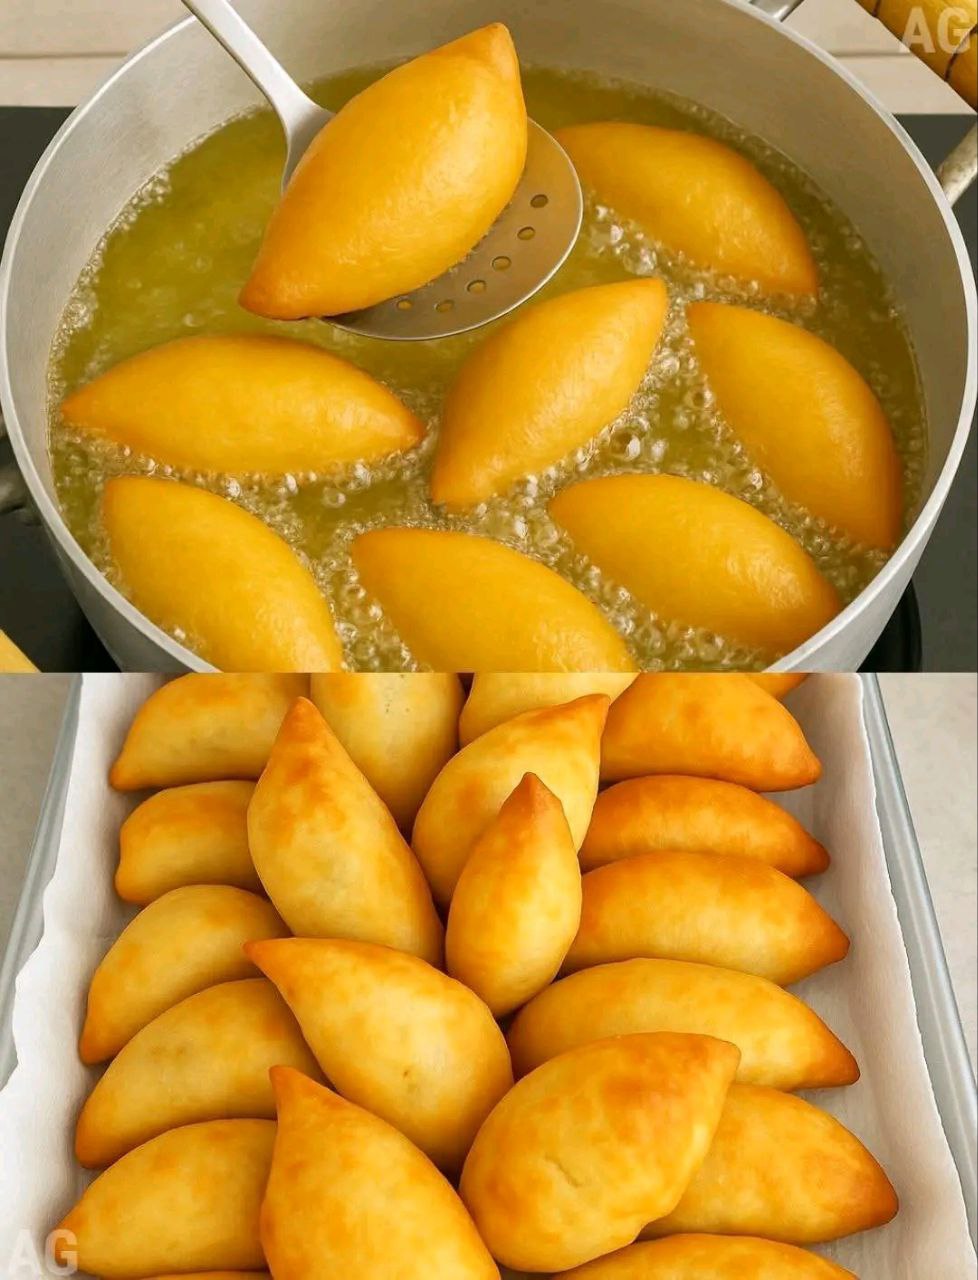
Grandma’s homemade cake

Introduction
There’s something uniquely comforting about “Grandma’s homemade” anything, isn’t there? It conjures images of a warm kitchen, the scent of something delicious baking, and the loving hands that prepared it. Today, we’re diving into a recipe that embodies all of that heartwarming nostalgia, even if its name might be a touch misleading. While the title proudly proclaims “Grandma’s Homemade Cake,” what we’re actually making are irresistible, golden-fried pieces of pure joy. Think of them as soft, pillowy fritters or delightful, un-holey doughnuts – a testament to how some of the best traditional recipes get their charming, often colloquial, names.
These aren’t your typical oven-baked cakes, but rather beautifully puffed, slightly sweet dough morsels, deep-fried to a perfect golden brown. Each bite offers a delightful contrast: a subtly crisp exterior that gives way to a wonderfully soft and airy interior. They’re simple, honest, and utterly delicious, making them the perfect treat for any time of day. Whether you serve them for breakfast with a cup of coffee, as a delightful afternoon snack, or a comforting dessert after a family meal, these “cakes” are guaranteed to bring smiles and a touch of that cherished homemade magic to your table.
This recipe is a celebration of simple ingredients transformed into something truly special. It’s about creating those cherished moments around food, sharing warmth and sweetness with loved ones. So, roll up your sleeves, embrace the delightful aroma of frying dough, and let’s make some memories with Grandma’s truly exceptional fried “cakes.”
Nutritional Information
Per serving (approximate values, based on 1 medium piece):
- Calories: 250 kcal
- Protein: 4g
- Carbohydrates: 30g
- Fat: 13g
- Fiber: 1g
- Sodium: 120mg
Ingredients
- 2 ½ cups (300g) all-purpose flour, plus more for dusting
- ¼ cup (50g) granulated sugar
- 1 tablespoon active dry yeast
- ½ teaspoon salt
- ¾ cup (180ml) warm milk (105-115°F / 40-46°C)
- 2 large eggs, at room temperature
- ¼ cup (55g) unsalted butter, melted and cooled slightly
- 1 teaspoon vanilla extract
- 6-8 cups vegetable oil, for deep frying (such as canola, sunflower, or peanut)
- ½ cup (60g) powdered sugar, for dusting (optional)
- ½ teaspoon ground cinnamon (optional, for cinnamon sugar)
Instructions
- Activate the Yeast: In a large mixing bowl, combine the warm milk, 1 teaspoon of the granulated sugar, and the active dry yeast. Stir gently and let it sit for 5-10 minutes, until bubbly and foamy. This indicates the yeast is active.
- Combine Wet Ingredients: To the yeast mixture, add the remaining granulated sugar, eggs, melted butter, and vanilla extract. Whisk well until thoroughly combined.
- Add Dry Ingredients: In a separate bowl, whisk together the all-purpose flour and salt. Gradually add the dry ingredients to the wet ingredients, mixing with a wooden spoon or a stand mixer with a dough hook attachment until a shaggy dough forms.
- Knead the Dough: Turn the dough out onto a lightly floured surface. Knead for 5-7 minutes, or until the dough is smooth, elastic, and no longer sticky. If using a stand mixer, knead on medium speed for 4-5 minutes.
- First Rise: Lightly grease a clean bowl with a little vegetable oil. Place the dough in the bowl, turning it once to coat. Cover the bowl with plastic wrap or a clean kitchen towel and let it rise in a warm place for 1 to 1 ½ hours, or until doubled in size.
- Shape the “Cakes”: Once the dough has risen, gently punch it down to release the air. Turn the dough out onto a lightly floured surface. You have two options for shaping:
- Option A (Oval/Fritter Shape): Roll the dough out to about ½-inch thickness. Using a sharp knife or pastry wheel, cut the dough into approximately 2-inch by 3-inch oval or football shapes, similar to what’s seen in the image.
- Option B (Drop Doughnuts): For a more rustic approach, simply pinch off small pieces of dough (about 1.5 to 2 tablespoons each) and gently roll them into rough balls or elongated shapes with your hands.
Place the shaped dough pieces on a lightly floured baking sheet, leaving some space between them.
- Second Rise (Optional but Recommended): Cover the shaped dough pieces loosely with plastic wrap or a kitchen towel and let them rise again for 20-30 minutes. This will make them lighter and airier when fried.
- Heat the Oil: Pour the vegetable oil into a large, heavy-bottomed pot or Dutch oven (at least 3 inches deep). Heat the oil over medium-high heat until it reaches 350-360°F (175-180°C). Use a candy thermometer or deep-fry thermometer to monitor the temperature accurately.
- Deep Fry the “Cakes”: Carefully, using a slotted spoon or spider, lower 3-4 dough pieces into the hot oil, being careful not to overcrowd the pot. Fry for 2-3 minutes per side, or until golden brown and puffed. The exact time will depend on your oil temperature and the size of your pieces.
- Drain and Cool: Once golden, remove the fried “cakes” with the slotted spoon and transfer them to a wire rack lined with paper towels to drain any excess oil. Repeat with the remaining dough, ensuring the oil temperature stays consistent between batches. Adjust heat as needed.
- Finish and Serve: While still warm, dust the fried “cakes” generously with powdered sugar. For cinnamon sugar, combine ½ cup powdered sugar with ½ teaspoon ground cinnamon and toss the warm “cakes” in the mixture. Serve immediately and enjoy!
Cooking Tips and Variations
Achieving perfectly fried dough is a delicate balance, and oil temperature is your best friend. Too low, and your “cakes” will absorb too much oil, becoming greasy and heavy. Too high, and they’ll brown too quickly on the outside while remaining raw in the middle. Invest in a good deep-fry thermometer and keep a close eye on it, adjusting your heat as needed. Frying in small batches is crucial; overcrowding the pot will drop the oil temperature significantly, leading to uneven cooking. When shaping, try to keep your pieces relatively uniform in size for consistent cooking. If your dough is too sticky to handle, lightly flour your hands, but avoid adding too much extra flour to the dough itself, as this can make them tough.
For flavor variations, the possibilities are endless! Add a teaspoon of grated lemon or orange zest to the dough for a bright citrus note. A pinch of freshly grated nutmeg or cardamom can add a wonderful warmth and spice. You can also experiment with different glazes instead of just powdered sugar. A simple milk glaze (powdered sugar whisked with a little milk and vanilla) or a lemon glaze would be delightful. For a truly decadent treat, dip them in melted chocolate or serve with a side of fruit jam or honey for dipping. For a savory twist (though less traditional for this specific “cake”), you could omit most of the sugar from the dough and add finely chopped herbs like chives, then serve with a savory dipping sauce.
Storage and Reheating
These fried “cakes” are truly best enjoyed fresh and warm, straight from the fryer. The crisp exterior and soft interior are at their peak just after cooling slightly. However, if you happen to have leftovers (which is a rare occurrence!), they can be stored. Place them in an airtight container at room temperature for up to 1-2 days. Be aware that the texture will soften considerably, and they will lose their initial crispiness.
To reheat, the best method is to place them on a baking sheet in a preheated oven at 300°F (150°C) for about 5-7 minutes, or until warmed through. This will help to revive some of their crispness. Avoid microwaving, as this tends to make them rubbery and chewy. If you prefer, a quick minute or two in an air fryer can also crisp them up nicely. If reheating, you might want to give them another light dusting of powdered sugar before serving.
Frequently Asked Questions
What’s the difference between these and traditional doughnuts?
While very similar, these fried “cakes” often differ in their shape (typically oval or irregular, rather than a ring or perfectly round ball), and sometimes in their dough consistency, which can be slightly softer or less dense than some classic doughnuts. They are essentially a type of fritter or sweet fried dough, often simpler in preparation than heavily yeasted, glazed doughnuts.
Can I make the dough ahead of time?
Yes, you can! After the first rise, you can punch down the dough, place it in a lightly oiled bowl, cover it tightly with plastic wrap, and refrigerate it for up to 24 hours. When you’re ready to fry, take the dough out of the refrigerator and let it come to room temperature for about 30-45 minutes before proceeding with shaping and the second rise.
What if I don’t have yeast? Can I use baking powder?
While yeast gives these “cakes” their characteristic airy, slightly chewy texture, you can make a quicker version using baking powder. For this recipe, you would typically use about 2-3 teaspoons of baking powder instead of yeast, and omit the rising times. The texture will be more cake-like and less airy, but still delicious. Adjust the milk quantity as needed to achieve a soft dough.



