Follow Me On Social Media!
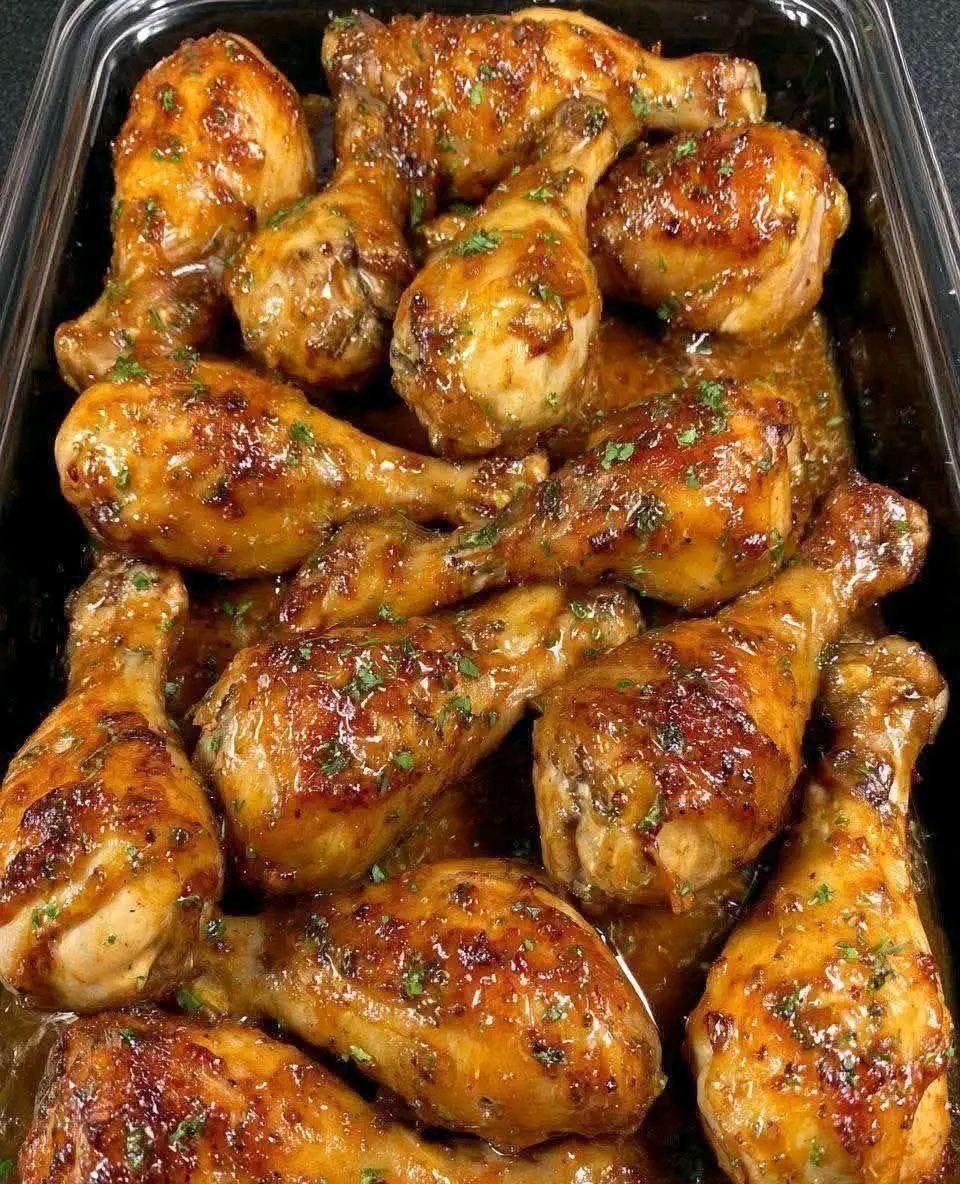
Honey Garlic Baked Chicken Drumsticks

Introduction
Prepare your taste buds for a symphony of sweet and savory because today we’re diving into the irresistible world of Honey Garlic Baked Chicken Drumsticks! This dish isn’t just a meal; it’s a culinary hug, a crowd-pleaser that effortlessly balances complex flavors with incredible ease of preparation. Imagine succulent chicken, coated in a glistening, sticky glaze that’s bursting with the aromatic punch of garlic and the comforting sweetness of honey, all baked to crispy-skinned perfection. It’s the kind of dish that disappears from the plate almost as quickly as it lands there, leaving everyone thoroughly satisfied and asking for more.
So, why drumsticks? Beyond their incredibly budget-friendly nature, chicken drumsticks are a true unsung hero in the kitchen. Their dark meat ensures they stay wonderfully juicy and tender throughout the baking process, making them incredibly forgiving for even the most novice of cooks. They’re also perfectly portioned and easy to eat, making them ideal for everything from a casual weeknight dinner to a lively game day spread or a potluck where everyone can grab and go. This particular recipe elevates the humble drumstick to gourmet status, transforming it into a sticky, finger-licking delight that will undoubtedly become a new family favorite. Get ready to master a dish that’s big on flavor, low on fuss, and guaranteed to impress!
What truly sets this Honey Garlic Baked Chicken Drumsticks recipe apart is its masterful balance of flavors and textures. The magic lies in the rich, glossy glaze – a harmonious blend of golden honey, pungent garlic, and savory soy sauce, which caramelizes beautifully in the oven, creating a sticky, slightly charred exterior. Beneath that irresistible skin, the meat remains incredibly tender and moist, infused with every savory-sweet note. We’ll show you how to achieve that coveted crispy skin, ensure the chicken is cooked through to perfection, and even offer tips for making this dish your own. Get ready to learn the secrets to creating a truly memorable meal that will have everyone reaching for a second (or third!) drumstick.
Nutritional Information
Per serving (approximate values):
- Calories: 380
- Protein: 35g
- Carbohydrates: 25g
- Fat: 15g
- Fiber: 1g
- Sodium: 750mg
Ingredients
- 2 lbs (about 8-10) chicken drumsticks, skin on
- 1/2 cup honey
- 1/4 cup soy sauce (low sodium preferred)
- 4 cloves garlic, minced (about 1 1/2 tablespoons)
- 1 tablespoon apple cider vinegar (or rice vinegar)
- 1 tablespoon olive oil
- 1 teaspoon grated fresh ginger (optional, but highly recommended)
- 1/2 teaspoon black pepper
- 1/4 teaspoon red pepper flakes (optional, for a touch of heat)
- 1 tablespoon cornstarch (optional, for a thicker glaze)
- 2 tablespoons fresh parsley or cilantro, chopped, for garnish
- Salt, to taste (only if needed after tasting the marinade, as soy sauce is salty)
Instructions
- Prepare the Chicken: Start by thoroughly rinsing the chicken drumsticks under cold water. Pat them completely dry with paper towels. This step is crucial for achieving crispy skin. Place the dried drumsticks in a large bowl or a gallon-sized freezer bag.
- Make the Marinade: In a medium bowl, whisk together the honey, soy sauce, minced garlic, apple cider vinegar, olive oil, grated ginger (if using), black pepper, and red pepper flakes (if using). If you desire a slightly thicker glaze, you can whisk in 1 tablespoon of cornstarch at this stage.
- Marinate the Chicken: Pour the prepared marinade over the chicken drumsticks, ensuring each piece is well coated. If using a bowl, toss the drumsticks to distribute the marinade evenly. If using a freezer bag, seal it and gently massage the marinade around the chicken. Cover the bowl or place the bag in the refrigerator and marinate for at least 30 minutes. For best flavor, marinate for 2-4 hours, or even overnight (up to 12 hours).
- Preheat the Oven: When you’re ready to bake, preheat your oven to 400°F (200°C). Line a large baking sheet with parchment paper or aluminum foil for easier cleanup. If using foil, you might want to lightly grease it with cooking spray to prevent sticking. Place an oven-safe wire rack on top of the prepared baking sheet; this allows for better air circulation around the drumsticks, promoting crispier skin.
- Arrange the Drumsticks: Remove the chicken from the marinade. Discard any excess marinade (do not reuse raw chicken marinade unless it has been boiled). Arrange the drumsticks in a single layer on the wire rack, ensuring there is space between each piece for even cooking and browning. Do not overcrowd the pan.
- Initial Baking: Bake for 20 minutes at 400°F (200°C).
- Baste and Continue Baking: After 20 minutes, carefully pull out the baking sheet. Using a pastry brush, baste the drumsticks generously with the pan juices and any caramelized glaze that has collected. This helps build up the delicious sticky coating. Return to the oven and continue baking for another 15-20 minutes, or until the internal temperature of the thickest part of the chicken (without touching the bone) reaches 165°F (74°C).
- Achieve Crispy Skin and Glaze: For extra crispy skin and a beautifully caramelized glaze, you have a couple of options:
- Option 1 (Broiler Finish): Once the chicken reaches 165°F (74°C), turn on your oven’s broiler to high. Keep a close eye on the chicken, broiling for 2-4 minutes, or until the skin is deeply golden brown and slightly charred in spots. Watch carefully as glazes can burn quickly under the broiler.
- Option 2 (Higher Heat Finish): Alternatively, after the chicken reaches 165°F (74°C), increase the oven temperature to 425°F (220°C) and bake for an additional 5-7 minutes, or until the skin is crispy and the glaze is bubbly and caramelized.
- Rest the Chicken: Once baked to perfection, remove the baking sheet from the oven. Transfer the drumsticks to a clean platter or cutting board. Tent loosely with foil and let them rest for 5-10 minutes. This allows the juices to redistribute, resulting in more tender and flavorful chicken.
- Garnish and Serve: Just before serving, sprinkle generously with fresh chopped parsley or cilantro for a pop of color and freshness. Serve hot with your favorite side dishes.
Cooking Tips and Variations
To truly master these Honey Garlic Baked Chicken Drumsticks and make them your own, consider these tips and variations:
- The Power of Patting Dry: We can’t stress this enough – thoroughly patting your chicken drumsticks dry with paper towels before marinating is the absolute secret to achieving that coveted crispy skin. Excess moisture creates steam, which prevents the skin from crisping up.
- Don’t Skimp on Marinating Time: While 30 minutes will give you a good start, letting the chicken marinate for at least 2-4 hours, or even better, overnight, will allow the flavors to deeply penetrate the meat. This results in a much more flavorful and tender drumstick.
- The Wire Rack Advantage: Baking the drumsticks on a wire rack set over a baking sheet is a game-changer. It allows hot air to circulate all around the chicken, ensuring even cooking and crispier skin on all sides, preventing a soggy bottom.
- Temperature Check for Safety and Juiciness: Always use a meat thermometer to ensure your chicken is cooked to a safe internal temperature of 165°F (74°C). This guarantees food safety while also preventing overcooking, which can lead to dry chicken. Insert the thermometer into the thickest part of the drumstick, avoiding the bone.
- Broiler for Ultimate Crispness: If your glaze isn’t quite as caramelized or your skin isn’t as crispy as you’d like at the end of baking, a quick 2-4 minutes under a hot broiler will do the trick. Keep a very close eye on it, as glazes can go from perfectly golden to burnt in a flash.
- Thickening the Glaze: If you prefer a very thick, sticky glaze, you can reserve about 1/4 cup of the marinade before adding the chicken. After the chicken is cooked, pour the reserved marinade into a small saucepan (ensure it has not touched raw chicken, or boil it for 1 minute). Bring it to a simmer, and if desired, whisk in an additional 1 teaspoon of cornstarch mixed with 1 tablespoon of cold water. Cook, stirring, until thickened. Drizzle this extra glaze over the cooked chicken before serving.
- Spice It Up: For those who love a little heat, increase the amount of red pepper flakes in the marinade. You could also add a pinch of cayenne pepper or a dash of your favorite hot sauce.
- Tangy Twist: If you like a more pronounced tangy flavor, increase the apple cider vinegar by another teaspoon or two. A squeeze of fresh lime juice over the finished drumsticks also adds a bright, zesty note.
- Herb Variations: While parsley or cilantro are classic garnishes, feel free to experiment. Chopped green onions add a mild oniony bite and visual appeal. A sprinkle of toasted sesame seeds also complements the Asian-inspired flavors beautifully.
- Soy Sauce Alternatives: If you’re looking for a gluten-free option, substitute tamari for soy sauce. For a lower-sodium alternative, use low-sodium soy sauce.
- Sweetener Swap: While honey provides that signature sticky sweetness, maple syrup can be used as a substitute for a slightly different flavor profile.
- Make It a Sheet Pan Meal: For an easy one-pan dinner, chop up some hearty vegetables like broccoli florets, bell pepper strips, or potato wedges. Toss them lightly with olive oil, salt, and pepper, and arrange them around the chicken drumsticks on the baking sheet. They will roast beautifully alongside the chicken, absorbing some of the delicious glaze. Add them to the pan about 10-15 minutes into the chicken’s cooking time, depending on how tender you like your vegetables.
Storage and Reheating
Proper storage and reheating are key to enjoying your delicious Honey Garlic Baked Chicken Drumsticks long after they’re first cooked.
- Storage: Allow any leftover drumsticks to cool completely to room temperature (but no longer than 2 hours) before storing. Transfer them to an airtight container and refrigerate for up to 3-4 days.
- Freezing: For longer storage, you can freeze the cooked drumsticks. Once cooled, place them in a single layer on a baking sheet and freeze until solid. Then, transfer the frozen drumsticks to a freezer-safe bag or container, removing as much air as possible to prevent freezer burn. They can be frozen for up to 2-3 months. Thaw overnight in the refrigerator before reheating.
- Reheating (Oven): The best way to reheat these drumsticks to maintain their crispy skin and juicy interior is in the oven. Preheat your oven to 350°F (175°C). Place the drumsticks on a baking sheet and heat for 15-20 minutes, or until thoroughly warmed through and the skin is crisp again. If reheating from frozen, this will take longer, around 30-40 minutes, or until the internal temperature reaches 165°F (74°C).
- Reheating (Air Fryer): An air fryer is also an excellent option for reheating, as it helps restore crispness quickly. Place the drumsticks in a single layer in the air fryer basket (do not overcrowd). Air fry at 375°F (190°C) for 8-12 minutes, flipping halfway, until heated through and crispy.
- Reheating (Microwave): While convenient, the microwave is generally not recommended for reheating these drumsticks as it can make the skin soggy and the meat less tender. If you must use a microwave, heat in short bursts (30-60 seconds) until just warmed through, then consider a quick finish in a hot pan or under the broiler to crisp up the skin if desired.
Frequently Asked Questions
Can I use chicken thighs instead of drumsticks?
Absolutely! Chicken thighs are an excellent substitute for drumsticks in this recipe. They have a similar dark meat texture and fat content, which keeps them juicy. The cooking time will be very similar, though you might need to add an extra 5-10 minutes depending on their size. Always cook until the internal temperature reaches 165°F (74°C).
Can I prepare the marinade ahead of time?
Yes, you can definitely prepare the marinade ahead of time! Whisk all the marinade ingredients together and store it in an airtight container in the refrigerator for up to 3-4 days. This makes meal prep even easier. Just add your chicken to the prepared marinade when you’re ready to start the marinating process.
My glaze isn’t very sticky, what went wrong?
Several factors could contribute to a less sticky glaze. Ensure you’re basting the chicken during the baking process, as this helps build up layers of the glaze. Also, make sure your oven temperature is accurate; a slightly lower temperature might prevent proper caramelization. For a guaranteed sticky glaze, consider adding the optional cornstarch to your marinade, or finishing the chicken under the broiler for a few minutes to really caramelize the sugars.
What are the best side dishes to serve with this chicken?
Honey Garlic Baked Chicken Drumsticks are incredibly versatile! They pair wonderfully with classic comfort sides like fluffy white or brown rice, mashed potatoes, or roasted sweet potatoes. For a lighter meal, consider a fresh green salad with a vinaigrette dressing, steamed green beans, or roasted broccoli. Asian-inspired sides like stir-fried noodles or a quick cucumber salad also complement the flavors beautifully.