Follow Me On Social Media!
Air Fryer Vanilla Pavlova Crispy Outside Soft & Marshmallowy Inside

Introduction
Imagine a dessert that’s simultaneously airy, delicate, and deeply satisfying. A cloud-like confection with a shatteringly crisp exterior that gives way to a soft, chewy, marshmallowy interior. That, my friends, is the magic of pavlova. This elegant meringue-based dessert, often associated with Australia and New Zealand, has graced countless dinner tables and celebrations for generations. Traditionally baked low and slow in a conventional oven, pavlova has always been a labor of love, requiring patience and a watchful eye to achieve its signature texture. The long baking times and the commitment of your oven for an extended period could sometimes deter even the most enthusiastic home bakers from attempting this showstopper.
But what if we told you there’s a revolutionary way to achieve pavlova perfection with less fuss, in less time, and with results that are even more consistently excellent? Enter the Air Fryer Vanilla Pavlova. This innovative approach harnesses the power of your air fryer to create a pavlova that boasts an unparalleled crispy shell and a perfectly soft, marshmallowy heart, all infused with the comforting aroma and taste of vanilla. The air fryer’s circulating hot air works wonders, drying out the meringue gently and evenly, ensuring that delightful contrast of textures that makes pavlova so irresistible. Get ready to impress your guests and delight your taste buds with this quicker, easier, and utterly spectacular Air Fryer Vanilla Pavlova. It’s a game-changer for anyone who loves this classic dessert but wants to simplify the process without compromising on quality.
Nutritional Information
Per serving (approximate values):
- Calories: 180
- Protein: 3g
- Carbohydrates: 42g
- Fat: 0g
- Fiber: 0g
- Sodium: 40mg
Ingredients
- 4 large egg whites, at room temperature
- 1 cup (200g) superfine granulated sugar
- 1 teaspoon vanilla extract (pure vanilla extract recommended)
- 1 teaspoon cornstarch
- 1 teaspoon white vinegar or cream of tartar
- For serving (optional):
- 1 cup heavy whipping cream
- 2 tablespoons powdered sugar
- 1/2 teaspoon vanilla extract
- Fresh berries (strawberries, raspberries, blueberries, kiwi)
- Fresh mint leaves for garnish
Instructions
- Prepare Your Air Fryer: Cut a piece of parchment paper to fit the bottom of your air fryer basket. You may need to cut it into a circle or square, ensuring it doesn’t touch the heating element. Lightly spray the parchment paper with a non-stick cooking spray, or lightly grease it with a neutral oil. This helps prevent sticking and makes it easier to remove the pavlova.
- Separate Egg Whites: Carefully separate the egg whites from the yolks, ensuring no trace of yolk gets into the whites. Even a tiny bit of yolk can prevent the egg whites from whipping properly. Place the egg whites in a very clean, dry, large mixing bowl, preferably a metal or glass bowl.
- Whip Egg Whites to Soft Peaks: Using an electric hand mixer or a stand mixer fitted with the whisk attachment, begin beating the egg whites on medium speed. Continue beating until the egg whites become foamy and hold soft peaks. This usually takes about 2-3 minutes.
- Gradually Add Sugar: With the mixer still running on medium-high speed, gradually add the superfine granulated sugar, about one tablespoon at a time. Add the sugar slowly, allowing each addition to dissolve into the egg whites before adding more. This slow incorporation is crucial for a stable and glossy meringue.
- Achieve Stiff, Glossy Peaks: Continue beating on high speed until all the sugar is incorporated and the meringue is thick, glossy, and holds very stiff peaks. When you lift the whisk, the peaks should stand straight up without collapsing. You should also be able to rub a small amount of meringue between your fingers and feel no grittiness from undissolved sugar. This process can take 7-10 minutes, depending on your mixer.
- Fold in Vanilla, Cornstarch, and Acid: Once stiff peaks are achieved, gently fold in the vanilla extract, cornstarch, and white vinegar (or cream of tartar). The cornstarch helps to create that soft, marshmallowy interior, while the acid stabilizes the meringue and contributes to the crisp exterior. Fold them in carefully with a spatula until just combined, being careful not to deflate the meringue.
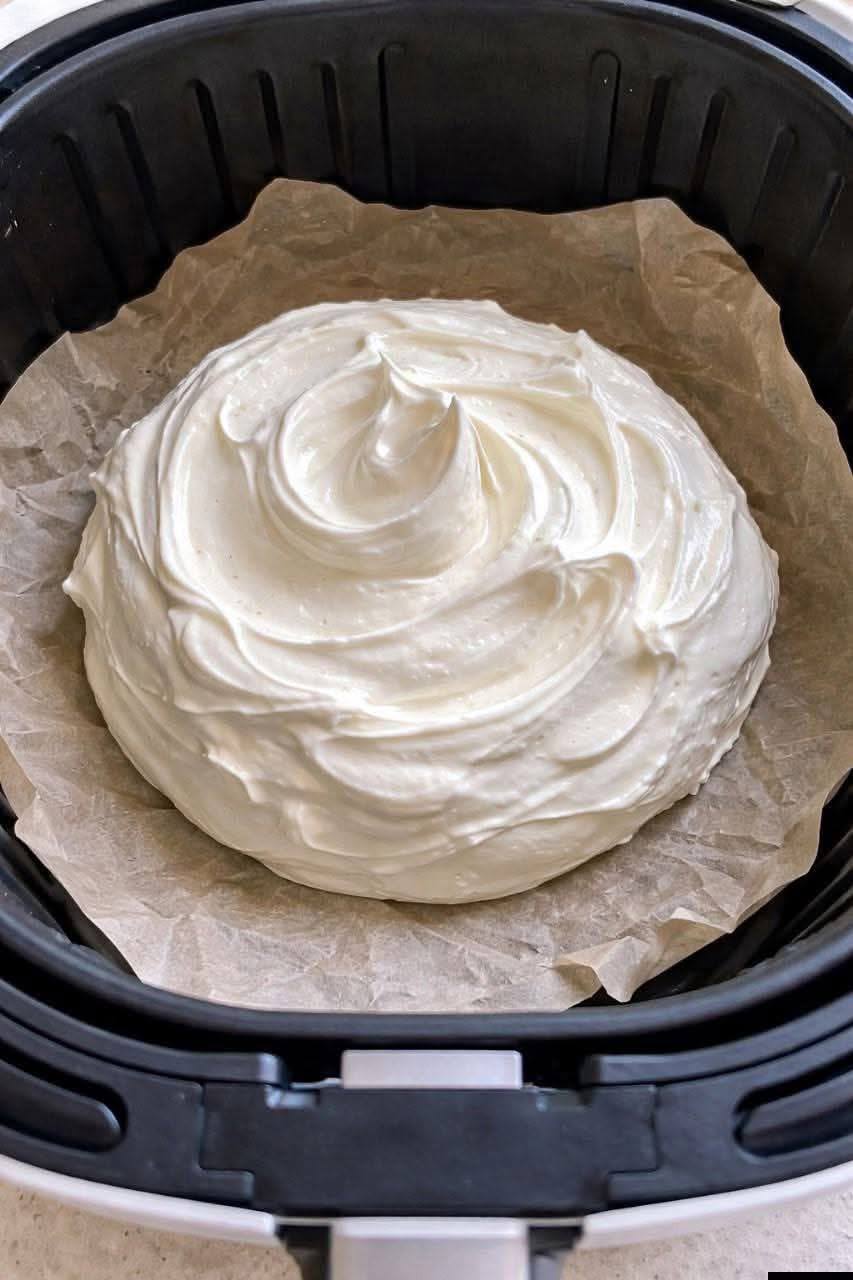
- Shape the Pavlova: Spoon the meringue onto the prepared parchment paper in your air fryer basket. Use the back of a spoon or an offset spatula to shape it into a circular mound, about 5-6 inches in diameter. Create a slight well or indentation in the center of the pavlova. This well will hold your delicious toppings later. You can also pipe the meringue using a large star tip for a more decorative edge, as shown in the image. Ensure the meringue doesn’t touch the sides of the air fryer basket too much, allowing for good air circulation.
- Air Fry – Initial Cooking: Carefully place the air fryer basket into the air fryer. Air fry at 250°F (120°C) for 30 minutes. This initial phase helps to set the exterior and begin the drying process.
- Air Fry – Drying Out Phase: After 30 minutes, reduce the air fryer temperature to 200°F (95°C). Continue to air fry for another 45-60 minutes. The exact time will depend on your air fryer model and the size of your pavlova. The goal is to dry out the meringue without browning it too much. The exterior should feel firm and dry to the touch.
- Cool Completely in Air Fryer: Once the cooking time is complete, turn off the air fryer. IMPORTANT: Do NOT open the air fryer immediately. Allow the pavlova to cool completely inside the closed air fryer for at least 1-2 hours, or even overnight. This slow cooling process is absolutely crucial for preventing cracks and ensuring the pavlova retains its crispness and marshmallowy interior.
- Prepare Toppings (Optional): Once the pavlova is completely cool, prepare your toppings. In a separate bowl, whip the heavy cream with powdered sugar and vanilla extract until soft peaks form.
- Serve: Gently transfer the cooled pavlova base to a serving plate. Spoon the whipped cream into the well you created, and then generously top with fresh berries and a few mint leaves for garnish. Serve immediately.
Cooking Tips and Variations
For pavlova perfection, attention to detail is key. First and foremost, ensure your mixing bowl and whisk are impeccably clean and dry. Any grease or water can prevent your egg whites from whipping to their full potential. Room temperature egg whites are also vital; they whip up to a greater volume and more stable foam than cold ones. If your eggs are cold, you can quickly warm them by placing the separated egg whites in a bowl set over a larger bowl of warm water for a few minutes. When adding the sugar, do it very slowly, a tablespoon at a time, allowing each addition to fully dissolve before adding the next. This creates a strong, stable meringue that won’t weep or collapse. The “rub test” is your friend here: rub a tiny bit of meringue between your fingers; if it feels gritty, keep beating until the sugar is fully dissolved and the meringue is smooth and glossy with stiff peaks.
When it comes to air fryer specific tips, parchment paper is your best friend. It prevents sticking and makes it easy to transfer the delicate pavlova. Ensure the parchment paper is cut to fit snugly in the basket without touching the heating element or blocking too much airflow. Avoid overcrowding your air fryer; if making multiple pavlovas, cook them in batches. Monitor your pavlova closely, especially during the drying phase, as air fryer temperatures can vary. If you notice it browning too quickly, you can slightly reduce the temperature or tent it loosely with foil. The cooling process is non-negotiable for success. Resist the urge to open the air fryer door until the pavlova is completely cool. The slow cooling prevents thermal shock, which can cause the pavlova to crack and lose its crispness. Allowing it to cool inside the air fryer creates a similar effect to cooling in a switched-off oven, allowing the meringue to dry out further and stabilize.
For variations beyond the classic vanilla, consider infusing your pavlova with other flavors. For a citrus twist, add 1 teaspoon of lemon or orange zest to the meringue along with the vanilla. For a mocha pavlova, fold in 1-2 tablespoons of unsweetened cocoa powder and 1 teaspoon of instant espresso powder at the very end. You could also swirl in a tablespoon of melted, cooled chocolate just before shaping. When it comes to toppings, the possibilities are endless. Instead of basic whipped cream, try a coconut whipped cream for a dairy-free option, or a lemon curd for a tangy contrast. Passion fruit pulp adds a tropical flair, while chocolate shavings, toasted nuts (like pistachios or almonds), or a drizzle of caramel or berry coulis can elevate the presentation and flavor profile. For a festive touch, use seasonal fruits – peaches and raspberries in summer, or poached pears and spiced cream in winter. You can also make individual mini pavlovas by piping smaller mounds, adjusting the cooking time accordingly (they will cook faster).
Storage and Reheating
Pavlova is best enjoyed the day it’s made, especially once topped with cream and fruit. However, you can prepare the pavlova base ahead of time, which is one of its great advantages for entertaining. An un-topped pavlova base should be stored in an airtight container at room temperature. It’s crucial to keep it away from any moisture, as humidity is the enemy of crisp meringue. Do not refrigerate an un-topped pavlova base, as the humidity in the fridge will make it soft and chewy, losing its desired texture. Stored correctly, an un-topped pavlova base can remain crisp for up to 2-3 days. If you notice it has softened slightly, you can try to “re-crisp” it by placing it back in the air fryer at 200°F (95°C) for 10-15 minutes, then allowing it to cool completely in the air fryer again. However, this method is not always guaranteed to restore its original crispness perfectly.
Once the pavlova has been topped with whipped cream and fresh fruit, it should be served immediately. Leftovers of a topped pavlova can be stored in an airtight container in the refrigerator for up to 1 day. However, be aware that the meringue will absorb moisture from the cream and fruit, causing it to soften significantly. While it will still be delicious, it will lose its characteristic crisp exterior. Pavlova is generally not suitable for reheating, as the delicate meringue structure will not hold up well to heat once it has absorbed moisture. The beauty of pavlova lies in its textural contrast, which is best experienced fresh. For the freshest and most impressive presentation, always assemble the pavlova with its toppings just before serving. This ensures that every bite delivers that delightful crunch and creamy, fruity goodness.
Frequently Asked Questions
Why did my pavlova crack?
Cracking is a common issue with pavlova and usually occurs due to sudden temperature changes. Rapid cooling after cooking can cause the meringue to contract too quickly, leading to cracks. This is why it’s crucial to let the pavlova cool completely inside the air fryer after it’s turned off. Over-beating the egg whites, not dissolving the sugar completely, or cooking at too high a temperature can also contribute to cracking. While a few cracks are common and don’t affect the taste, slow cooling helps minimize them.
Can I make this pavlova without an air fryer?
Yes, you can absolutely make pavlova in a conventional oven! The process is similar, but the cooking time and temperature will differ. For an oven-baked pavlova, preheat your oven to 250°F (120°C). Bake the shaped meringue for 1 hour, then reduce the oven temperature to 200°F (95°C) and bake for another 1 to 1.5 hours, or until the meringue is firm to the touch. Crucially, turn off the oven and leave the pavlova inside with the door ajar for several hours or overnight to cool completely. The air fryer method simply offers a quicker and often more consistent way to achieve the desired texture due to its efficient air circulation.
What is the difference between pavlova and meringue?
While both pavlova and meringue are made from whipped egg whites and sugar, they differ in their texture and sometimes in their additional ingredients. Meringue typically refers to a light, crisp, and fully dried out confection, often used as a topping or small cookie. Pavlova, on the other hand, is a specific type of meringue that is characterized by its crisp outer shell and a soft, chewy, marshmallow-like interior. This unique texture is achieved by adding a small amount of cornstarch and an acid (like vinegar or cream of tartar) to the meringue mixture, which helps to create that distinctive soft center while the outside dries out and becomes crispy.
How do I know when the pavlova is cooked through?
The pavlova is cooked when its exterior feels firm and dry to the touch, and it sounds hollow when gently tapped. It should be relatively easy to lift from the parchment paper without sticking. The color should remain white or a very pale cream, not significantly browned. Remember, the goal is to dry it out, not to bake it until it’s hard all the way through. The most important indicator of success, however, is the cooling process. If it cools slowly and completely inside the air fryer, it will achieve its perfect crispy outside and marshmallowy inside.