Follow Me On Social Media!
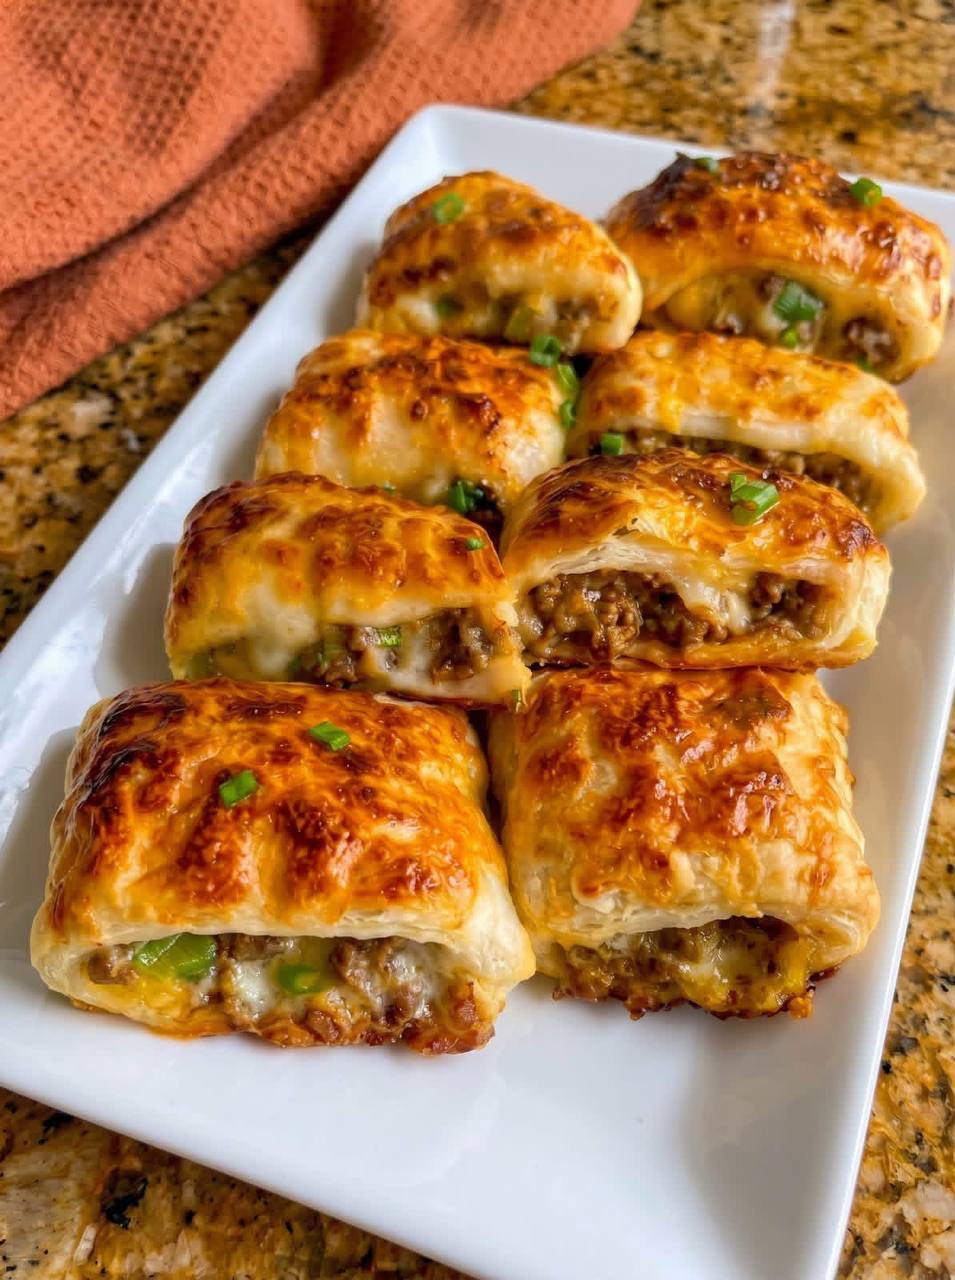
Cheesy Beef Taco Pockets

Introduction
Get ready to meet your new favorite handheld meal or party appetizer: Cheesy Beef Taco Pockets! Imagine all the vibrant, savory flavors of your beloved tacos, but wrapped up in a golden, flaky, buttery puff pastry crust. These delightful pockets are crispy on the outside, bursting with seasoned ground beef and gooey melted cheese on the inside, creating an irresistible combination that will have everyone reaching for more. They’re the ultimate crowd-pleaser, perfect for game day gatherings, a fun weeknight dinner, or even a quick, satisfying snack.
What makes these taco pockets truly special is their incredible versatility and ease of preparation. They transform classic taco components into a convenient, mess-free package, making them ideal for kids and adults alike. No more juggling shells or dealing with toppings spilling out – just pure, delicious taco goodness in every bite. The contrast between the rich, savory beef filling and the delicate, crisp pastry is simply divine, making them a standout dish that’s both comforting and exciting.
Whether you’re looking for an impressive appetizer that comes together quickly, a fun twist on taco night, or a portable meal solution, these Cheesy Beef Taco Pockets tick all the boxes. They’re customizable, make-ahead friendly, and guaranteed to disappear fast. Get ready to bake up a batch of pure joy that will have everyone asking for the recipe!
Nutritional Information
Per serving (approximate values, based on 8 pockets):
- Calories: 390
- Protein: 22g
- Carbohydrates: 25g
- Fat: 22g
- Fiber: 2g
- Sodium: 680mg
Ingredients
- 1 tablespoon olive oil
- 1 pound lean ground beef (85/15 or 90/10 recommended)
- 1 medium onion, finely diced
- 2 cloves garlic, minced
- 1 packet (1 ounce) taco seasoning mix
- 1/2 cup water or beef broth
- 1/2 cup canned diced tomatoes, drained (optional, for extra moisture and flavor)
- 1 cup shredded Monterey Jack or Mexican blend cheese
- 2 sheets (from a 17.3-ounce package) frozen puff pastry, thawed according to package directions
- 1 large egg, beaten (for egg wash)
- 2 tablespoons chopped fresh cilantro or green onions, for garnish (optional)
- For serving: salsa, sour cream, guacamole, or your favorite taco toppings
Instructions
- Prepare the Taco Beef Filling: Heat the olive oil in a large skillet or non-stick pan over medium-high heat. Add the ground beef and cook, breaking it up with a spoon, until fully browned and no longer pink. Drain off any excess grease.
- Add the finely diced onion to the skillet with the beef and cook for 3-5 minutes, until softened and translucent. Stir in the minced garlic and cook for another minute until fragrant.
- Stir in the taco seasoning mix, water (or beef broth), and drained diced tomatoes (if using). Bring the mixture to a simmer, then reduce the heat to low and let it cook for 5-7 minutes, stirring occasionally, until the liquid has mostly evaporated and the mixture has thickened. Remove the skillet from the heat and let the filling cool slightly. This is crucial to prevent the pastry from becoming soggy.
- Preheat Oven and Prepare Pastry: Preheat your oven to 400°F (200°C). Line two large baking sheets with parchment paper.
- On a lightly floured surface, carefully unfold one sheet of thawed puff pastry. Gently roll it out slightly with a rolling pin, just enough to smooth out the creases and make it a bit larger, aiming for roughly a 10×10-inch square.
- Cut the puff pastry sheet into 4 equal squares. Repeat with the second sheet of puff pastry, so you have 8 squares total.
- Assemble the Pockets: Place about 1/4 cup of the cooled beef filling onto one half of each puff pastry square, leaving a small border around the edges.
- Sprinkle about 1-2 tablespoons of shredded cheese over the beef filling on each square.
- Fold the other half of the puff pastry square over the filling, creating a rectangle or triangle shape. Gently press down around the edges to seal the pocket.
- Use the tines of a fork to crimp the edges all around each pocket. This not only creates a nice decorative edge but also helps to seal the pastry securely, preventing the filling from leaking out during baking.
- Egg Wash and Bake: Carefully transfer the assembled taco pockets to the prepared baking sheets, leaving some space between each one.
- In a small bowl, whisk the egg with 1 teaspoon of water to create an egg wash. Lightly brush the tops of each taco pocket with the egg wash. This will give them a beautiful golden-brown, glossy finish.
- Bake for 18-22 minutes, or until the puff pastry is puffed up, golden brown, and cooked through. The exact baking time may vary depending on your oven.
- Serve: Remove the taco pockets from the oven and let them cool on the baking sheets for a few minutes before transferring them to a wire rack. Garnish with chopped fresh cilantro or green onions, if desired. Serve warm with your favorite dipping sauces like salsa, sour cream, or guacamole.
Cooking Tips and Variations
Perfect Pastry Handling: Puff pastry is best when cold. If it gets too warm and sticky while you’re working with it, pop it back into the refrigerator for 10-15 minutes to firm up. Avoid overworking the pastry, as this can prevent it from puffing up properly. Gently unfold and roll just enough to smooth it out.
Preventing Soggy Bottoms: Ensure your beef filling is not too wet. After cooking, drain off any excess fat and liquid thoroughly. Allowing the filling to cool slightly before assembling the pockets also helps prevent the pastry from becoming soggy and makes it easier to handle.
Sealing Secrets: A good seal is key to preventing leaks. After folding the pastry, press firmly around the edges with your fingers to seal. Then, use a fork to crimp the edges. For extra security, you can lightly moisten the edges of the pastry with a little water or egg wash before folding and crimping.
Cheese Choice: While Monterey Jack or a Mexican blend works wonderfully, feel free to experiment! Cheddar, Colby Jack, or even a little cream cheese mixed into the beef can add different dimensions of flavor and creaminess. Use freshly shredded cheese for the best melt.
Flavor Boosters for the Filling: Don’t be afraid to customize! Add 1/4 cup of canned corn (drained), 1/4 cup of black beans (rinsed and drained), or finely diced bell peppers (red, green, or yellow) to the beef mixture along with the onions for extra texture and flavor. A pinch of smoked paprika or a dash of hot sauce can also amp up the taste.
Spice It Up: For those who love a kick, add a finely diced jalapeño (seeds removed for less heat) to the beef mixture with the onions, or sprinkle in a pinch of cayenne pepper with the taco seasoning.
Vegetarian Option: For a delicious vegetarian version, substitute the ground beef with seasoned cooked lentils, black beans, or a plant-based ground crumble. Ensure the filling is well-seasoned and not too wet.
Even Browning: If your oven tends to bake unevenly, rotate the baking sheets halfway through the baking time to ensure all pockets get beautifully golden and crisp.
Serving Suggestions: These pockets are fantastic on their own, but truly shine with dipping sauces. Classic choices include chunky salsa, cool sour cream, creamy guacamole, or a vibrant cilantro-lime crema. For a more substantial meal, serve them alongside a simple green salad or a bowl of black bean and corn salsa.
Storage and Reheating
Make-Ahead Instructions: You can assemble the taco pockets up to 24 hours in advance. After assembling and crimping, arrange them on a parchment-lined baking sheet, cover loosely with plastic wrap, and refrigerate. When ready to bake, brush with egg wash and bake as directed, adding a few extra minutes to the baking time if baking from cold.
Freezing Unbaked Pockets: Assemble the pockets as directed, but do not egg wash. Place them on a baking sheet and freeze until solid (about 2-3 hours). Once frozen, transfer them to a freezer-safe bag or airtight container. They can be stored for up to 2 months. When ready to bake, place frozen pockets on a parchment-lined baking sheet, brush with egg wash, and bake at 400°F (200°C) for 25-30 minutes, or until golden brown and cooked through.
Storing Leftovers: Cooked Cheesy Beef Taco Pockets can be stored in an airtight container in the refrigerator for up to 3-4 days. The pastry might lose some of its crispness, but they will still be delicious.
Reheating: For best results, reheat leftover taco pockets in a preheated oven or toaster oven at 350°F (175°C) for 10-15 minutes, or until heated through and the pastry is crisp again. Microwaving is not recommended as it will make the pastry soggy.
Frequently Asked Questions
Can I use homemade pastry instead of store-bought puff pastry?
Yes, if you have a favorite homemade puff pastry recipe and the time to make it, it would certainly elevate these taco pockets! However, store-bought frozen puff pastry is specifically chosen for this recipe due to its convenience and consistent, delicious results. It makes this recipe approachable for even novice bakers.
My puff pastry isn’t puffing up. What went wrong?
There are a few common reasons. The most frequent is that the pastry got too warm while you were working with it, causing the butter layers to melt before baking. Ensure your pastry stays cold. Overworking the dough can also inhibit puffing. Lastly, make sure your oven is preheated to the correct temperature, as a hot oven is essential for the steam to create those flaky layers.
Can I make these gluten-free?
Absolutely! Many brands now offer gluten-free puff pastry that works wonderfully as a substitute. Ensure all other ingredients, especially your taco seasoning, are certified gluten-free. The preparation steps remain the same.
What if I don’t have taco seasoning?
No problem! You can easily make your own taco seasoning blend. A common mix includes 1 tablespoon chili powder, 1 teaspoon ground cumin, 1/2 teaspoon paprika, 1/2 teaspoon onion powder, 1/2 teaspoon garlic powder, 1/4 teaspoon dried oregano, and a pinch of cayenne pepper (optional). Adjust to your taste preferences.