Follow Me On Social Media!
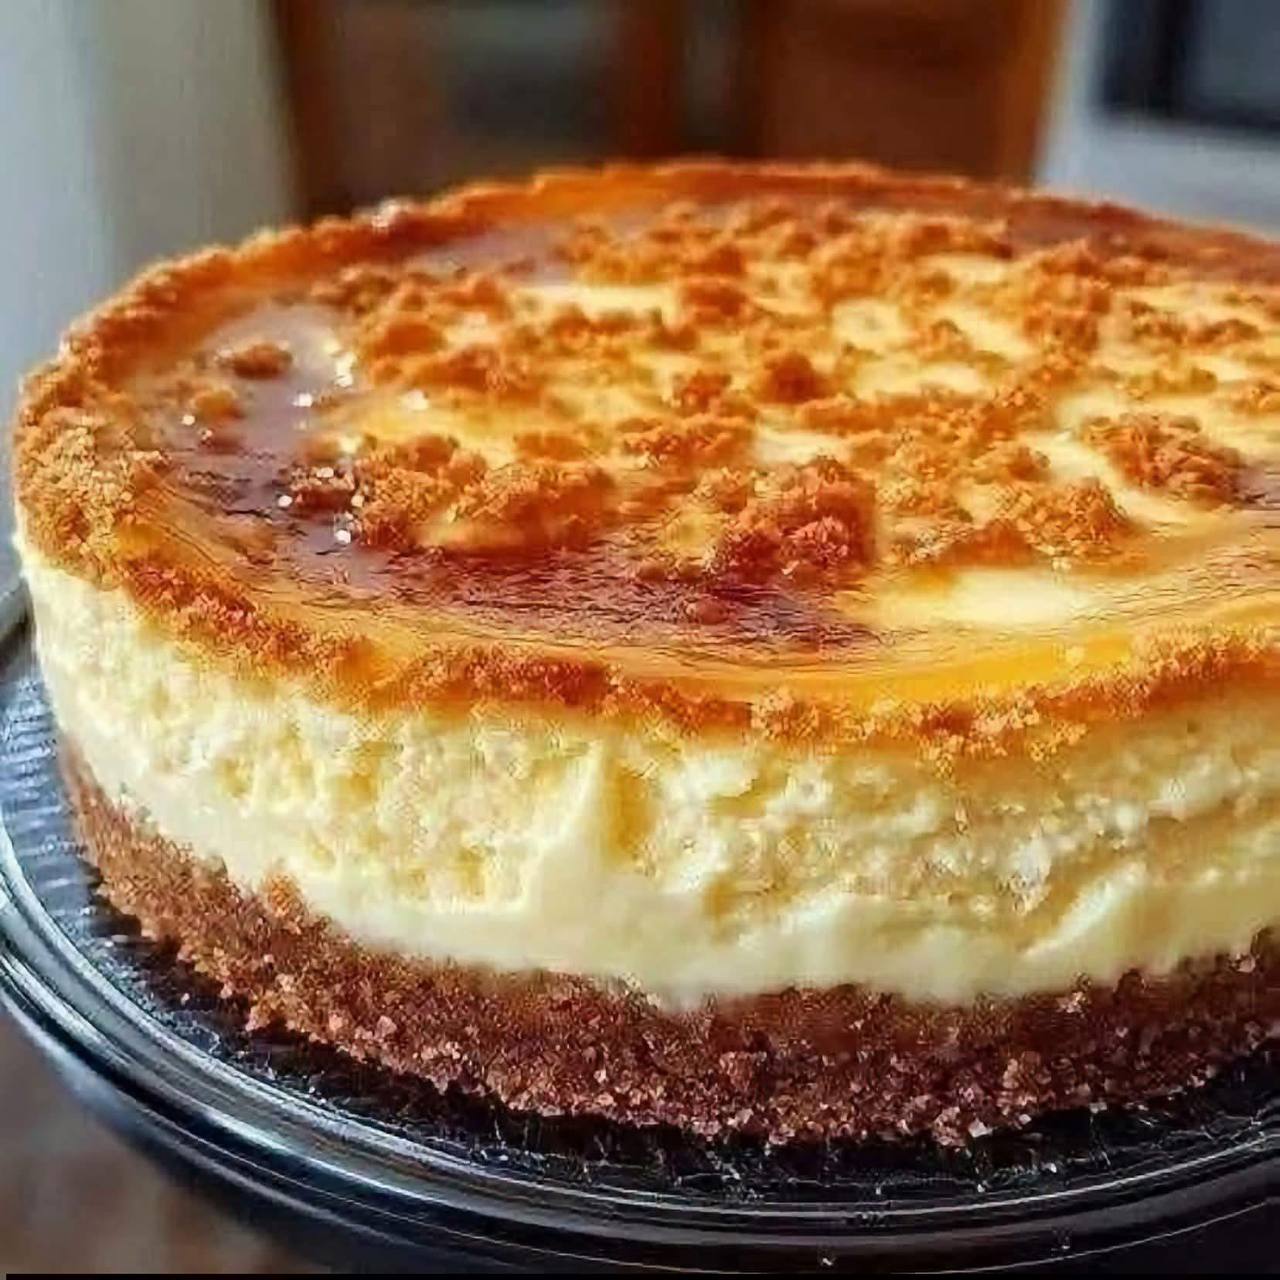
Creamy caramel cheesecake

Introduction
Prepare to embark on a culinary journey to pure bliss, where creamy meets crunchy, and sweet caramel intertwines with tangy cheesecake. Today, we’re diving into the irresistible world of our Creamy Caramel Cheesecake – a dessert that’s not just a treat, but an experience. This isn’t your average cheesecake; it’s a masterpiece of textures and flavors, designed to captivate your senses and leave an unforgettable impression. Imagine a perfectly golden, buttery graham cracker crust, cradling a velvety smooth, rich cream cheese filling that practically melts in your mouth. Then, picture that decadent filling enrobed in a luscious, glistening layer of homemade caramel, and finally, crowned with a delightful, crunchy crumb topping that adds just the right amount of textural contrast. It’s a symphony of indulgence that promises to be the star of any gathering or a luxurious treat for yourself.
Cheesecake, in its many forms, has long held a special place in the hearts of dessert lovers worldwide. Its universal appeal lies in its rich, satisfying creaminess and its versatility to be paired with almost any flavor. What elevates this particular Creamy Caramel Cheesecake to legendary status is the thoughtful combination of classic technique with a generous dose of caramel magic. We’ve meticulously crafted this recipe to ensure every component contributes to a harmonious whole – from the structural integrity of the crust to the crack-free perfection of the filling, and the exquisite balance of sweetness from the caramel. This isn’t just a recipe; it’s a guide to creating a dessert that looks professionally made yet is entirely achievable in your own kitchen.
Whether you’re a seasoned baker or a curious novice, this Creamy Caramel Cheesecake recipe is designed to guide you to success. We’ll walk you through the essential steps, share invaluable tips for cheesecake perfection, and even offer variations to customize it to your liking. Get ready to impress your family and friends, or simply treat yourself to a slice of pure heaven. This cheesecake is more than just a dessert; it’s a celebration of comfort, luxury, and the simple joy of truly exceptional food. So, tie on your apron, gather your ingredients, and let’s create a dessert that will be talked about long after the last crumb is savored.
Nutritional Information
Per serving (approximate values):
- Calories: 650 kcal
- Protein: 10g
- Carbohydrates: 75g
- Fat: 38g
- Fiber: 1g
- Sodium: 350mg
Ingredients
For the Graham Cracker Crust:
- 1 ½ cups (about 180g) graham cracker crumbs (from about 12-14 full sheets)
- ¼ cup (50g) granulated sugar
- ½ cup (113g) unsalted butter, melted
For the Cheesecake Filling:
- 32 ounces (900g) full-fat cream cheese, softened to room temperature
- 1 ½ cups (300g) granulated sugar
- ¼ cup (60g) all-purpose flour
- 1 teaspoon pure vanilla extract
- ¼ teaspoon salt
- 1 cup (240g) sour cream, at room temperature
- 4 large eggs, at room temperature
For the Homemade Caramel Sauce:
- 1 cup (200g) granulated sugar
- ¼ cup (60ml) water
- ½ cup (120ml) heavy cream, warmed
- ¼ cup (56g) unsalted butter, cut into cubes, at room temperature
- ½ teaspoon sea salt (optional, for salted caramel)
For the Crunchy Crumb Topping:
- ½ cup (60g) all-purpose flour
- ¼ cup (50g) granulated sugar
- ¼ cup (50g) packed light brown sugar
- ¼ teaspoon ground cinnamon (optional)
- ¼ cup (56g) unsalted butter, very cold and cut into small pieces
Instructions
- Prepare the Crust: Preheat your oven to 350°F (175°C). Lightly grease a 9-inch springform pan. In a medium bowl, combine the graham cracker crumbs, ¼ cup granulated sugar, and melted butter. Mix until well combined and the crumbs are moistened. Press the mixture firmly and evenly into the bottom of the prepared springform pan. Bake for 10 minutes, then remove from oven and let cool slightly while you prepare the filling. Reduce oven temperature to 325°F (160°C).
- Prepare for Water Bath: Wrap the bottom and sides of the springform pan tightly with heavy-duty aluminum foil (at least 2-3 layers) to prevent water from seeping in during the water bath.
- Make the Cheesecake Filling: In the bowl of a stand mixer fitted with the paddle attachment (or using a hand mixer), beat the softened cream cheese on medium speed until completely smooth and free of lumps, about 2-3 minutes. Scrape down the sides of the bowl.
- Add the 1 ½ cups granulated sugar, flour, vanilla extract, and salt. Beat on low speed until just combined, scraping down the bowl as needed. Do not overmix.
- Add the sour cream and mix on low speed until just incorporated.
- Add the eggs one at a time, mixing on low speed after each addition until just combined. Be careful not to overmix the batter once the eggs are added; overmixing can incorporate too much air, leading to cracks.
- Bake the Cheesecake: Pour the cheesecake batter over the cooled graham cracker crust in the prepared springform pan.
- Place the foil-wrapped springform pan into a larger roasting pan. Carefully pour hot water into the roasting pan until it reaches about halfway up the sides of the springform pan.
- Carefully transfer the roasting pan to the preheated oven. Bake for 60-75 minutes, or until the edges are set but the center still has a slight wobble when gently shaken.
- Cool the Cheesecake: Turn off the oven and prop the oven door open slightly (about 2-3 inches). Let the cheesecake cool in the water bath inside the oven for 1 hour. This slow cooling prevents cracking.
- Remove the cheesecake from the water bath and the roasting pan. Carefully remove the foil. Let it cool completely on a wire rack at room temperature for another 1-2 hours.
- Once completely cool, cover loosely with plastic wrap and refrigerate for at least 6-8 hours, or preferably overnight, to allow it to set properly.
- Make the Homemade Caramel Sauce: In a heavy-bottomed saucepan, combine the 1 cup granulated sugar and ¼ cup water. Cook over medium heat, stirring gently until the sugar dissolves. Once dissolved, stop stirring and boil until the mixture turns a deep amber color (this can take 8-12 minutes). Watch carefully, as it can burn quickly.
- Immediately remove from heat. Carefully and slowly pour the warm heavy cream into the hot sugar mixture while whisking constantly (the mixture will bubble up vigorously). Stir until smooth.
- Add the cubed butter and sea salt (if using). Whisk until the butter is fully melted and incorporated, and the sauce is smooth. Let the caramel cool completely to room temperature, stirring occasionally. It will thicken as it cools.
- Make the Crunchy Crumb Topping: While the cheesecake chills, prepare the crumb topping. In a medium bowl, combine the flour, granulated sugar, brown sugar, and cinnamon (if using).
- Add the very cold, cubed butter. Using your fingertips or a pastry blender, cut the butter into the dry ingredients until the mixture resembles coarse crumbs. Refrigerate until ready to use.
- Assemble the Cheesecake: Once the cheesecake is thoroughly chilled, carefully run a thin knife around the edge of the pan before releasing the springform sides.
- Pour the cooled caramel sauce evenly over the top of the cheesecake, spreading it gently to the edges.
- Sprinkle the crunchy crumb topping evenly over the caramel layer.
- Serve: Slice the Creamy Caramel Cheesecake with a hot, clean knife (wiping it clean after each slice for best results). Serve immediately and enjoy!
Cooking Tips and Variations
For the ultimate creamy caramel cheesecake experience, attention to detail is key. Always ensure your cream cheese, sour cream, and eggs are at room temperature. This is crucial for achieving a smooth, lump-free batter that emulsifies properly, preventing a grainy texture and reducing the likelihood of cracks. When mixing the filling, beat the cream cheese first until perfectly smooth before adding other ingredients. Once the eggs are added, mix on the lowest speed possible and only until just combined; overmixing incorporates too much air, which can cause the cheesecake to puff up and then crack as it cools. The water bath is your best friend for a perfectly baked, crack-free cheesecake – it provides a moist, even cooking environment. Don’t skip it! For easy setup, use heavy-duty foil to wrap your springform pan, ensuring no water seeps in. Finally, the slow cooling process, first in the oven with the door ajar, then at room temperature, and finally in the refrigerator, is vital for preventing drastic temperature changes that can lead to cracks and for allowing the cheesecake to fully set and develop its rich flavor and texture. For slicing, dip your knife in hot water and wipe it clean between each cut for perfectly neat slices.
This recipe is wonderfully versatile, allowing for several delicious variations. If you’re short on time, a good quality store-bought caramel sauce can be used in place of homemade, just ensure it’s a thick, pourable consistency. For a salted caramel twist, a sprinkle of flaky sea salt over the caramel layer just before serving elevates the flavor beautifully. Consider varying the crust: crushed Oreo cookies or shortbread biscuits can replace graham crackers for a different flavor profile. You can also add spices to the crust or filling, such as a pinch of nutmeg or a dash of espresso powder for depth. For an extra layer of decadence, a drizzle of melted dark chocolate over the caramel and crumb topping would be divine. Nuts, such as toasted pecans or walnuts, can be added to the crumb topping or sprinkled over the finished cheesecake for an additional crunch and nutty flavor. For individual servings, bake the cheesecake in a muffin tin lined with paper liners for mini cheesecakes, adjusting baking time accordingly.
Storage and Reheating
To store your Creamy Caramel Cheesecake, cover it loosely with plastic wrap or place it in an airtight container. It should be kept refrigerated. When properly stored, the cheesecake will remain fresh and delicious for up to 4-5 days. It’s best enjoyed chilled, directly from the refrigerator. Freezing cheesecake is also an excellent option for longer storage. To freeze, first place the cheesecake (whole or in slices) on a baking sheet and freeze until firm, about 2-3 hours. Once firm, wrap it tightly in several layers of plastic wrap, then a layer of aluminum foil to prevent freezer burn. Frozen cheesecake can be stored for up to 1-2 months. When you’re ready to enjoy, transfer the frozen cheesecake to the refrigerator and let it thaw overnight. Do not attempt to reheat cheesecake, as it will alter the creamy texture and can cause it to become rubbery or oily. Cheesecake is traditionally a cold dessert, and reheating is not recommended.
Frequently Asked Questions
How do I prevent my cheesecake from cracking?
Preventing cracks in a cheesecake involves several key steps. First, ensure all your ingredients, especially cream cheese and eggs, are at room temperature. This helps create a smooth, homogenous batter. Second, avoid overmixing the batter, particularly after adding the eggs, as incorporating too much air can lead to cracks. Third, always use a water bath during baking; the steam creates a moist environment that promotes even cooking and prevents the cheesecake from drying out and cracking. Finally, allow the cheesecake to cool slowly – first in the turned-off oven with the door ajar, then at room temperature, and finally in the refrigerator – to avoid sudden temperature changes that can cause cracks.
Can I make the caramel sauce ahead of time?
Yes, absolutely! The homemade caramel sauce can be made up to a week in advance. Once prepared and cooled, transfer it to an airtight container and store it in the refrigerator. When you’re ready to use it, gently warm the caramel in a saucepan over low heat or in the microwave in short bursts, stirring frequently, until it reaches a pourable consistency. Be careful not to overheat it, as it can scorch easily.
What if I don’t have a springform pan?
While a springform pan is ideal for cheesecakes due to its removable sides, you can improvise if you don’t have one. You can use a regular 9-inch round cake pan. Line the bottom and sides of the pan with parchment paper, leaving an overhang on two opposite sides to create “handles.” This will allow you to lift the cooled cheesecake out of the pan. Be sure to grease the pan well before lining. You will still need to wrap the outside of the pan in foil if using a water bath.