Follow Me On Social Media!
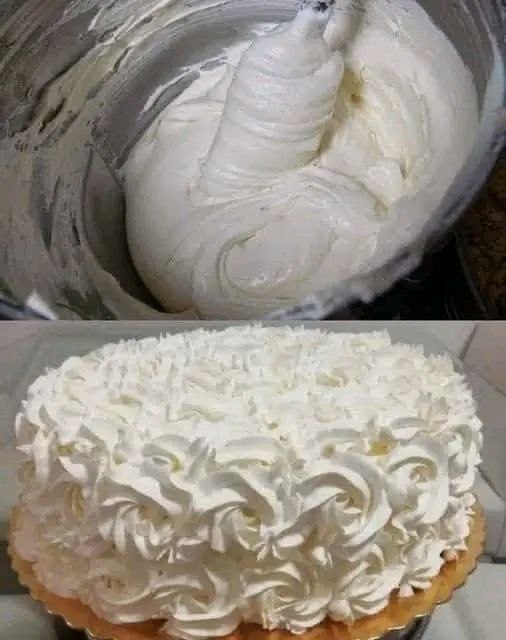
Creating a Whipped Cream Masterpiece From Batter to Decorated Cake

Introduction
There’s something undeniably enchanting about a perfectly crafted whipped cream cake. It evokes images of joyful celebrations, sun-drenched picnics, and the simple pleasure of a light, ethereal dessert. Unlike its buttercream-laden counterparts, a whipped cream cake offers a delicate sweetness and an incredibly airy texture that melts in your mouth, leaving a refreshing finish. It’s a dessert that feels both elegant and approachable, a true crowd-pleaser that never goes out of style. The beauty lies in its simplicity, allowing the pure, creamy flavor of the whipped topping to shine, often complemented by the subtle notes of vanilla and a tender cake base.
This recipe isn’t just about baking a cake; it’s about creating a masterpiece, a visual and culinary delight that will impress and satisfy. We’ll guide you through every step, from preparing a wonderfully moist and fluffy cake batter that serves as the perfect foundation, to mastering the art of whipping cream to absolute perfection – stable, luscious, and ready for decorating. The star of our show is the exquisite rosette decoration, a classic technique that transforms a simple cake into a stunning centerpiece, exuding charm and sophistication. Imagine the gasps of delight as you present a cake adorned with delicate swirls, each one a testament to your newfound baking prowess.
Whether you’re celebrating a birthday, an anniversary, or simply want to elevate a weeknight dessert into something extraordinary, this guide will equip you with all the knowledge and techniques needed to achieve a professional-looking and incredibly delicious whipped cream cake. We’ll demystify the process of working with whipped cream, offering crucial tips to ensure it holds its shape beautifully, even in warmer conditions. Get ready to embark on a delightful baking journey that promises not just a cake, but an experience – from the moment you whisk your first ingredient to the blissful first bite of your very own whipped cream masterpiece.
Nutritional Information
Per serving (approximate values, based on 12 servings for a standard 8-inch cake):
- Calories: 420 kcal
- Protein: 5g
- Carbohydrates: 55g
- Fat: 20g
- Fiber: 1g
- Sodium: 250mg
Ingredients
- For the Vanilla Cake Base:
- 2 ½ cups (300g) all-purpose flour, sifted
- 1 ½ cups (300g) granulated sugar
- 1 tablespoon baking powder
- ½ teaspoon salt
- 1 cup (226g) unsalted butter, softened
- 4 large eggs, at room temperature
- 1 cup (240ml) whole milk, at room temperature
- 2 teaspoons pure vanilla extract
- For the Whipped Cream Frosting:
- 4 cups (960ml) heavy cream (cold, at least 36% fat)
- ¾ cup (90g) powdered sugar, sifted
- 2 teaspoons pure vanilla extract
- 1 teaspoon unflavored gelatin powder (optional, for stabilization)
- 2 tablespoons cold water (optional, for gelatin)
Instructions
- Prepare the Cake Base: Preheat your oven to 350°F (175°C). Grease and flour two 8-inch round cake pans, or line with parchment paper circles.
- In a medium bowl, whisk together the sifted flour, granulated sugar, baking powder, and salt. Set aside.
- In a large bowl, using an electric mixer on medium speed, cream the softened butter until light and fluffy, about 2-3 minutes.
- Add the eggs one at a time, beating well after each addition until fully incorporated. Scrape down the sides of the bowl as needed.
- Reduce mixer speed to low. Gradually add the dry ingredients to the wet ingredients in three additions, alternating with the milk, beginning and ending with the dry ingredients. Mix until just combined after each addition; do not overmix.
- Stir in the vanilla extract until just incorporated.
- Divide the batter evenly between the prepared cake pans.
- Bake for 28-32 minutes, or until a wooden skewer inserted into the center of the cakes comes out clean.
- Remove cakes from the oven and let them cool in the pans for 10-15 minutes before inverting them onto a wire rack to cool completely. Ensure cakes are completely cool before frosting, ideally for at least 2 hours or even overnight.
- Prepare the Stabilized Whipped Cream (Optional, but Recommended): If using gelatin, in a small microwave-safe bowl, sprinkle the unflavored gelatin powder over 2 tablespoons of cold water. Let it sit for 5 minutes to bloom.
- Microwave the bloomed gelatin for 10-15 seconds, or until completely dissolved and clear. Let it cool slightly but do not let it set. Ensure it is cool to the touch before adding to the cream.
- Whip the Cream: Ensure your heavy cream, mixing bowl (preferably metal), and whisk attachment are thoroughly chilled. Place the cold heavy cream, sifted powdered sugar, and vanilla extract into the chilled mixing bowl.
- If using dissolved gelatin, slowly drizzle the slightly cooled gelatin mixture into the cream while the mixer is on low speed.
- Begin whipping on low speed, gradually increasing to medium-high speed. Whip until soft peaks form, then continue whipping until stiff peaks are achieved. Be careful not to over-whip, as it can quickly turn into butter. The cream should hold its shape firmly when the whisk is lifted.
- Assemble and Crumb Coat the Cake: Once the cakes are completely cool, use a serrated knife to level the tops of the cakes if desired, creating flat surfaces.
- Place one cake layer on your serving plate or cake stand. Spread about ½ to ¾ cup of whipped cream evenly over the top.
- Carefully place the second cake layer on top.
- Apply a thin layer of whipped cream all over the top and sides of the cake. This is your crumb coat, designed to trap any loose crumbs.
- Refrigerate the cake for at least 20-30 minutes to allow the crumb coat to set. This step is crucial for a clean final frosting layer.
- Final Frosting and Decorating: Once the crumb coat is set, apply a thicker, more even layer of whipped cream over the entire cake, smoothing it out with an offset spatula or cake scraper. You can leave it smooth, or prepare for rosettes.
- For the rosette decoration, fit a large star tip (such as Wilton 1M or 2D) into a piping bag. Fill the piping bag about two-thirds full with the remaining whipped cream. Do not overfill, as the warmth from your hands can cause the cream to deflate.
- Starting from the top edge of the cake, pipe rosettes. To create a rosette, apply even pressure and start piping from the center, spiraling outwards in a tight circle until you complete one rosette. Release pressure to finish.
- Continue piping rosettes, working your way across the top of the cake, slightly overlapping each one to create a full, lush effect.
- Once the top is covered, move to the sides of the cake. Pipe rosettes in rows, again overlapping slightly to cover the entire surface, working from top to bottom.
- If your whipped cream in the piping bag starts to become too soft, place it in the refrigerator for a few minutes to re-chill. If you run out, whip a fresh small batch of cream.
- Once decorated, refrigerate the cake for at least 30 minutes before serving to allow the whipped cream to set firmly.
Cooking Tips and Variations
Chill Everything for Whipped Cream Perfection: This is arguably the most crucial tip for stable whipped cream. Ensure your heavy cream, mixing bowl (preferably stainless steel or glass), and whisk attachment are all thoroughly chilled before you begin whipping. A cold environment helps the fat molecules in the cream emulsify properly and hold air, resulting in a much firmer and more stable whipped cream. You can place your bowl and whisk in the freezer for 15-20 minutes before starting.
Don’t Overmix the Cake Batter: For a light and tender cake, mix the dry and wet ingredients only until just combined. Overmixing develops gluten, leading to a tough and dense cake. A few lumps are perfectly acceptable.
Stabilize Your Whipped Cream: While the optional gelatin method is great, other stabilizers include cream of tartar (add ½ teaspoon per cup of cream), powdered milk (1 tablespoon per cup of cream), or even a small amount of cornstarch (1 teaspoon per cup of cream, mixed with the powdered sugar). These help prevent the whipped cream from deflating, especially in warmer conditions or if the cake needs to sit out for a while.
Work in Batches for Decorating: If you have a large cake or are working in a warm kitchen, don’t put all your whipped cream into the piping bag at once. Keep the unused portion in the refrigerator and refill your bag as needed. The warmth from your hands can quickly deflate the cream in the bag.
Practice Piping: If you’re new to piping rosettes, practice on a piece of parchment paper first. You can scrape the practice cream back into the bowl and reuse it. This helps you get a feel for the pressure and motion required for consistent, beautiful rosettes.
Cake Flavor Variations: While vanilla is classic, you can easily adapt the cake base. Consider a lemon zest cake for a bright, tangy contrast, or a chocolate cake for a decadent combination. A light almond cake would also be delightful.
Whipped Cream Flavor Variations: Infuse your whipped cream with other flavors. Add a touch of almond extract for an elegant twist, or a tablespoon of espresso powder for a subtle coffee note. You can also fold in finely grated citrus zest (lemon, orange, lime) for a fresh burst of flavor.
Fruit Fillings and Toppings: This cake pairs beautifully with fresh fruit. You can add a layer of fresh berries (strawberries, raspberries, blueberries) or sliced peaches between the cake layers with the whipped cream. For decoration, arrange fresh fruit on top of the finished rosettes just before serving. A fruit compote or curd can also be used as a filling for an extra layer of flavor and texture.
Chocolate Drizzle: For a touch of decadence, gently drizzle melted chocolate (dark, milk, or white) over the top of the finished cake just before serving. This adds visual appeal and another layer of flavor.
Coconut Whipped Cream: For a dairy-free option, use full-fat canned coconut cream (chilled overnight) instead of heavy cream. Scoop out the thick cream from the top of the can, leaving the liquid behind, and whip it just like regular heavy cream. It’s surprisingly stable and delicious.
Different Piping Tips: Experiment with other piping tips for varied textures. A round tip can create elegant dots or swirls, while a leaf tip can add delicate green accents if you choose to color a small portion of the cream.
Chocolate Shavings or Sprinkles: For a simple yet effective decoration, sprinkle chocolate shavings, edible glitter, or your favorite sprinkles over the finished cake, particularly around the edges or in the center. This adds texture and visual interest.
Make Ahead Components: The cake layers can be baked a day in advance, wrapped tightly in plastic wrap, and stored at room temperature or even frozen. This breaks up the work and makes assembly easier.
Storage and Reheating
Storage: Since this cake is made with fresh whipped cream, it is crucial to store it properly in the refrigerator. Cover the cake loosely with plastic wrap or a cake dome to prevent it from drying out and absorbing odors from other foods in the fridge. Whipped cream cakes are best enjoyed within 2-3 days of preparation. Beyond that, the whipped cream may start to lose its firmness and the cake can dry out. If using a gelatin-stabilized whipped cream, it will hold up a bit longer, possibly up to 4 days.
Reheating: Whipped cream cakes are not suitable for reheating. The whipped cream will melt and lose its texture when exposed to heat. This cake is meant to be served chilled or at cool room temperature. If you prefer your cake slightly less cold, you can take it out of the refrigerator about 15-20 minutes before serving, but do not leave it out for extended periods, especially in a warm environment.
Frequently Asked Questions
Why did my whipped cream deflate or become watery?
The most common reasons for deflated or watery whipped cream are insufficient chilling of the cream and equipment, or over-whipping. Ensure your heavy cream, mixing bowl, and whisk attachment are all very cold. Start with cold cream straight from the refrigerator. Over-whipping can cause the cream to separate and become grainy or turn into butter, releasing the liquid. Also, if the cream is left out at room temperature for too long, it will naturally start to deflate, especially if it’s not stabilized. Using a stabilizer like gelatin or cornstarch can significantly help maintain its structure.
Can I make the cake layers ahead of time?
Yes, absolutely! Cake layers can be baked 1-2 days in advance. Once completely cooled, wrap each layer tightly in plastic wrap and store them at room temperature. For longer storage, you can freeze the wrapped cake layers for up to 1-2 months. Thaw them at room temperature before assembling and frosting. This is a great way to break up the baking process and make assembly day less hectic.
What kind of cream should I use for whipping?
You must use heavy cream or heavy whipping cream, which typically has a milk fat content of 36% or higher. Do not use “whipping cream” (which has a lower fat content, usually 30-35%) or half-and-half, as they will not whip up as firm or hold their shape as well. The higher fat content in heavy cream is essential for creating stable, fluffy whipped cream.
How do I prevent my cake from drying out?
Several factors contribute to a moist cake. First, ensure you don’t overbake it; use the skewer test for doneness. Second, wrap the cooled cake layers tightly in plastic wrap if making them ahead of time. Third, proper storage of the finished cake is key: keep it covered in the refrigerator. If you anticipate needing the cake to last longer, a brush of simple syrup (equal parts sugar and water, boiled and cooled) on the cake layers before frosting can also add moisture.