Follow Me On Social Media!
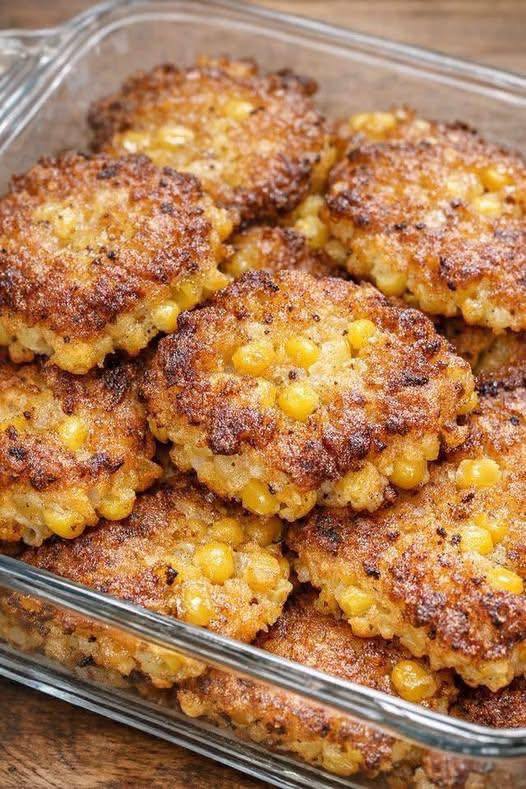
Crispy Corn Fritters

Introduction
There’s something undeniably magical about a perfectly crispy corn fritter. That golden-brown exterior, giving way to a tender, sweet interior bursting with fresh corn kernels – it’s a symphony of textures and flavors that captures hearts and taste buds alike. These aren’t just any corn fritters; this recipe is meticulously crafted to deliver that ultimate “crispy” factor, making them utterly irresistible from the very first bite. Imagine the satisfying crunch followed by the soft, sweet pop of corn – it’s a culinary experience that elevates a simple vegetable into a star.
Corn fritters are essentially savory pancakes or patties, a delightful way to enjoy the natural sweetness of corn. They are incredibly versatile, fitting seamlessly into almost any meal of the day. Whether you’re looking for a quick and satisfying breakfast, a light lunch, a delicious side dish for dinner, or an impressive appetizer for guests, these crispy corn fritters are your answer. This recipe focuses on simplicity and technique to ensure that every fritter emerges from the pan with that coveted golden crispness, making it a go-to dish you’ll want to make again and again.
What makes this particular recipe stand out is its emphasis on achieving that perfect crispy texture without deep-frying. We’ll guide you through the art of pan-frying to ensure a beautiful, crunchy crust while keeping the inside tender and flavorful. They’re quick to prepare, using readily available ingredients, and promise a burst of fresh flavor that’s perfect for any season. Get ready to transform humble corn into a crispy, golden delight that will become a beloved staple in your kitchen!
Nutritional Information
Per serving (approximate values):
- Calories: 180
- Protein: 5g
- Carbohydrates: 25g
- Fat: 7g
- Fiber: 3g
- Sodium: 250mg
Ingredients
- 2 cups fresh corn kernels (from about 3-4 ears of corn, or 16 oz frozen corn, thawed and drained)
- 1/2 cup all-purpose flour
- 1/4 cup cornmeal (fine or medium grind)
- 1 large egg, lightly beaten
- 1/4 cup milk (dairy or non-dairy)
- 2 tablespoons unsalted butter, melted
- 1 teaspoon baking powder
- 1/2 teaspoon salt
- 1/4 teaspoon black pepper
- 1/4 cup chopped green onions (optional, for flavor and color)
- Vegetable oil or canola oil for pan-frying
Instructions
- If using fresh corn, carefully cut the kernels off the cob. If using frozen corn, ensure it is completely thawed and well-drained. Pat dry with a paper towel to remove any excess moisture, which helps with crispiness.
- In a large mixing bowl, combine the all-purpose flour, cornmeal, baking powder, salt, and black pepper. Whisk well to ensure all dry ingredients are evenly distributed.
- In a separate medium bowl, whisk together the lightly beaten egg, milk, and melted butter until well combined.
- Pour the wet ingredients into the dry ingredients. Stir gently with a spoon or spatula until just combined. Be careful not to overmix the batter; a few lumps are perfectly fine. Overmixing can lead to tough fritters.
- Gently fold in the corn kernels and the chopped green onions (if using) into the batter.
- Heat about 2-3 tablespoons of vegetable or canola oil in a large non-stick skillet or cast-iron pan over medium-high heat. You want enough oil to coat the bottom of the pan generously, but not so much that you are deep-frying.
- Once the oil is hot and shimmering (a drop of batter should sizzle immediately), spoon about 2-3 tablespoons of batter per fritter into the pan. Use the back of the spoon to gently flatten each fritter slightly into a round shape, about 2-3 inches in diameter. Do not overcrowd the pan; cook in batches if necessary to ensure even cooking and browning.
- Cook for 3-4 minutes per side, or until the fritters are deeply golden brown and crispy on the outside, and cooked through in the center. The cooking time may vary depending on the heat of your pan and the thickness of your fritters.
- Carefully flip the fritters using a thin spatula. If the pan seems dry, add a little more oil before flipping the next batch.
- Once cooked, transfer the crispy corn fritters to a wire rack placed over a baking sheet lined with paper towels. This allows excess oil to drain and helps maintain their crispness.
- Serve immediately with your favorite toppings or as a side dish.
Cooking Tips and Variations
Achieving that perfect crispiness is key to these fritters. Firstly, ensure your corn is as dry as possible. Excess moisture can lead to a soggy fritter. If using frozen corn, thaw it completely and then pat it thoroughly with paper towels. When pan-frying, don’t overcrowd the pan. Giving each fritter enough space allows for even heat distribution and prevents steaming, which can make them less crispy. Maintain a consistent medium-high heat; too low, and they’ll absorb too much oil and be greasy; too high, and they’ll burn before cooking through. A light dusting of cornstarch in the batter, in addition to the flour, can also enhance the exterior crispness.
For variations, the possibilities are endless! To add a cheesy note, fold in 1/4 cup of shredded cheddar, Parmesan, or Monterey Jack cheese with the corn. For a touch of heat, finely dice a jalapeño (remove seeds for less spice) and add it to the batter. A pinch of cayenne pepper or smoked paprika can also give a nice kick. Fresh herbs like chopped chives, cilantro, or parsley can brighten the flavor profile. For a heartier fritter, you could even add a tablespoon or two of finely diced cooked bacon or ham. To make them gluten-free, simply substitute the all-purpose flour with a gluten-free all-purpose flour blend that contains xanthan gum. If you prefer a richer flavor, you can brown the butter slightly before melting it and adding it to the wet ingredients.
Storage and Reheating
These crispy corn fritters are best enjoyed fresh, straight from the pan, when their crispness is at its peak. However, if you have leftovers, they can be stored in an airtight container in the refrigerator for up to 2-3 days. To maintain their texture, it’s best to place a paper towel between layers of fritters to absorb any moisture.
For reheating, avoid the microwave, as it will make them soft and rubbery. The best way to restore some of their crispness is to reheat them in a dry skillet over medium heat for a few minutes per side until warmed through and slightly crispy again. Alternatively, you can reheat them in a toaster oven or conventional oven at 350°F (175°C) for about 8-10 minutes, or until heated through and crisp. Freezing is also an option; once cooled, arrange them in a single layer on a baking sheet and freeze until solid, then transfer to a freezer-safe bag for up to 1 month. Reheat from frozen in an oven or toaster oven until hot and crisp.
Frequently Asked Questions
How do I make sure my fritters are crispy?
The key to crispy fritters lies in several factors: ensuring your corn is dry (especially if using frozen), not overcrowding the pan during frying, using enough oil (but not too much for deep-frying), and maintaining consistent medium-high heat. A little cornmeal in the batter also contributes to a crispier texture.
Can I use canned corn for this recipe?
While fresh or frozen corn is preferred for its texture and sweetness, you can use canned corn. Be sure to drain it very well and pat it dry with paper towels to remove as much liquid as possible before adding it to the batter. This is crucial for achieving crispiness.
What are some good dipping sauces for corn fritters?
Corn fritters are incredibly versatile with dips! Classic choices include sour cream, Greek yogurt, salsa, or a sweet chili sauce. You can also make a quick aioli with mayonnaise, garlic, and a squeeze of lemon, or a zesty lime crema by mixing sour cream or Greek yogurt with lime juice and a pinch of chili powder.
Can I prepare the batter ahead of time?
It’s best to prepare the batter just before cooking. The baking powder will start to activate once wet, and if the batter sits for too long, the fritters might not be as light and fluffy. However, you can mix the dry ingredients and wet ingredients separately and combine them right before you’re ready to cook.