Follow Me On Social Media!
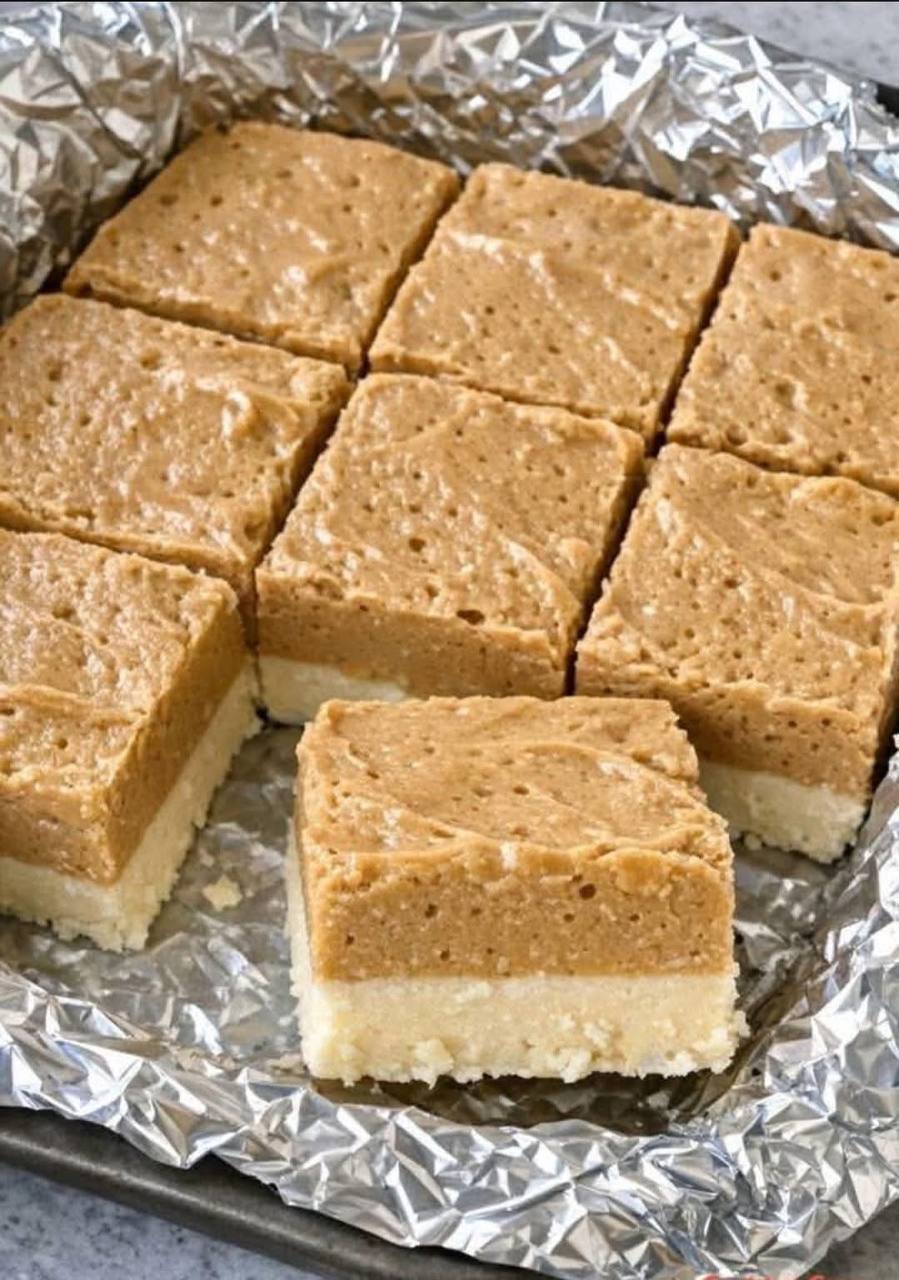
My brother makes this every summer

Introduction
There are some tastes that just scream “summer,” aren’t there? For my family, that taste is undeniably these incredible Peanut Butter Fudge Bars. Every single year, without fail, as soon as the weather warms up and the days stretch long, my brother whips up a batch (or three!) of these irresistible treats. It’s more than just a dessert; it’s a cherished tradition, a bright, sweet beacon signaling the start of lazy days, backyard barbecues, and spontaneous gatherings with loved ones. The moment these bars appear on the counter, perfectly cut into neat squares, you know summer has truly arrived.
What makes these bars so special? Beyond the nostalgia and the brotherly love, it’s their sheer simplicity and undeniable deliciousness. This isn’t some fussy, bake-for-hours kind of dessert. Oh no, this is the ultimate “no-bake” hero, meaning your kitchen stays cool, and your effort stays minimal – precisely what you want when the sun is blazing. Imagine two perfect layers: a dense, sweet, almost crumbly base, topped with an incredibly smooth, rich, and utterly dreamy peanut butter fudge. It’s a symphony of sweet, salty, and creamy all in one bite, and it’s always the first thing to disappear from any dessert table.
Whether you’re looking for the perfect potluck contribution, a fuss-free treat for a picnic, or just something wonderfully sweet to keep in the fridge for those spontaneous summer cravings, these Peanut Butter Fudge Bars are your answer. They’re easy enough for even the most novice baker (my brother certainly isn’t a pastry chef, bless him!), yet impressive enough to wow any crowd. So, get ready to make this your new summer staple, because once you try them, you’ll understand why “my brother makes this every summer” is a phrase uttered with such loving anticipation.
Nutritional Information
Per serving (approximate values):
- Calories: 380
- Protein: 7g
- Carbohydrates: 45g
- Fat: 22g
- Fiber: 2g
- Sodium: 210mg
Ingredients
For the Bottom Layer:
- 1 cup (2 sticks) unsalted butter, melted
- 2 cups powdered sugar, sifted
- 1 teaspoon vanilla extract
- 1/2 cup finely shredded unsweetened coconut (optional, but adds a lovely texture)
For the Top Layer:
- 1 cup (2 sticks) unsalted butter, softened
- 1 cup creamy peanut butter (such as Jif or Skippy, avoid natural for this recipe)
- 3-4 cups powdered sugar, sifted (start with 3, add more if needed for consistency)
- 1/4 cup milk (whole milk or 2% works best)
- 1 teaspoon vanilla extract
- 1/4 teaspoon salt (balances the sweetness)
Instructions
- Prepare Your Pan: Line an 8×8 inch baking pan with aluminum foil, leaving an overhang on all sides. This overhang will act as “handles” later, making it incredibly easy to lift the entire batch out of the pan. Lightly grease the foil with cooking spray or a thin layer of butter.
- Start the Bottom Layer: In a medium-sized mixing bowl, combine the melted butter, 2 cups of sifted powdered sugar, and 1 teaspoon of vanilla extract. Stir until completely smooth and well combined. If using, fold in the shredded coconut now.
- Press the Base: Pour the bottom layer mixture into the prepared 8×8 inch pan. Using the back of a spoon or your hands (lightly greased if it’s too sticky), press the mixture down firmly and evenly into the bottom of the pan. Make sure it’s compact and forms a solid base.
- Chill the Base: Place the pan in the refrigerator for at least 30 minutes to allow the bottom layer to firm up and set. This step is crucial for clean layers.
- Begin the Top Layer: While the bottom layer is chilling, prepare the peanut butter fudge topping. In a large mixing bowl, using an electric mixer (handheld or stand mixer), cream together the softened butter and creamy peanut butter until light and fluffy, about 2-3 minutes.
- Add Dry Ingredients to Top Layer: Gradually add 3 cups of the sifted powdered sugar, the milk, 1 teaspoon of vanilla extract, and the salt to the peanut butter mixture. Start on low speed to avoid a cloud of powdered sugar, then increase to medium-high. Beat until the mixture is smooth and creamy.
- Adjust Consistency: If the mixture seems too soft or sticky, add the remaining 1 cup of powdered sugar, a little at a time, until the fudge reaches a thick, spreadable consistency. It should be firm enough to hold its shape but still easy to spread.
- Layer the Fudge: Remove the chilled pan from the refrigerator. Carefully spread the peanut butter fudge mixture evenly over the set bottom layer. Use an offset spatula or the back of a spoon to smooth the top.
- Final Chill: Return the pan to the refrigerator and chill for at least 2-3 hours, or preferably overnight, until the bars are completely firm and set. This will ensure clean, beautiful cuts.
- Cut and Serve: Once fully chilled, use the foil overhang to lift the entire block of bars out of the pan and onto a cutting board. Peel back the foil. Using a large, sharp knife, cut the bars into 16 or 25 squares, depending on your desired size. For cleaner cuts, wipe the knife clean between each slice.
- Enjoy: Serve chilled and watch them disappear!
Cooking Tips and Variations
Achieving the perfect Peanut Butter Fudge Bar is all about a few key techniques and knowing how to adapt. Here are my favorite tips for success, plus some delicious variations to keep things exciting:
Tips for Best Results:
- Use Room Temperature Butter for the Top Layer: For the peanut butter fudge layer, make sure your butter is truly softened to room temperature. This allows it to cream smoothly with the peanut butter and powdered sugar, resulting in a wonderfully light and fluffy texture, rather than a lumpy or grainy one.
- Sift Your Powdered Sugar: This is a non-negotiable step for both layers! Powdered sugar can clump easily, and sifting it ensures a silky-smooth texture in both your base and your fudge, preventing any gritty surprises.
- Don’t Skimp on Chilling Time: Patience is a virtue, especially with no-bake desserts. Chilling the bottom layer sufficiently before adding the top helps prevent the layers from mixing. More importantly, chilling the finished bars for several hours (or overnight) is crucial for them to set up firmly enough for clean, precise cuts. If you try to cut them too soon, they’ll be messy and won’t hold their shape.
- Press the Base Firmly: When creating the bottom layer, really press it down into the pan. A compact base provides a stable foundation for the fudge layer and prevents it from crumbling when cut.
- Creamy Peanut Butter is Key: For this recipe, stick to traditional creamy peanut butter like Jif or Skippy. Natural peanut butter, with its oil separation, can result in a greasier and less stable fudge texture.
- Wipe Your Knife: For perfectly clean slices, especially after the bars are fully chilled, run your knife under hot water and wipe it clean between each cut. This helps to melt through the fudge slightly, preventing sticking and dragging.
- Good Quality Vanilla: A good quality vanilla extract makes a noticeable difference in the overall flavor profile. Don’t skimp on this!
Delicious Variations:
- Chocolate Lover’s Dream:
- Chocolate Chips: Fold 1/2 cup of mini chocolate chips into the peanut butter fudge layer for an extra burst of chocolatey goodness.
- Chocolate Drizzle: Melt 1/2 cup of semi-sweet or dark chocolate chips with a teaspoon of coconut oil or butter. Once the bars are completely set and cut, drizzle the melted chocolate over the top for a beautiful finish and extra flavor.
- Chocolate Crust: Instead of the butter/powdered sugar base, consider a crushed Oreo or graham cracker crust for the bottom layer. Combine 1 1/2 cups of crushed cookies with 1/2 cup melted butter and press into the pan.
- Sweet and Salty Perfection: Sprinkle a pinch of flaky sea salt over the top of the peanut butter fudge layer just before the final chill. The salt beautifully enhances the peanut butter and cuts through the sweetness.
- Nut Butter Alternatives: While peanut butter is classic, you can experiment with other creamy nut butters like almond butter or cashew butter for a different flavor profile. Just ensure they are the “no-stir” variety for best results.
- Add a Crunch: Fold 1/2 cup of finely chopped roasted peanuts (or other nuts like pecans or walnuts) into the peanut butter fudge layer for added texture and nutty flavor.
- Spice It Up: A tiny pinch of cinnamon or nutmeg could be added to either layer for a subtle warmth, especially if you’re making these in the cooler months.
- Make it Vegan: Use plant-based butter (like Miyoko’s Kitchen or Earth Balance sticks) and a plant-based milk (almond, soy, or oat milk work well) to make this recipe entirely vegan-friendly. Ensure your peanut butter is also vegan.
- Citrus Zest Brightness: For a surprisingly refreshing twist, add 1-2 teaspoons of finely grated orange or lemon zest to the bottom layer. It provides a lovely counterpoint to the richness.
Storage and Reheating
Proper storage is essential to keep these Peanut Butter Fudge Bars fresh, firm, and delicious. Reheating isn’t typically necessary, as they are best served chilled, but here’s what you need to know:
Storage:
- Refrigeration is Key: Due to the butter and milk content, these bars must be stored in the refrigerator. Place them in an airtight container. This will prevent them from drying out, absorbing odors from other foods, and becoming too soft.
- Shelf Life: Stored properly in the refrigerator, these Peanut Butter Fudge Bars will last for up to 1 week.
- Freezing for Longer Storage: If you want to keep them for an extended period, these bars freeze beautifully!
- Cut the bars into individual squares.
- Place them in a single layer on a baking sheet lined with parchment paper and freeze for about 1-2 hours, or until solid. This “flash freezing” prevents them from sticking together.
- Once frozen solid, transfer the bars to a freezer-safe airtight container or a heavy-duty freezer bag. You can place parchment paper between layers to prevent sticking.
- Frozen bars will maintain their quality for up to 2-3 months.
Serving (No Reheating):
- Serve Chilled: These bars are designed to be served cold, directly from the refrigerator. The firm texture is part of their appeal.
- Thawing Frozen Bars: If serving from frozen, simply remove the desired number of bars from the freezer and let them thaw in the refrigerator for a few hours, or at room temperature for about 30-60 minutes, until they are soft enough to enjoy but still firm.
- Avoid Warm Temperatures: Do not leave these bars out at warm room temperature for extended periods, especially on a hot day. The butter and peanut butter will soften, making them mushy and difficult to handle. If serving at an outdoor event, keep them in a cooler or on ice until just before serving.
Frequently Asked Questions
Why did my bottom layer turn out greasy?
A greasy bottom layer can happen if you use too much butter or if the butter isn’t fully incorporated with the powdered sugar. Ensure you measure accurately and stir until the mixture is smooth and homogenous. Also, make sure to chill it thoroughly before adding the top layer; chilling helps to solidify the butter and prevent it from seeping out.
Can I use natural peanut butter for this recipe?
While natural peanut butter is fantastic for many things, it’s generally not recommended for this specific fudge recipe. Natural peanut butter tends to separate and can result in a greasier, less stable, and more prone-to-crumble fudge consistency. For the best results and the classic texture of these bars, stick to creamy, processed peanut butter like Jif or Skippy.
My fudge layer is too soft/too hard. What went wrong?
The consistency of your fudge layer is primarily controlled by the amount of powdered sugar and milk. If it’s too soft, you likely need to add more powdered sugar, a tablespoon at a time, until it reaches a firm, spreadable consistency. If it’s too hard or crumbly, you might have added too much powdered sugar or not enough milk. Try adding a tiny splash of milk (1/2 teaspoon at a time) and beating it in until it softens slightly. Remember to always sift your powdered sugar to avoid lumps that can affect texture.
How can I make sure my bars cut cleanly?
The secret to clean cuts is thorough chilling and a good knife technique. Ensure your bars are chilled for at least 2-3 hours, or even better, overnight, until they are completely firm. When cutting, use a large, sharp knife. For the cleanest cuts, run your knife under hot water, wipe it dry, and then make a single, decisive cut. Repeat this process for each slice, wiping the knife clean and reheating it if necessary. Using the foil overhang to lift the entire block out of the pan onto a cutting board also helps immensely.