Follow Me On Social Media!
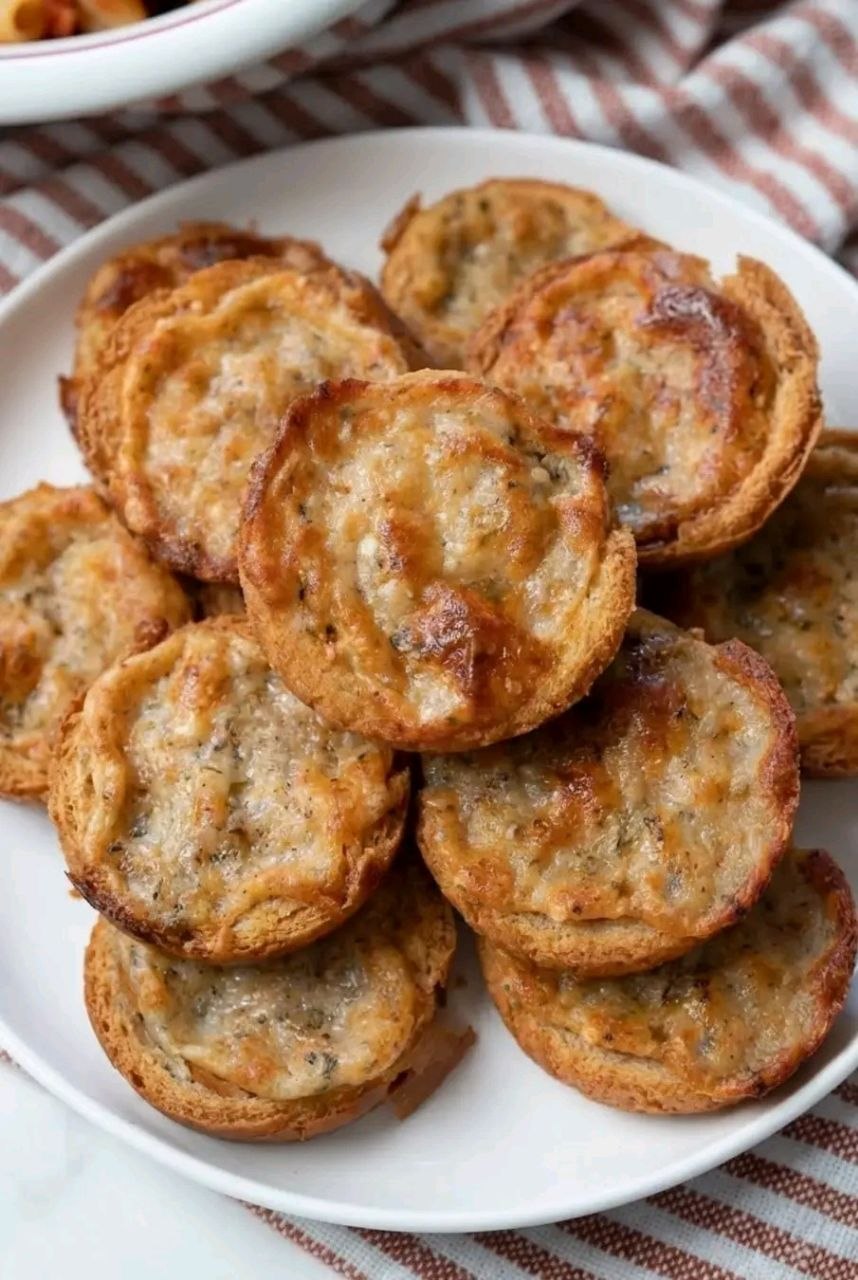
Sandwich Crust Garlic Rolls

Introduction
Ever find yourself with a pile of leftover sandwich crusts after making lunch for the kids (or yourself, no judgment here!)? Don’t toss them! Instead, let’s transform those often-discarded edges into something truly spectacular: Sandwich Crust Garlic Rolls. This ingenious recipe takes what many consider waste and elevates it into a delicious, budget-friendly appetizer or snack that will have everyone asking for more. Imagine crispy, golden-brown bites bursting with savory garlic and melted cheese – all from something you might have thrown away!
These Sandwich Crust Garlic Rolls are the ultimate culinary hack, turning humble bread crusts into an irresistible treat. They’re incredibly easy to make, requiring minimal ingredients and effort, yet delivering maximum flavor. Perfect for a quick snack, an impromptu appetizer for guests, or a delightful side dish to pasta night, these rolls are a testament to creative cooking and reducing food waste. Get ready to discover a new favorite way to enjoy every last bit of your bread!
The appeal of this dish lies in its simplicity and versatility. It’s a fantastic way to stretch your grocery budget and introduce a fun, interactive element to your meals. The combination of toasted bread, aromatic garlic, rich butter, and gooey cheese creates a textural and flavor explosion that’s both comforting and exciting. Whether you’re a seasoned home cook or just starting in the kitchen, these garlic rolls are a foolproof recipe that promises delicious results every single time.
Nutritional Information
Per serving (approximate values):
- Calories: 180
- Protein: 6g
- Carbohydrates: 20g
- Fat: 9g
- Fiber: 2g
- Sodium: 280mg
Ingredients
- 12-15 sandwich crusts (from white or wheat bread)
- 4 tablespoons unsalted butter, melted
- 3 cloves garlic, minced (or 1 teaspoon garlic powder)
- 1/4 cup shredded mozzarella cheese (or preferred cheese like Parmesan, cheddar, or a blend)
- 1 tablespoon fresh parsley, finely chopped (optional, for garnish)
- Pinch of salt
- Pinch of black pepper
- Optional: 1/4 teaspoon red pepper flakes for a kick
- Optional: Marinara sauce for dipping
Instructions
- Preheat your oven to 375°F (190°C). Line a baking sheet with parchment paper for easy cleanup.
- Arrange the sandwich crusts in a single layer on the prepared baking sheet. Ensure there’s a little space between each crust for even toasting.
- In a small microwave-safe bowl, melt the unsalted butter. This should take about 30-45 seconds in the microwave, or you can melt it gently on the stovetop.
- Add the minced garlic (or garlic powder), salt, and black pepper to the melted butter. If using red pepper flakes, add them now. Stir well to combine.
- Using a pastry brush, generously brush the garlic butter mixture over each sandwich crust. Make sure to coat both sides if possible, or at least the top and edges thoroughly.
- Sprinkle the shredded mozzarella cheese evenly over the buttered crusts. Don’t be shy; the cheese will melt and become wonderfully gooey.
- Place the baking sheet in the preheated oven and bake for 8-12 minutes, or until the crusts are golden brown and the cheese is bubbly and melted. Keep a close eye on them, as oven temperatures can vary and they can go from perfectly golden to burnt quickly.
- If you prefer an extra crispy or slightly charred top, you can switch the oven to broiler setting for the last 1-2 minutes. Watch constantly to prevent burning.
- Once baked to perfection, carefully remove the baking sheet from the oven.
- If using, sprinkle the fresh chopped parsley over the hot garlic rolls for an added burst of color and fresh flavor.
- Serve immediately while warm and the cheese is still melty. Serve with a side of marinara sauce for dipping, if desired.
Cooking Tips and Variations
For the crispiest garlic rolls, make sure your oven is fully preheated before putting the crusts in. Don’t overcrowd the baking sheet; if you have too many crusts, bake them in batches to ensure even browning and crispness. For an extra layer of flavor, consider lightly toasting the crusts for 2-3 minutes before adding the garlic butter and cheese, then proceed with the recipe as usual.
When it comes to variations, the possibilities are endless! Instead of mozzarella, try a sprinkle of grated Parmesan cheese for a sharper, saltier flavor, or a blend of Italian cheeses for more complexity. For a herbaceous twist, add dried oregano, basil, or Italian seasoning to your garlic butter mixture. A pinch of onion powder can also complement the garlic beautifully. If you like a little heat, a dash of cayenne pepper or a few extra red pepper flakes will do the trick. For a richer, more decadent flavor, you can spread a thin layer of cream cheese on the crusts before adding the garlic butter and shredded cheese. Vegans can easily adapt this recipe by using plant-based butter and dairy-free shredded cheese. You can also experiment with different types of bread crusts, from whole wheat to sourdough, for varying textures and flavors.
To ensure your garlic is well distributed and doesn’t burn, mince it very finely or use garlic powder if you’re worried about larger pieces charring too quickly. If you’re short on time, you can even use pre-minced garlic from a jar, though fresh garlic always provides the best flavor. Remember to taste your garlic butter mixture before brushing it on; adjust salt and pepper to your preference.
Storage and Reheating
Sandwich Crust Garlic Rolls are best enjoyed fresh out of the oven when they are at their crispiest and the cheese is perfectly gooey. However, if you happen to have any leftovers, they can be stored. Allow the rolls to cool completely to room temperature before storing. Place them in an airtight container or a resealable plastic bag. They will keep in the refrigerator for up to 2-3 days. Be aware that the texture will soften considerably once cooled and stored.
To reheat, the best method is to use your oven or a toaster oven. Preheat your oven to 300-325°F (150-160°C). Spread the garlic rolls in a single layer on a baking sheet. Reheat for 5-10 minutes, or until they are warmed through and the cheese is re-melted. This method helps to restore some of their original crispness. Avoid microwaving, as this will make them soft and chewy rather than crispy. If you’re in a hurry, a quick reheat in an air fryer at 350°F (175°C) for 2-4 minutes can also work wonders, resulting in a nice crisp exterior.
Frequently Asked Questions
Can I use any type of bread crusts for this recipe?
Yes, absolutely! While white bread crusts are commonly used and provide a classic texture, you can certainly experiment with other types of bread. Whole wheat, sourdough, or even brioche crusts can add different flavor profiles and textures to your garlic rolls. Just be mindful that denser breads might require a minute or two longer in the oven to achieve desired crispness.
What’s the best way to get the garlic butter to stick to the crusts?
The key is to melt the butter thoroughly and then brush it on generously. If your crusts are very dry, a light mist of water before brushing can help the butter adhere better, but generally, melted butter should stick well. If you’re having trouble, warming the crusts slightly in the oven for a minute or two before applying the butter can also help create a better surface for adhesion.
Can I prepare these ahead of time?
While these garlic rolls are truly best served fresh, you can do some prep work in advance. You can mince the garlic and chop the parsley ahead of time and store them in separate airtight containers in the refrigerator. You can also melt the butter and mix in the garlic and seasonings, but it’s best to apply this mixture and bake the rolls just before serving to ensure maximum freshness and crispiness.
What can I serve with these Sandwich Crust Garlic Rolls?
These versatile garlic rolls are perfect as a standalone snack or appetizer. They also make a fantastic side dish for a variety of meals. Pair them with pasta dishes like spaghetti and meatballs, lasagna, or chicken alfredo. They’re also great alongside a fresh salad, a bowl of soup, or as a dipper for your favorite marinara or even a creamy pesto sauce. Don’t underestimate their appeal at a casual gathering or game night!