Follow Me On Social Media!
Search Results for Homemade Bread Recipe

Introduction
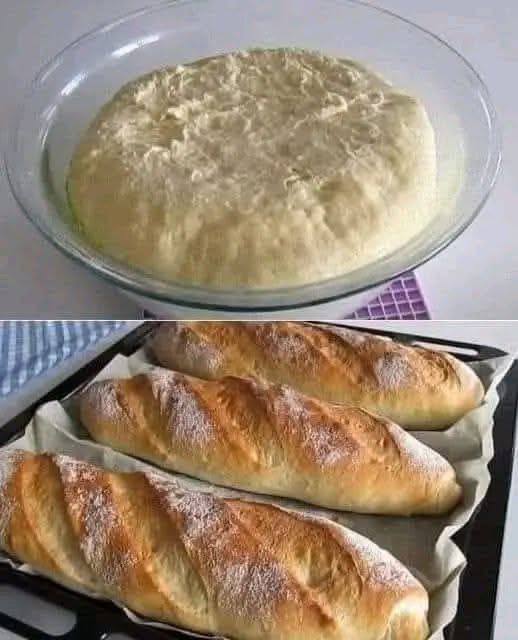
There are few culinary delights as universally cherished as a fresh, warm baguette. Its golden, impossibly crisp crust shatters with a satisfying crackle, yielding to an airy, chewy interior studded with irregular holes – the hallmark of true artisan bread. The aroma alone is enough to transport you to a bustling Parisian boulangerie, even if you’re just stepping out of your own kitchen. This isn’t just bread; it’s an experience, a simple yet profound pleasure that elevates any meal, from a humble cheese board to a gourmet stew. The beauty of the baguette lies in its simplicity: a few basic ingredients transformed by time, technique, and a touch of magic into something truly extraordinary.
For many, the idea of baking bakery-quality French baguettes at home seems daunting. Visions of complex machinery, secret ingredients, and years of training might pop into mind. But what if we told you that achieving those iconic golden loaves, complete with their signature slashes and airy crumb, is not only possible but incredibly rewarding? This recipe demystifies the art of the baguette, breaking down each step into clear, manageable instructions. We’ll guide you through the process, from mixing the humble dough to shaping those elegant forms and finally, to baking them to a stunning, crackling perfection.
Prepare to impress your friends, delight your family, and most importantly, treat yourself to the unparalleled joy of a homemade baguette. The journey might require a little patience and attention to detail, but the payoff—that first bite into a warm, crusty loaf—is absolutely priceless. Get ready to embark on a delicious adventure that will transform your bread-making skills and fill your home with the irresistible scent of freshly baked French bread.
Nutritional Information
Per serving (approximate values for 1/4 of one baguette, assuming 3 baguettes per recipe):
- Calories: 210
- Protein: 7g
- Carbohydrates: 42g
- Fat: 1g
- Fiber: 2g
- Sodium: 390mg
Ingredients
- 3 cups (360g) bread flour, plus more for dusting
- 1 teaspoon (5g) active dry yeast
- 1 ½ teaspoons (9g) fine sea salt
- 1 ¼ cups (300ml) lukewarm water (about 100-110°F or 38-43°C)
Instructions
- Prepare the Dough (Autolyse & Mix): In a large mixing bowl, combine the bread flour and lukewarm water. Mix with a wooden spoon or your hands until just combined and no dry spots of flour remain. This is a shaggy, sticky dough. Cover the bowl with plastic wrap or a damp kitchen towel and let it rest for 20 minutes. This process, called autolyse, allows the flour to fully hydrate and gluten to start developing, making kneading easier. After 20 minutes, sprinkle the yeast and salt over the dough. Mix thoroughly, kneading in the bowl for about 5-7 minutes. The dough will still be sticky, but it should start to come together.
- First Rise (Bulk Fermentation): Transfer the dough to a lightly oiled clean bowl, turning it once to coat. Cover the bowl tightly with plastic wrap or a damp kitchen towel. Let the dough rise in a warm place (around 75-80°F or 24-27°C) for 1.5 to 2 hours, or until it has at least doubled in size. During this time, perform “stretch and folds” every 30 minutes for the first 90 minutes. To do this, lightly wet your hands, gently grab a portion of the dough from the edge, stretch it upwards, and fold it over to the center. Rotate the bowl and repeat this 3-4 times. This builds strength in the dough without aggressive kneading.
- Divide and Preshape: Gently turn the risen dough out onto a lightly floured surface. Be careful not to deflate it too much. Divide the dough into three equal pieces (approximately 230-240g each). Lightly flour your hands and gently preshape each piece into a loose, oblong shape. Cover the preshaped dough with a damp kitchen towel and let it rest for 15-20 minutes. This allows the gluten to relax, making final shaping easier.
- Final Shaping: Lightly flour your work surface. Take one piece of dough and gently flatten it into a rectangle. Fold the top third of the dough down towards the center, pressing firmly to seal. Fold the bottom third up and over the previous fold, pressing firmly to seal. Then, fold the entire dough in half lengthwise, sealing the seam tightly with the heel of your hand. Gently roll the dough back and forth, tapering the ends slightly, until you have a baguette about 14-16 inches long. Repeat with the remaining dough pieces.
- Second Rise (Proofing): Transfer the shaped baguettes to a floured couche (a linen proofing cloth) or a baking sheet lined with parchment paper that has been heavily floured. Create folds in the couche or parchment paper between each baguette to help them hold their shape. Cover loosely with a damp kitchen towel or plastic wrap and let them proof for 45-60 minutes in a warm place, or until they have visibly puffed up but are not overly airy (the “poke test” should show the dough springs back slowly).
- Preheat Oven & Prepare for Baking: About 30 minutes before baking, preheat your oven to 475°F (245°C) with a baking stone or heavy baking sheet inside. Place an empty oven-safe pan (like a cast iron skillet or broiler pan) on the bottom rack of your oven.
- Score and Bake: Carefully transfer the proofed baguettes to the preheated baking stone or sheet. Using a sharp razor blade or lame, make 3-5 diagonal slashes about ½ inch deep along the top of each baguette. Be confident and swift with your cuts. Immediately pour about ½ cup of boiling water into the hot pan on the bottom rack (this creates steam for a crispy crust). Quickly close the oven door.
- Bake: Bake for 20-25 minutes, or until the baguettes are deep golden brown and sound hollow when tapped on the bottom. If your oven has a convection setting, you can use it for the last 5-10 minutes for extra crispness.
- Cool: Transfer the baked baguettes to a wire rack to cool completely before slicing. This is crucial for developing their internal texture and preventing a gummy crumb.
Cooking Tips and Variations
For the best results, always use high-quality bread flour; its higher protein content is essential for developing the strong gluten structure needed for a chewy crumb and good rise. Don’t rush the bulk fermentation or proofing stages; yeast works on its own schedule, and patience is key for flavor development and texture. When scoring, a quick, confident hand is more important than deep cuts; practice on a small piece of scrap dough if you’re nervous. To achieve that signature crispy crust, steam is vital during the initial baking. If you don’t have a dedicated steam oven, placing a pan of boiling water in the oven or misting the oven walls with a spray bottle is effective. For variations, you can experiment with adding a tablespoon of whole wheat flour for a nuttier flavor or incorporating herbs like dried rosemary or thyme into the dough during the mixing stage. If you prefer a slightly sour note, you can convert this to a sourdough baguette recipe by using an active sourdough starter instead of commercial yeast and adjusting the hydration accordingly, though this requires more advanced knowledge of sourdough baking. Remember that every oven is different, so keep an eye on your baguettes and adjust baking time as needed; they should be a deep golden brown for optimal flavor and crust.
Storage and Reheating
Homemade baguettes are best enjoyed on the day they are baked. The crust will be at its peak crispness and the interior perfectly tender. If you have leftovers, store them at room temperature in a paper bag for up to 1 day. Avoid plastic bags, as they will trap moisture and make the crust soft. For longer storage, you can freeze un-sliced baguettes. Wrap them tightly in plastic wrap, then in aluminum foil, and freeze for up to 1 month. To reheat, remove from the freezer, unwrap, and let thaw at room temperature for an hour (or bake from frozen for a quicker option). Place the baguette directly on the oven rack in a preheated 375°F (190°C) oven for 5-10 minutes, or until the crust is crisp again and the interior is warmed through. You can also lightly mist the baguette with water before reheating to help restore the crust.
Frequently Asked Questions
Why is my baguette crust not crispy?
A crispy crust relies heavily on steam in the oven during the initial baking phase. Ensure your oven is fully preheated, and you create enough steam (either with a pan of boiling water or by spraying the oven walls) immediately after placing the baguettes inside. Also, make sure to bake them long enough until they are a deep golden brown; under-baked baguettes will have a softer crust.
My baguettes are dense and don’t have large holes. What went wrong?
This can be due to several factors. It might be under-proofing (not letting the dough rise long enough), over-kneading (which can tighten the gluten too much), or not enough hydration in the dough. Ensure you’re using bread flour for good gluten development and allow ample time for both the bulk fermentation and the final proof, paying attention to the dough’s texture and feel rather than just strict timings.
Can I make this recipe without a stand mixer?
Absolutely! This recipe is designed to be made by hand. The initial mixing and stretch-and-folds during the first rise effectively develop the gluten without the need for a stand mixer. In fact, many artisan bread bakers prefer to work the dough by hand to better feel its development.