Follow Me On Social Media!
Secret Ingredient for the Crispiest Bacon

Introduction
Ah, bacon. Just the word conjures images of sizzling strips, smoky aromas, and the promise of a truly satisfying meal. It’s a breakfast staple, a sandwich enhancer, a salad topper, and let’s be honest, often a meal in itself. The universal love for bacon is undeniable, transcending cultures and cuisines. But while many adore bacon, achieving that elusive, perfect crispiness can feel like a culinary quest. Too often, we’re left with flabby, undercooked pieces, or worse, burnt, brittle shards that crumble to dust. The journey to perfectly cooked bacon, where each bite delivers a satisfying crunch without being overly greasy or undercooked, has plagued home cooks for generations.
Fear not, fellow bacon enthusiasts! Today, we’re unlocking the secret to consistently crispy, gloriously golden bacon every single time. Forget the guesswork, the uneven cooking, and the disappointing results. We’re about to reveal a simple, yet incredibly effective, secret ingredient that will revolutionize your bacon-making game. This isn’t just about crispiness; it’s about achieving an even cook, a beautiful caramelization, and a flavor profile that will have you wondering how you ever lived without it. Prepare to elevate your breakfast, brunch, and any other meal where bacon makes an appearance, because once you try this method, there’s no going back.
What you’re about to discover is a foolproof technique that guarantees perfection without requiring any fancy equipment or complex culinary skills. We’ll walk you through the “secret ingredient” itself, explain the science behind its magic, and provide a detailed, step-by-step recipe that even the most novice cook can master. Get ready to impress your family and friends, and most importantly, treat yourself to the best crispy bacon you’ve ever tasted. Your quest for perfect bacon ends here!
Nutritional Information
Per serving (approximate values for 3 slices of thick-cut bacon cooked with the secret ingredient):
- Calories: 180
- Protein: 12g
- Carbohydrates: 1g
- Fat: 14g
- Fiber: 0g
- Sodium: 480mg
Ingredients
- 1 pound thick-cut bacon (about 12-16 slices, depending on thickness)
- 1/4 cup cold water (this is our secret ingredient!)
- Freshly ground black pepper, to taste (optional)
Instructions
- Prepare Your Pan: Choose a large, heavy-bottomed skillet or a cast-iron pan. If you’re cooking a full pound of bacon, you might need to cook in two batches to avoid overcrowding. For oven baking, use a large rimmed baking sheet lined with parchment paper or foil for easier cleanup. If using foil, crimp the edges slightly to create a barrier and prevent grease from spilling.
- Arrange the Bacon: Lay the bacon strips in a single layer in your cold skillet or on your cold baking sheet. Ensure the strips are not overlapping, as this will prevent them from crisping evenly.
- Add the Secret Ingredient: Pour the 1/4 cup of cold water directly into the pan with the bacon. If using a baking sheet, you can drizzle it over the bacon strips, aiming for an even distribution. The water should just barely cover the bottom of the pan around the bacon.
- Begin Cooking (Stovetop Method): Place the skillet over medium-high heat. The water will come to a simmer and then begin to evaporate. This process slowly renders the fat from the bacon without burning the meat. Once the water has fully evaporated (this usually takes about 5-8 minutes), reduce the heat to medium-low.
- Begin Cooking (Oven Method): Place the baking sheet with the bacon and water into a cold oven. Set the oven temperature to 400°F (200°C). As the oven preheats, the water will slowly evaporate, and the bacon will begin to cook.
- Continue Cooking and Monitor: For both methods, continue cooking, flipping the bacon occasionally with tongs for stovetop, or once or twice for oven-baked, to ensure even browning. Keep a close eye on it, especially towards the end, as bacon can go from perfectly crispy to burnt very quickly. The cooking time will vary depending on the thickness of your bacon and your desired level of crispiness. This usually takes an additional 10-15 minutes on the stovetop after the water evaporates, or 15-25 minutes total in the oven.
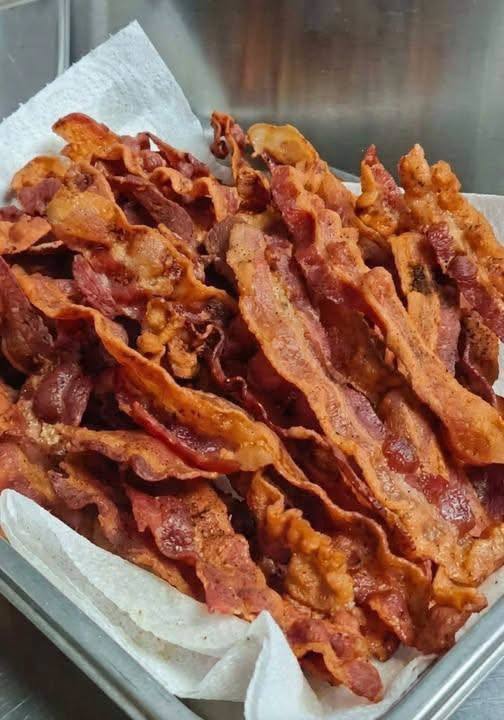
- Achieve Golden Perfection: Cook until the bacon reaches your desired level of crispiness and a beautiful golden-brown color. The edges should be slightly curled and brittle-looking. If you like a little black pepper, you can sprinkle it on during the last few minutes of cooking.
- Drain and Rest: Once cooked, immediately transfer the crispy bacon from the pan or baking sheet to a plate lined with several layers of paper towels. This allows any excess grease to drain off, which is crucial for maintaining crispiness. Let the bacon rest for a minute or two; it will continue to crisp up slightly as it cools.
- Serve and Enjoy: Serve your perfectly crispy bacon immediately as part of a hearty breakfast, crumbled over salads, tucked into sandwiches, or as a delectable snack.
Cooking Tips and Variations
The secret ingredient, cold water, works by slowly rendering the fat from the bacon before the meat itself starts to cook and crisp. As the water heats up and evaporates, it gently coaxes the fat out of the bacon, ensuring that the meat cooks evenly and becomes wonderfully crispy without drying out or burning. This slow rendering process is key to achieving that desirable texture and prevents the bacon from seizing up or becoming chewy. It also significantly reduces splattering, making for a cleaner cooking experience!
Pro Tips for Bacon Perfection:
- Choose Thick-Cut Bacon: While this method works for all types of bacon, thick-cut varieties yield a more substantial, satisfyingly crispy result. They also tend to render more evenly.
- Don’t Overcrowd the Pan: This is a golden rule for crispy bacon. Overlapping strips will steam rather than fry, leading to flabby results. Cook in batches if necessary.
- Start Cold: Always place your bacon in a cold pan or a cold oven. This allows the fat to render slowly and evenly as the temperature gradually rises, which is fundamental to crispiness.
- Manage Bacon Grease: Don’t discard that flavorful bacon fat! Carefully pour it into a heat-proof container (like a glass jar) through a fine-mesh sieve to remove any bits of bacon. Once cooled and solidified, it can be stored in the refrigerator for weeks and used to add incredible flavor to roasted vegetables, eggs, cornbread, or even gravies.
- Pat Dry Before Cooking (Optional but Recommended): For even crispier results, especially with very wet bacon, gently pat the raw bacon strips dry with paper towels before placing them in the pan. This removes excess surface moisture, allowing for quicker browning once the water has evaporated.
- Low and Slow (After Water Evaporation): Once the water has evaporated, resist the urge to crank up the heat. A moderate, consistent temperature will ensure the bacon cooks through and crisps without burning.
- Monitor Closely: Bacon can go from perfectly cooked to burnt in a matter of seconds. Stay near the stove or oven, especially during the last few minutes of cooking, and remove the bacon just before it reaches your ideal crispness, as it will continue to cook slightly from residual heat.
Variations to Experiment With:
- Sweet and Spicy Bacon: Before adding the water, sprinkle a light coating of brown sugar and a pinch of cayenne pepper over the bacon. The sugar will caramelize beautifully, creating a delightful candied effect, while the cayenne adds a gentle kick.
- Maple Glazed Bacon: During the last 5 minutes of cooking, brush the bacon with a thin layer of pure maple syrup. This creates a sweet, sticky glaze that pairs wonderfully with the salty bacon.
- Herb-Infused Bacon: Add a few sprigs of fresh rosemary or thyme to the pan along with the bacon and water. The herbs will infuse a subtle aromatic flavor into the bacon as it cooks. Remove the herbs before serving.
- Smoked Paprika Bacon: Sprinkle a small amount of smoked paprika over the bacon before cooking for a deeper, smoky flavor profile.
- Everything Bagel Bacon: For a savory twist, sprinkle your bacon with “everything bagel” seasoning during the last few minutes of cooking. The sesame seeds, poppy seeds, dried garlic, and onion will add a fantastic texture and flavor.
Storage and Reheating
Proper storage and reheating are key to enjoying your crispy bacon for more than just one meal.
Storage:
- Room Temperature: Cooked bacon should not be left at room temperature for more than two hours due to food safety concerns.
- Refrigeration: Once your crispy bacon has cooled completely, transfer it to an airtight container or a resealable plastic bag. Store it in the refrigerator for up to 4-5 days. Ensure it’s sealed well to prevent it from absorbing odors from other foods.
- Freezing: For longer storage, cooked bacon can be frozen. Arrange the cooled bacon strips in a single layer on a baking sheet and freeze until solid. Once frozen, transfer the strips to a freezer-safe bag or container, separating layers with parchment paper to prevent sticking. Frozen cooked bacon can last for up to 1-2 months.
Reheating:
The goal when reheating is to bring back that delightful crispiness without drying out the bacon or making it greasy.
- Oven Method (Recommended for Crispiness): This is the best method for restoring crispiness. Preheat your oven to 350°F (175°C). Spread the bacon in a single layer on a baking sheet. Heat for 5-10 minutes, or until warmed through and crisp. Keep a close eye on it to prevent burning.
- Air Fryer Method: If you have an air fryer, this is another excellent option for quick reheating and crisping. Place the bacon in a single layer in the air fryer basket. Cook at 350°F (175°C) for 3-5 minutes, flipping halfway through, until hot and crispy.
- Skillet Method: Place the bacon in a cold skillet over medium-low heat. Cook for a few minutes, flipping occasionally, until it’s warmed through and re-crisped. Be careful not to add any extra oil, as the bacon will release its own fat.
- Microwave Method (Use with Caution): While convenient, the microwave is generally not recommended for reheating crispy bacon as it tends to make it chewy and less crispy. If you must use it, heat in short 15-30 second bursts on a paper towel-lined plate until warm, but be aware that the texture may be compromised.
Frequently Asked Questions
Why does adding water make bacon crispy?
The magic of adding cold water lies in its ability to slowly render the fat from the bacon. As the water heats up and evaporates, it gently melts the fat, allowing it to cook out of the meat before the bacon itself gets too hot and starts to burn. This slow rendering process ensures that the bacon cooks evenly, resulting in beautifully crispy strips without being dried out or chewy. It’s a method that promotes thorough cooking and perfect texture.
Can I use this method for thin-cut bacon too?
Yes, absolutely! While thick-cut bacon often yields a more substantial and satisfyingly crispy result, this water method works wonderfully for thin-cut bacon as well. Just be aware that thin-cut bacon will cook much faster once the water has evaporated, so you’ll need to monitor it even more closely to prevent it from burning. The initial water evaporation time will be similar, but the subsequent crisping time will be significantly shorter.
What’s the best way to prevent bacon from splattering?
The water method itself is a fantastic way to significantly reduce splattering! By adding water to the pan, you’re essentially steaming the bacon first, which allows the fat to render slowly and gently. Once the water has evaporated, and the bacon begins to fry, there will be less fat to splatter aggressively. For oven baking, covering the baking sheet loosely with foil during the first part of cooking (after adding water) can further minimize splattering, though it might slightly increase cooking time. Using a splatter screen over your skillet during stovetop cooking is also an effective tool.
How do I know when the bacon is perfectly crispy?
Perfectly crispy bacon will be a deep golden-brown to reddish-brown color, with edges that are slightly curled and appear brittle. When you lift a piece with tongs, it should feel firm and rigid, not floppy. There will be visible signs of rendered fat, and the meat itself will have a satisfying, almost glass-like snap when broken. Remember that bacon continues to crisp slightly as it cools on paper towels, so it’s often best to remove it from the heat just a moment before it reaches your absolute ideal crispiness.