Follow Me On Social Media!
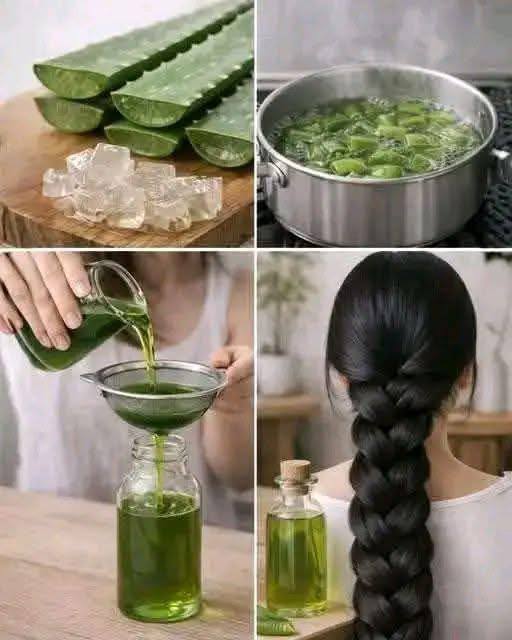
Aloe Vera Hair Oil

Introduction
While my usual beat involves tantalizing the taste buds, today we’re venturing into a different kind of nourishment – one for your hair! The concept of “Aloe Vera Hair Oil” might sound like a beauty product, and indeed it is, but as a culinary editor, I see a fascinating “recipe” unfolding before my eyes. This isn’t about eating, but about crafting a potent, natural elixir using techniques very similar to those we employ in the kitchen. We’ll be dissecting the process of transforming raw aloe vera into a beneficial hair treatment, much like preparing an herbal infusion or a medicinal syrup.
Aloe vera has long been revered for its incredible healing properties, both internally and externally. For hair, it’s a powerhouse of vitamins, minerals, enzymes, and amino acids that work synergistically to promote scalp health, strengthen strands, and impart a natural shine. The beauty of creating your own aloe vera hair oil lies in complete control over the ingredients, ensuring purity and freshness. You bypass harsh chemicals, artificial fragrances, and unnecessary additives often found in commercial products, opting instead for a truly natural and holistic approach to hair care.
This DIY project aims to create a deeply conditioning and restorative hair treatment. Regular use can help soothe an irritated scalp, reduce dandruff, minimize hair breakage, encourage healthy growth, and leave your hair feeling soft, strong, and lustrous. Think of this as a culinary adventure for your hair, where fresh, vibrant ingredients are carefully prepared to yield a truly nourishing result. Let’s dive into the “ingredients” and “techniques” required to whip up this amazing beauty concoction!
Nutritional Information
Per serving (approximate values):
- Calories: 0
- Protein: 0g
- Carbohydrates: 0g
- Fat: 0g
- Fiber: 0g
- Sodium: 0mg
Ingredients
- 2-3 large, fresh Aloe Vera leaves (mature, dark green leaves are best)
- 1 cup (240ml) Carrier Oil (e.g., cold-pressed Coconut Oil, Olive Oil, Almond Oil, or Jojoba Oil)
- 1/4 cup (60ml) Filtered Water (for initial boiling)
- Optional: 5-10 drops Essential Oil (e.g., Lavender, Rosemary, Peppermint – for fragrance and added benefits)
Instructions
- Prepare the Aloe Vera Leaves: Thoroughly wash the aloe vera leaves under cool running water to remove any dirt or debris. Pat them dry. Using a sharp knife, carefully trim off the spiky edges along both sides of each leaf.
- Extract the Aloin: Stand the trimmed leaves upright in a glass or jar for 10-15 minutes. This allows the yellow aloin (latex) to drain out. Aloin can be irritating to the skin, so this step is crucial. Discard the drained yellow liquid.
- Slice the Aloe: Lay the leaves flat and slice them into 1-inch (2.5 cm) thick pieces.
- Extract the Gel: Carefully scoop out the clear, translucent gel from the inside of each aloe vera piece using a spoon or a butter knife. Try to avoid scraping too much of the green rind, as it can contain irritants. You should have about 1 cup of fresh aloe vera gel.
- Blend the Gel: Place the extracted aloe vera gel into a blender. Add the 1/4 cup of filtered water. Blend on high until you achieve a smooth, lump-free liquid. This helps to break down the gel and makes it easier to infuse.
- Combine with Carrier Oil: In a clean, dry saucepan, pour the 1 cup of your chosen carrier oil. Add the blended aloe vera and water mixture to the saucepan.
- Slow Infusion (Double Boiler Method Recommended): Place the saucepan over a double boiler (a heat-safe bowl set over a pot of simmering water) to ensure gentle, even heating. If you don’t have a double boiler, you can heat it directly over very low heat on the stovetop, but be extremely careful not to burn the mixture.
- Simmer Gently: Heat the mixture on low heat, stirring occasionally, for 30-45 minutes. The goal is to slowly evaporate all the water content from the aloe vera, leaving behind the oil infused with the beneficial compounds. You will notice the mixture bubbling gently and the aloe vera solids starting to turn light brown and crispy. The water evaporation is complete when there are no more bubbles and the oil appears clear.
- Cool the Mixture: Once all the water has evaporated and the aloe vera solids are visibly separated and slightly browned, remove the saucepan from the heat. Let the oil cool completely to room temperature.
- Strain the Oil: Place a fine-mesh strainer or a cheesecloth-lined sieve over a clean, sterilized glass bottle or jar. Carefully pour the cooled aloe vera oil mixture through the strainer, ensuring all the solid aloe vera pieces are separated from the infused oil. You may need to gently press the solids to extract any remaining oil.
- Add Essential Oils (Optional): Once the oil is fully strained and in your storage bottle, you can add 5-10 drops of your preferred essential oil. Mix gently by swirling the bottle.
- Bottle and Store: Cap the bottle tightly. Your homemade Aloe Vera Hair Oil is now ready to use!
Cooking Tips and Variations
Choosing Your Carrier Oil: The choice of carrier oil significantly impacts the final product. Coconut oil is excellent for deep conditioning and shine, olive oil is rich in antioxidants and vitamins, almond oil is lightweight and promotes softness, and jojoba oil closely mimics natural scalp sebum, making it great for balancing oily scalps. Experiment to find what works best for your hair type.
Ensuring Purity and Freshness: Always use fresh, healthy aloe vera leaves. Avoid leaves that are yellowing, bruised, or have any signs of rot. The fresher the aloe, the more potent your oil will be. Similarly, opt for high-quality, cold-pressed carrier oils to maximize benefits.
The Importance of Draining Aloin: Do not skip the step of draining the yellow aloin from the aloe leaves. This substance can be a skin irritant and cause itching or discomfort on the scalp. Patience here ensures a safe and beneficial product.
Gentle Heat is Key: When infusing the aloe with the oil, using a double boiler or very low heat is critical. High heat can degrade the beneficial compounds in both the aloe vera and the carrier oil, reducing the efficacy of your hair oil. It also prevents the oil from burning.
Complete Water Evaporation: Ensure all the water from the aloe vera gel has completely evaporated during the simmering process. Any residual water can lead to bacterial growth and significantly shorten the shelf life of your oil. The oil should look clear, and the aloe solids should be visibly crispy and separate.
Adding Essential Oils: Always add essential oils after the infused oil has cooled down. Heat can diminish the therapeutic properties of essential oils. Choose essential oils based on your hair concerns: rosemary oil is known for stimulating hair growth, lavender oil for soothing the scalp, and tea tree oil for its anti-fungal properties (great for dandruff).
Variations for Enhanced Benefits: You can further enhance your hair oil by infusing other beneficial herbs. For instance, dried rosemary leaves, hibiscus petals, or fenugreek seeds can be added along with the aloe vera and carrier oil during the simmering process. Strain them out with the aloe solids. This creates a multi-beneficial herbal hair oil.
Testing for Sensitivity: Before applying the oil generously to your scalp, perform a patch test. Apply a small amount to a discreet area of your skin (like behind the ear) and wait 24 hours to check for any adverse reactions.
Storage and Reheating
Storage: Store your homemade Aloe Vera Hair Oil in a clean, airtight glass bottle or jar in a cool, dark place, away from direct sunlight and heat. A dark amber or cobalt blue bottle can help protect the oil from light degradation, preserving its potency for longer. Refrigeration is generally not necessary unless you live in a very hot and humid climate, but it can extend the shelf life slightly.
Shelf Life: Due to the natural ingredients and absence of chemical preservatives, homemade aloe vera hair oil typically has a shelf life of 3-6 months. Always check for any changes in smell, color, or consistency before use. If it develops a rancid smell or any signs of mold, discard it immediately. Making smaller batches ensures you always have a fresh product.
Reheating (for application): If your carrier oil (like coconut oil) solidifies in cooler temperatures, you can gently warm the bottle by placing it in a bowl of warm water for a few minutes until the oil liquefies. Avoid microwaving or heating the oil directly on the stove, as this can degrade its beneficial properties. Only warm the amount you intend to use for a single application.
Frequently Asked Questions
How often should I use this Aloe Vera Hair Oil?
For best results, you can use the aloe vera hair oil 1-2 times a week as a pre-shampoo treatment or an overnight mask. Apply it to your scalp and hair, massage gently, leave it on for at least 30 minutes (or overnight), and then wash it out with a mild shampoo. For very dry ends, a tiny amount can be used as a leave-in conditioner.
Can I use fresh aloe vera gel directly on my hair without infusing it in oil?
Yes, you can use fresh aloe vera gel directly on your hair and scalp. It’s an excellent conditioner and scalp soother. However, fresh gel has a much shorter shelf life (a few days in the refrigerator) and its consistency can be less manageable than an oil. Infusing it in oil allows for deeper penetration, longer shelf life, and combines the benefits of aloe with the conditioning properties of the carrier oil.
Why is it important to remove the aloin?
Aloin is a yellowish, bitter substance found just beneath the skin of the aloe vera leaf. While it has some medicinal properties, it can be a strong laxative when ingested and can cause skin irritation or allergic reactions in some individuals when applied topically. Draining it off ensures your hair oil is gentle and safe for scalp application.
What if my hair oil smells rancid before the 3-6 month mark?
If your hair oil develops a rancid smell, it means the oils have oxidized, or there might have been residual water that led to microbial growth. This often happens if the water wasn’t completely evaporated during the infusion process, or if the oil was exposed to too much heat, light, or air. Ensure thorough water evaporation, store in an airtight, dark container in a cool place, and consider adding a natural antioxidant like a few drops of Vitamin E oil (added after cooling) to help prolong shelf life.