Follow Me On Social Media!
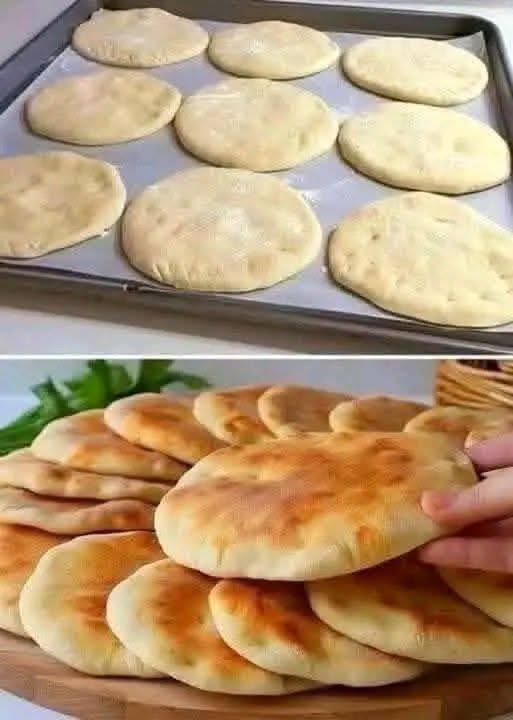
Soft Homemade Skillet Flatbread Pita Style

Introduction
Imagine the aroma of freshly baked bread wafting through your kitchen, the kind that makes your stomach rumble and your mouth water. Now, imagine achieving that same soft, chewy perfection without even turning on your oven. Welcome to the world of homemade skillet flatbread, pita-style! This recipe is a game-changer for anyone who loves warm, tender bread but doesn’t want the fuss of traditional baking. These flatbreads are incredibly versatile, forming the perfect base for countless meals, and their “pita-style” characteristic means they puff up beautifully, creating delightful pockets just waiting to be filled.
Forget dry, crumbly store-bought pitas that often lack flavor and texture. This recipe offers a superior homemade alternative that is not only fresher but also unbelievably easy to make with minimal ingredients and no special equipment beyond a good skillet. The magic lies in the simple combination of flour, yeast, water, and a hot pan, transforming humble ingredients into soft, pliable flatbreads with those coveted airy pockets. Whether you’re a seasoned baker or a complete novice, you’ll be amazed at how quickly and effortlessly you can create these delicious rounds, making them an instant staple in your culinary repertoire.
The beauty of this skillet flatbread lies in its simplicity and the incredible satisfaction it brings. Each flatbread cooks up in minutes, puffing like a dream right before your eyes, creating an almost magical cooking experience. They are perfect for scooping up creamy hummus, cradling juicy kebabs, or simply enjoying on their own with a drizzle of olive oil and a sprinkle of herbs. Get ready to elevate your meals and impress your family and friends with these wonderfully soft, chewy, and utterly irresistible homemade skillet flatbreads.
Nutritional Information
Per serving (approximate values, based on 8 servings per batch):
- Calories: 210
- Protein: 7g
- Carbohydrates: 39g
- Fat: 3g
- Fiber: 2g
- Sodium: 350mg
Ingredients
- 2 ½ cups (300g) all-purpose flour, plus more for dusting
- 1 teaspoon active dry yeast
- 1 teaspoon granulated sugar
- 1 teaspoon fine sea salt
- 1 cup (240ml) warm water (105-115°F / 40-46°C)
- 2 tablespoons olive oil, plus more for cooking
Instructions
- Activate the Yeast: In a large mixing bowl, combine the warm water and granulated sugar. Sprinkle the active dry yeast over the top. Stir gently and let it sit for 5-10 minutes, or until the mixture becomes foamy. This indicates that the yeast is active and ready to work. If it doesn’t foam, your yeast may be old, or the water wasn’t the right temperature; start again with fresh yeast.
- Mix the Dough: Add the all-purpose flour and fine sea salt to the yeast mixture in the bowl. Pour in the 2 tablespoons of olive oil. Using a wooden spoon or your hands, mix until a shaggy dough forms and all the flour is incorporated.
- Knead the Dough: Transfer the dough to a lightly floured surface. Knead for 7-10 minutes until the dough is smooth, elastic, and no longer sticky. If the dough is too sticky, add a very small amount of flour, a teaspoon at a time. If it’s too dry, add a tiny bit of water. The goal is a supple, resilient dough.
- First Rise: Lightly grease the mixing bowl with a little olive oil. Place the kneaded dough in the bowl, turning it once to coat. Cover the bowl with plastic wrap or a clean kitchen towel. Let the dough rise in a warm place for 1 to 1.5 hours, or until it has doubled in size. A warm oven (turned off, with just the pilot light on if you have one, or briefly warmed and then turned off) is a great spot.
- Divide and Shape: Once the dough has doubled, gently punch it down to release the air. Transfer the dough to a lightly floured surface. Divide the dough into 8 equal pieces. For best results, you can weigh them to ensure even sizes, around 60-65g each. Roll each piece into a smooth, tight ball.
- Resting Period: Arrange the dough balls on a lightly floured baking sheet or piece of parchment paper. Cover them loosely with a clean kitchen towel and let them rest for another 10-15 minutes. This resting period is crucial as it allows the gluten to relax, making the dough much easier to roll out without springing back.
- Roll Out Flatbreads: Lightly flour your work surface and a rolling pin. Take one dough ball and roll it out into a thin, round disc, approximately 6-7 inches (15-18 cm) in diameter and about ⅛ inch (3-4 mm) thick. Try to keep the thickness as even as possible for uniform puffing. Place the rolled-out flatbreads on a lightly floured surface or parchment paper as you finish them, keeping them covered with a towel while you roll the others to prevent drying.
- Preheat the Skillet: Heat a large non-stick or cast-iron skillet over medium-high heat. Allow the skillet to heat thoroughly for at least 3-5 minutes. You want it hot enough that a drop of water sizzles instantly. Do not add any oil to the pan at this stage unless you prefer a slightly crispier exterior.
- Cook the Flatbreads: Carefully place one rolled-out flatbread into the hot, dry skillet. Cook for 1-2 minutes, or until bubbles begin to form all over the surface and the underside has light golden-brown spots.
- Flip and Puff: Flip the flatbread over. Continue to cook for another 1-2 minutes. This is when the magic happens! The flatbread should puff up like a balloon, creating that characteristic “pita-style” pocket. If it doesn’t puff completely, don’t worry; it will still be delicious. Use a spatula or tongs to gently press down on any areas that aren’t puffing to encourage the steam to spread.
- Finish Cooking: Once the flatbread has puffed and both sides have developed beautiful golden-brown spots, remove it from the skillet.
- Keep Warm and Soft: Transfer the cooked flatbread to a plate and immediately cover it with a clean kitchen towel. This traps the steam, keeping the flatbread soft and pliable. Repeat the process with the remaining dough balls, adjusting the heat as needed to prevent burning. If the pan gets too hot, lower the heat slightly. You can add a tiny drizzle of olive oil to the pan between flatbreads if you like a richer flavor or crispier texture.
Cooking Tips and Variations
To achieve the perfect soft and chewy texture with beautiful pockets, the temperature of your water for activating the yeast is crucial. It should feel comfortably warm to the touch, like a baby’s bathwater, between 105-115°F (40-46°C). Water that’s too hot will kill the yeast, and water that’s too cold won’t activate it. If your kitchen is cold, warming your mixing bowl slightly before adding the ingredients can help the dough rise more efficiently. A warm spot near a sunny window or in an oven that’s been briefly warmed and then turned off are ideal environments for proofing. Don’t be afraid to get your hands in the dough during kneading; it’s the best way to feel its consistency and ensure it’s smooth and elastic. Proper kneading develops the gluten, which is essential for the flatbreads to puff up nicely and have that desirable chewy texture.
When rolling out the flatbreads, aim for an even thickness. If one side is thicker than the other, it might not puff uniformly. Use just enough flour on your surface to prevent sticking, but avoid over-flouring, as this can make the dough tough. The skillet heat is also key; medium-high is generally ideal. If the skillet isn’t hot enough, the flatbreads won’t puff, and they’ll become dry and hard. If it’s too hot, they’ll burn before cooking through. You might need to adjust the heat slightly as you cook each piece. Don’t overcrowd the pan; cook one or two at a time to ensure even heat distribution and proper puffing. Covering the cooked flatbreads with a towel immediately after they come off the skillet is vital; it traps steam and keeps them soft and pliable, preventing them from drying out.
This basic recipe is a fantastic canvas for various flavor additions. For a savory twist, try making Garlic Herb Flatbread. Simply add 1-2 cloves of minced garlic and 1-2 tablespoons of dried herbs like oregano, thyme, or rosemary (or a mix) to the flour mixture. You can also brush the cooked flatbreads with melted garlic butter for an extra burst of flavor. To make Whole Wheat Flatbread, substitute up to half of the all-purpose flour with whole wheat flour. Keep in mind that whole wheat flour absorbs more liquid, so you might need to add an extra tablespoon or two of water to achieve the right dough consistency. The whole wheat version will be denser but offers more fiber and a nuttier flavor. For a truly indulgent treat, try Cheese Stuffed Flatbread. After dividing the dough into balls, flatten each ball slightly, place a tablespoon or two of shredded cheese (mozzarella, feta, or a blend work well) in the center, and then carefully bring the edges of the dough together to seal the cheese inside. Roll it out gently into a disc, making sure not to tear the dough, and then cook as usual. The melted cheese inside is a delightful surprise!
Another delicious variation is to incorporate spices into the dough. For an Indian-inspired flavor, add a teaspoon of cumin powder or nigella seeds (kalonji) to the dry ingredients. For a Mediterranean touch, a pinch of za’atar can be kneaded into the dough. You can also experiment with different oils; swapping a portion of the olive oil for melted butter in the dough can add a rich, buttery flavor. For a touch of sweetness, a small amount of honey can replace the sugar, giving the flatbread a slightly different depth of flavor and helping with browning. Don’t be afraid to get creative and tailor these flatbreads to your taste preferences and the meal you’re serving them with.
Storage and Reheating
These homemade skillet flatbreads are best enjoyed fresh and warm, straight off the skillet. However, if you have leftovers, they store quite well and can be easily reheated. To store, allow the flatbreads to cool completely to room temperature. Stack them and place them in an airtight container or a large resealable plastic bag. They can be stored at room temperature for 2-3 days. For longer storage, they can be frozen. Wrap individual flatbreads tightly in plastic wrap, then place them in a freezer-safe bag or container. They will keep in the freezer for up to 2 months.
When you’re ready to enjoy your stored flatbreads, reheating them properly will bring back much of their original softness and chewiness. If reheating from room temperature, you have a few options. The quickest method is to gently warm them in a dry skillet over medium heat for 30 seconds to 1 minute per side, until heated through and slightly pliable. You can also briefly microwave them for 10-20 seconds, but be careful not to overcook, as this can make them tough. For a slightly crispier exterior, you can toast them lightly in a toaster oven or even a regular toaster on a low setting. If reheating from frozen, there’s no need to thaw them first. You can place the frozen flatbreads directly into a hot, dry skillet over medium heat, flipping occasionally, until they are soft and warmed through. Alternatively, you can pop them in a preheated oven at 350°F (175°C) for 5-7 minutes, or until soft. Covering them with foil in the oven can help retain moisture. Always cover reheated flatbreads with a clean towel for a minute or two after warming to allow them to soften further with residual steam.
Frequently Asked Questions
What if my flatbreads don’t puff up?
There are a few common reasons why flatbreads might not puff. The most frequent culprit is insufficient heat in the skillet; ensure your pan is very hot before adding the dough. Another reason could be that the dough wasn’t kneaded enough, preventing proper gluten development, or it didn’t rise adequately. Also, if the dough is rolled too thick or has holes, steam can escape, preventing the puff. Don’t worry if they don’t puff perfectly every time; they’ll still taste delicious!
Can I make the dough ahead of time?
Yes, absolutely! You can prepare the dough up to the end of the first rise (step 4). After it has doubled in size, gently punch it down, place it in an airtight container, and refrigerate it for up to 24 hours. When you’re ready to cook, remove the dough from the refrigerator and let it come to room temperature for about 30-60 minutes before proceeding with dividing, shaping, and cooking. This slow fermentation can even enhance the flavor.
Can I use whole wheat flour for this recipe?
Yes, you can substitute some of the all-purpose flour with whole wheat flour. For a lighter texture, start by replacing 1 cup of all-purpose flour with whole wheat flour. Whole wheat flour absorbs more liquid, so you might need to add an extra tablespoon or two of water to achieve the desired dough consistency. The resulting flatbreads will be denser and have a nuttier flavor, but still wonderfully soft.
What’s the best way to serve these flatbreads?
These skillet flatbreads are incredibly versatile! They are perfect for scooping up dips like hummus, baba ghanoush, or tzatziki. They make excellent wraps for gyros, falafel, chicken shawarma, or any sandwich filling. You can also use them as a side with stews, curries, or grilled meats. For breakfast, try them with scrambled eggs and cheese, or spread with jam. The possibilities are endless!